


· By FryAway
How to Clean Kitchen Grease for a Spotless Kitchen
Knowing how to clean kitchen grease isn't about scrubbing harder—it's about working smarter. The secret comes down to one simple idea: using the right method for the right kind of grease.
It's not about reaching for the harshest chemicals you can find. It’s about understanding whether you’re dealing with fresh splatters from tonight's dinner or that stubborn, sticky buildup that’s been there for weeks. Mastering this difference is the key to a truly spotless kitchen.
Your Guide to a Grease-Free Kitchen
Welcome! Think of this as your go-to playbook for winning the war against kitchen grease. That slick film on your cabinets, the stubborn residue on your stovetop, and that sticky patch on the floor—they all have the same origin, but each requires a different plan of attack.
Our goal here is to give you a clear path forward, showing you that a sparkling, non-sticky kitchen is completely within reach, no endless scrubbing required.
The real challenge with kitchen grease is how it changes over time. Fresh splatters from frying bacon are pretty easy to wipe away if you get to them quickly. But when left to sit, grease goes through a process called polymerization. It mixes with dust, heat, and air, transforming into a thick, tacky varnish that feels almost impossible to remove. This guide will walk you through the best strategies for both kinds, so you have the right tools and techniques for any greasy situation.
Fresh Splatters vs. Hardened Buildup
Before you grab a sponge, you need to know your enemy. Fresh grease is a simple fix. Old, hardened grease is a complex polymer that won't give up without a fight. Getting this distinction right from the start is crucial.
This decision tree visualizes the first question you should always ask before you start cleaning.
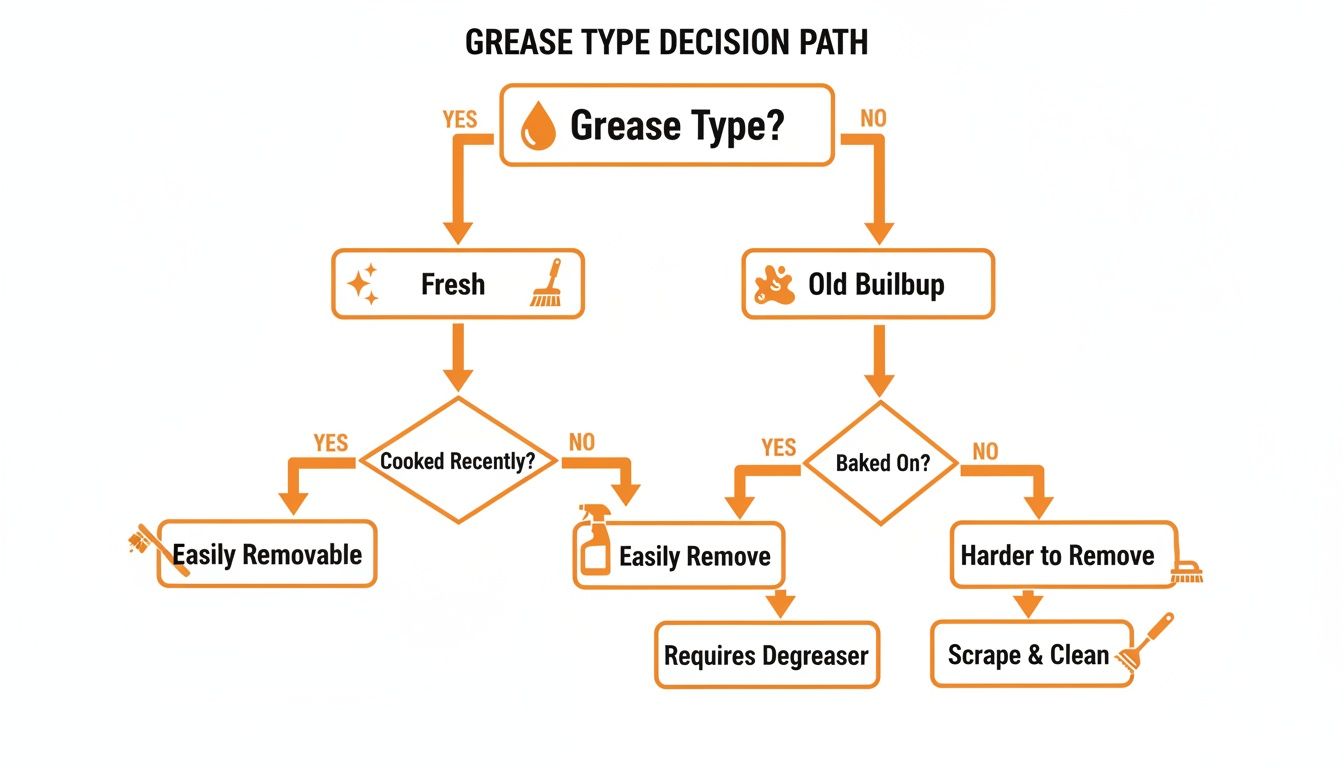
As you can see, simply identifying the grease as fresh or old sets your entire cleaning strategy. It's the difference between a quick wipe-down and a more involved deep clean, saving you a ton of wasted time and effort.
And it’s not just us obsessing over this. The demand for effective kitchen cleaning is a massive global trend. The worldwide market for kitchen grease cleaners was valued at around $3.2 billion and is projected to hit $4.5 billion by 2033. That surge shows a huge investment in keeping kitchens clean, with North America holding about 37% of the market share. You can discover more insights about the kitchen degreaser market growth and see how consumer demand is driving innovation.
For a quick reference, here's a simple table to help you choose the right solution on the fly.
Quick Guide to Grease Cleaning Solutions
| Surface Type | Best DIY Solution | Recommended Commercial Cleaner | Frequency |
|---|---|---|---|
| Stovetop | Baking soda paste and vinegar | A heavy-duty degreaser spray | Daily wipe-down, weekly deep clean |
| Range Hood & Filter | Boiling water with baking soda & dish soap | A specialized stainless steel degreaser | Monthly |
| Cabinets (Wood) | Warm water with a few drops of dish soap | A gentle, wood-safe degreaser | As needed, or monthly |
| Backsplash (Tile) | White vinegar and water solution (1:1) | A multi-surface kitchen cleaner | Weekly |
| Pans & Cookware | Soapy water for fresh grease; boiling water & baking soda for burnt-on | A powerful degreasing dish soap | After each use |
This table is a great starting point, but always remember to spot-test a new cleaning solution in an inconspicuous area first!
The Importance of Proper Disposal
Before grease even becomes a cleaning problem on your surfaces, it starts as used cooking oil in your pan. What you do with that oil is a critical, and often overlooked, part of grease management.
CRITICAL TIP: Never, ever pour used cooking oil down the drain. It’s a guaranteed recipe for disaster, leading to stubborn clogs, expensive plumbing bills, and major headaches.
A much better approach is to solidify the oil so you can just toss it in the trash. We always recommend FryAway, a plant-based powder that makes the whole process incredibly simple.
Just follow these three easy steps:
- Sprinkle and Stir: While the oil is still hot, sprinkle in the FryAway powder and give it a good stir until it completely dissolves.
- Cool Down: Let the oil cool down completely. As it cools, FryAway works its magic, turning the liquid oil into a solid, organic block.
- Toss into household trash: Once it’s solid, you can easily scoop the hardened oil out and toss it right into your household trash bin.
Making this a regular habit, especially after cooking up favorites like Crispy Buttermilk Fried Chicken or Homemade French Fries, stops greasy messes before they even start. It protects your pipes, keeps your kitchen cleaner, and makes enjoying fried foods totally hassle-free.
How to Clean Greasy Stovetops and Range Hoods
Your stovetop and range hood are ground zero for grease. Every time you sear a steak or fry some bacon, tiny oil droplets go airborne and eventually settle on these surfaces, creating that familiar sticky, grimy film. Getting rid of this buildup isn't just about making your kitchen look good—it's a critical part of keeping it clean and safe.
The trick is knowing how to approach each surface. You wouldn't use the same method on a sleek glass cooktop as you would on rugged cast-iron grates, and using the wrong technique can lead to scratches, discoloration, or even permanent damage.
Conquering Different Stovetop Surfaces
Every type of stovetop comes with its own cleaning playbook. But before you even start, make sure the appliance is completely cool. For electric models, go ahead and unplug it. This is a non-negotiable safety step.
Here’s the breakdown for the most common types:
-
Glass or Ceramic Cooktops: These smooth tops look fantastic but they show every single streak and are surprisingly easy to scratch. For a gentle but effective clean, mix up a paste with baking soda and a few drops of water. Spread it over the greasy spots and let it work its magic for about 15 minutes. Then, give it a light spray with white vinegar. The fizzing reaction is what helps lift all that grime off the surface. Wipe it all away with a soft microfiber cloth.
-
Electric Coil Stovetops: First things first, remove the coils—they should pull straight out. The drip pans underneath are usually the real mess. Let them soak in hot, soapy water to loosen everything up. If you're dealing with stubborn, baked-on gunk, a commercial degreaser or another good soak in a baking soda solution will do the trick. A quick wipe of the stovetop surface with a soapy sponge, a rinse, and a thorough dry is all it takes before you pop the coils back in.
-
Gas Stovetops: The grates are almost always the biggest headache here. If you have cast iron or enamel grates, fill your sink with hot water and a powerful degreasing dish soap and let them soak for 20-30 minutes. After they've had a good soak, give them a scrub with a non-abrasive brush, rinse well, and dry them completely. This last step is crucial for preventing rust.
A clean stovetop is a safer stovetop. Beyond just cleaning up grease, preventing it from becoming a fire hazard is a huge part of kitchen safety. To really level up your kitchen safety game, you might want to check out our guide on how to prevent grease fires.
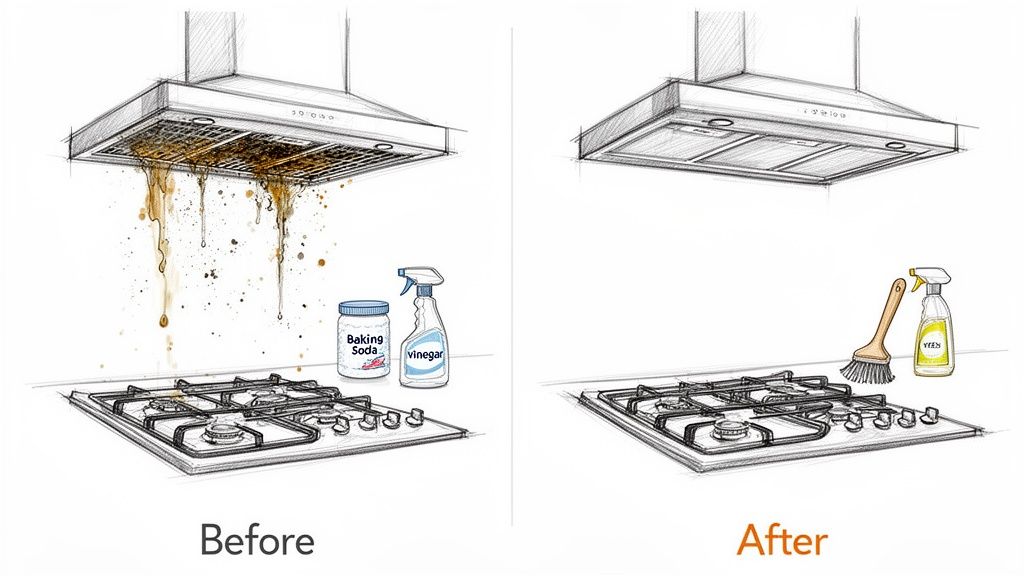
Cleaning Your Range Hood and Filters
Think of your range hood as the first line of defense against airborne grease, which means its filter takes a serious beating. Once that filter gets clogged, it can't do its job, and you'll start finding grease on your cabinets, walls, and everywhere else. Making a habit of cleaning it monthly will save you a lot of work down the road.
For the hood's exterior, a simple wipe-down with a microfiber cloth and warm, soapy water is usually enough for weekly maintenance. If you’ve got some stickier buildup, a 1:1 solution of vinegar and water will cut right through it without harming stainless steel or painted finishes.
But the real transformation happens when you clean the metal mesh filters.
- Remove and Soak: Start by carefully taking the metal filters out of the hood. Fill your sink or a large pot with boiling water. Slowly—and carefully—add about half a cup of baking soda and a generous squirt of degreasing dish soap.
- Submerge and Wait: Gently place the greasy filters into the hot water mixture. Let them soak for at least 15-20 minutes. You’ll quickly see the water turn murky as the grease literally dissolves away.
- Scrub and Rinse: After the soak, grab a non-abrasive brush and scrub away any leftover residue. Give the filters a thorough rinse with hot water, then let them air dry completely before putting them back. Making sure they're totally dry prevents any moisture-related issues.
Tackling Grease on Cabinets, Walls, and Backsplashes
The war on grease doesn't just end at the stovetop. Tiny, airborne grease particles from your favorite fried dishes love to travel, eventually settling on your cabinets, walls, and backsplash. Before you know it, you've got a sticky, dust-grabbing film that makes the whole kitchen feel grimy.
Cleaning these vertical surfaces is a bit of a balancing act. You need something tough enough to cut through the gunk but gentle enough to protect your paint, wood finish, or grout. The trick is to match your cleaning method to the material you're working with.
How to Safely Clean Wooden Cabinets
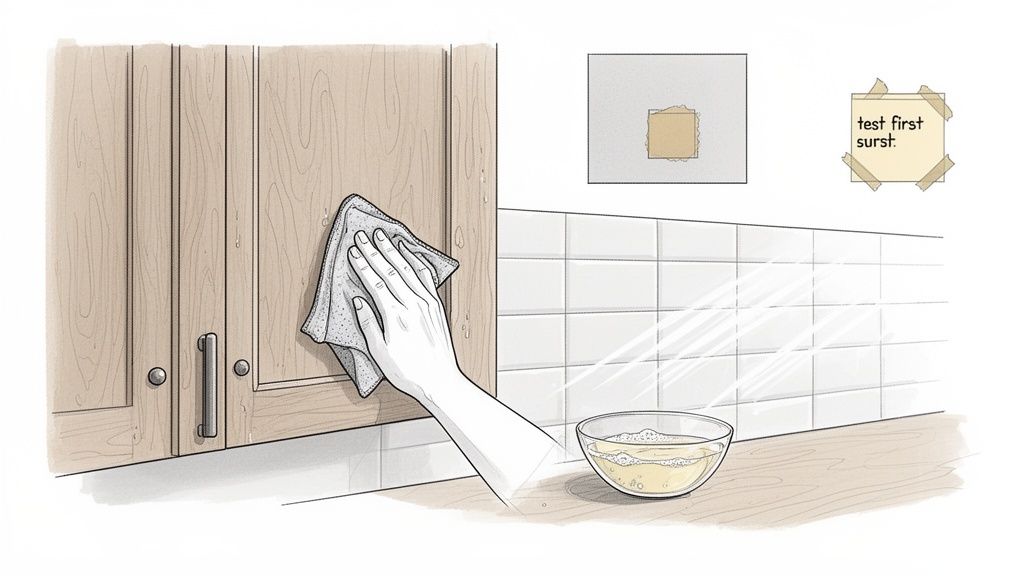
Wood cabinets are especially vulnerable to grease buildup. Using a harsh chemical cleaner can strip the finish right off, leaving you with permanent discoloration. That’s why you should always start with the mildest solution first.
For most routine cleanups, a simple mix of warm water and a few drops of a good degreasing dish soap does the job perfectly. Just dip a microfiber cloth in the sudsy water, wring it out so it’s barely damp, and wipe down the cabinets, always moving with the wood grain. Follow that up with a second cloth dampened with plain water to rinse, and then dry everything completely with a clean, dry cloth.
Pro Tip: Got some older, really stubborn grease on your wood cabinets? Mix up a paste with equal parts baking soda and water. Gently rub it onto the sticky spots with your fingers or a soft cloth, let it sit for a few minutes, then wipe it away with a damp cloth. Always, always test this on a hidden spot first to be safe.
Learning the best way to clean wood kitchen cabinets is the key to keeping them looking great for years to come.
Cleaning Up Your Walls and Backsplash
The right cleaning method for your walls and backsplash is all about the material. What works on durable ceramic tile could be a total disaster on a wall with flat paint.
-
Painted Walls: If your walls have a semi-gloss or glossy finish, a 50/50 mix of white vinegar and warm water in a spray bottle is a fantastic degreaser. Lightly mist the greasy spots, let it sit for a minute to work its magic, and then wipe clean with a soft cloth. Be extra careful with matte or flat paint—scrubbing can ruin the finish. Stick to a very mild soap and water solution and gently dab instead.
-
Tile Backsplashes: Ceramic and porcelain tiles can handle a bit more elbow grease. Your vinegar and water spray will work great here. For that gross, greasy buildup in the grout lines, an old toothbrush dipped in a baking soda paste will scrub it clean without scratching the tile.
-
Stainless Steel Backsplashes: With stainless steel, the main goal is avoiding streaks. You can use a dedicated stainless steel cleaner or the same vinegar solution, but the trick is to always wipe in the direction of the grain. Once it's clean, you can buff it with a tiny bit of mineral or olive oil on a clean cloth to restore that shine and help repel future splatters.
Proper Oil Disposal: Your First Line of Defense
Of course, the easiest way to deal with grease is to stop it from building up in the first place. That starts with how you handle used cooking oil after frying up tempura shrimp or a batch of onion rings. Instead of letting old oil sit around or pouring it down the drain (a huge no-no!), you need a clean and simple disposal plan.
This is where we always recommend FryAway. It's a plant-based powder that turns liquid cooking oil into a solid, making cleanup a breeze. The process couldn't be simpler:
- Sprinkle and Stir: While the oil is still hot, sprinkle in the FryAway powder and give it a good stir until it completely dissolves.
- Cool Down: Now, just let the pan cool down. As it does, the oil will harden into a solid chunk.
- Toss into household trash: Once it's solid, you can easily scoop it out and toss it right into your regular trash bin.
By using FryAway, you're tackling the main source of kitchen grease right at the stove. This dramatically cuts down on the amount of oil that can splatter and settle on your cabinets and walls later.
How to Tackle Greasy Pots, Pans, and Kitchen Floors
The daily grind of cooking always leaves its mark, especially on two key areas: the pots and pans you cook with and the floors you walk on. A greasy pan is a real pain to clean, and a slick, grimy floor isn't just an eyesore—it's a legitimate safety hazard.
Knowing how to cut through that stubborn kitchen grease requires the right techniques, ones that protect your favorite cookware while making sure your floors are truly clean and slip-free.
It's a universal problem, and the market for cleaning solutions reflects that. The kitchen grease cleaner market in Asia-Pacific alone is booming, with a projected growth rate of 8.5%. What's currently a $768 million industry is expected to hit $1.08 billion by 2033, all thanks to rising incomes and a bustling food service industry. It's clear people everywhere are looking for better ways to keep their kitchens clean.
Preserving Your Cookware While Removing Grease
Not all cookware is created equal, and using the wrong cleaning method can strip a non-stick coating or ruin the beautiful seasoning on a cast iron skillet. You need to tailor your approach.
- Stainless Steel: For most jobs, hot, soapy water does the trick. But for those stubborn, burnt-on messes? Fill the pan with an inch of water, toss in a tablespoon of baking soda, and bring it to a simmer for a few minutes. Once it cools, the grease should lift right off.
- Non-Stick Pans: Gentle is the name of the game here. Stay away from abrasive sponges or harsh chemicals that will scratch that delicate surface. A soft sponge and a good degreasing dish soap are all you need. If something is really baked on, just let it soak in warm, soapy water for an hour before washing.
- Cast Iron: The golden rule: never use soap on a well-seasoned cast iron pan. It will strip away that non-stick surface you've worked so hard to build. Instead, scrub the warm pan with coarse salt and a little bit of oil on a paper towel. For really stuck-on food, boil some water in the pan to loosen everything up before you scrub.
Getting Greasy Kitchen Floors Clean and Safe
Kitchen floors take a beating from spills and splatters, quickly developing a greasy film that grabs dirt and becomes dangerously slippery. The key isn't just mopping—it's using a solution that actually cuts through the oil.
A gallon of hot water mixed with about a quarter-cup of a powerful degreasing dish soap is a simple and surprisingly effective fix. If you have tile or vinyl floors, adding a cup of white vinegar to the mix will give you some extra cleaning muscle.
Key Takeaway: The most important step for a non-slippery floor is the final rinse. After you've mopped with your cleaning solution, go over the entire floor again with a mop dipped in plain, clean hot water. This removes any leftover soapy residue, so your floor is just clean, not slick.
Of course, the best way to deal with a greasy floor is to prevent the big messes in the first place. Knowing how to clean up oil spills in the kitchen the moment they happen can save you a lot of trouble later.
The Smartest Way to Handle Leftover Cooking Oil
Before grease has a chance to bake onto your pans or splatter on the floor, it starts as used cooking oil. How you get rid of that oil is the first and most important step in managing grease. Pouring it down the drain is a definite no-go—it solidifies in pipes and creates massive, expensive clogs.
This is where FryAway comes in. It's our go-to for a mess-free, eco-friendly way to handle used oil. This plant-based powder makes oil disposal incredibly simple after you've cooked up something delicious like homemade onion rings or crispy fish tacos.
It’s just three easy steps:
- Sprinkle and Stir: While the oil is still hot in the pan, just sprinkle in the FryAway powder. Give it a gentle stir until it’s completely dissolved.
- Cool Down: Now, just let the pan cool down completely. As it does, FryAway magically transforms the liquid oil into a solid, waxy block.
- Toss into household trash: Once it's solid, you can easily scoop the hardened oil right out of the pan and toss it into your regular household garbage. It’s clean, easy, and keeps your plumbing safe.
Smart and Safe Cooking Oil Disposal with FryAway
Much of the battle against kitchen grease is won or lost before it even has a chance to splatter onto your backsplash. If you want a cleaner kitchen, the real starting point is figuring out what to do with all that used cooking oil.
For years, the go-to methods have been messy, inconvenient, and often disastrous for your home’s plumbing. Many of us have been guilty of pouring hot oil down the drain, hoping a rush of hot water will just wash it away. That's a temporary fix, at best. As the fats, oils, and grease (we call them FOGs) travel down your pipes, they cool, solidify, and bind with other gunk to create stubborn, expensive blockages.
The other common trick is storing used oil in old coffee cans or glass jars, but that just creates clutter and a potential spill that’s waiting to happen.
A Cleaner Way to Dispose of Cooking Oil
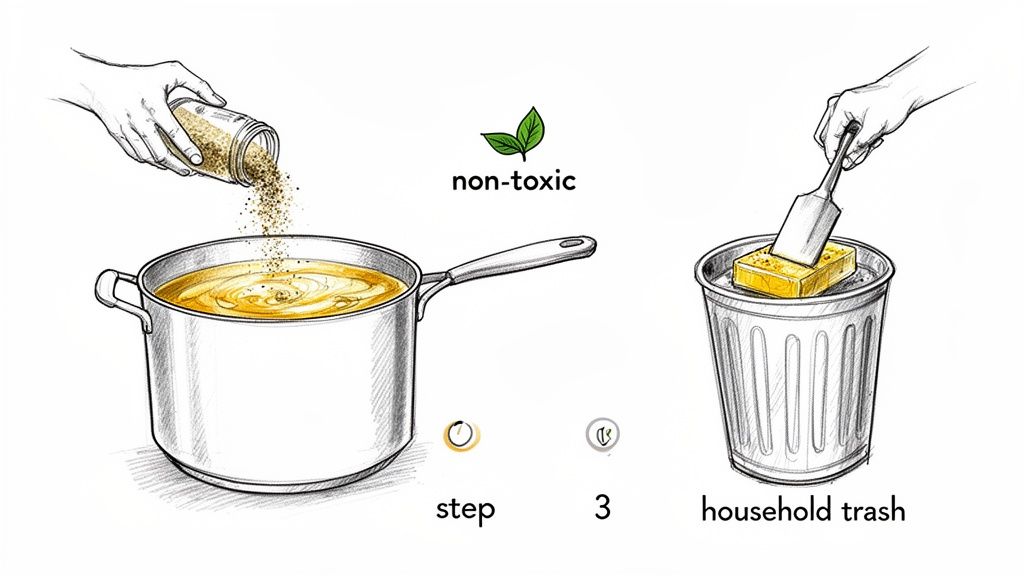
There’s a much better method that completely eliminates the mess while protecting your pipes. We always recommend FryAway, a non-toxic, 100% plant-based powder that makes oil disposal incredibly simple and safe. It’s a total game-changer, turning that messy liquid oil into solid organic waste you can toss right into your household trash.
Using it couldn't be easier and it fits right into your post-cooking cleanup routine.
- Sprinkle and Stir: While your used cooking oil is still hot, just sprinkle the FryAway powder into the pan. Give it a quick stir to make sure the powder fully dissolves.
- Cool Down: Now, just leave the pan to cool down completely. As the temperature drops, FryAway works its magic, transforming the liquid oil into a solid, waxy block.
- Toss into household trash: Once the oil has fully solidified, you can easily scoop the hardened puck right out of your pan and throw it directly into your regular trash bin.
This simple process tackles the biggest source of kitchen grease right at the stove, preventing clogs before they start and making your entire kitchen cleanup feel so much easier.
Enjoy Fried Foods Without the Mess
When you know you have a clean and easy disposal plan, cooking your favorite fried foods becomes that much more enjoyable. You can finally focus on getting that perfect crispy texture without dreading the greasy aftermath.
Here are a couple of classic fried recipes that are a perfect match for the FryAway cleanup method:
- Crispy Buttermilk Fried Chicken: This timeless recipe needs a good amount of oil to get that signature golden-brown, crunchy crust. After you’ve fried your chicken to perfection, the leftover oil in your skillet or deep fryer can be handled in seconds. Just sprinkle, stir, cool, and toss.
- Homemade French Fries: The secret to truly great fries is often a double-fry method, which means you’ll definitely have hot oil left over. Instead of worrying about what to do with it, you can solidify the oil right in the pot, making the post-meal cleanup fast and simple.
Using a smart disposal method like FryAway is the first step in a responsible kitchen routine. For a deeper dive into the best practices, you can learn more about how to dispose of cooking oil safely and protect your home's plumbing.
Beyond just oil disposal, safely cleaning kitchen grease often involves chemical products. Understanding how to assess chemical risks is crucial for maintaining a truly safe kitchen. This knowledge ensures that both your cooking and cleaning practices contribute to a healthier home environment. By managing FOGs from start to finish, you create a system that is not only cleaner but also safer for everyone.
Proactive Tips for a Permanently Clean Kitchen
Ever feel like you're in a constant battle with grease? The real secret to winning isn't marathon scrubbing sessions; it's stopping the grease from building up in the first place. Shifting your mindset from reactive cleaning to proactive maintenance is the game-changer for a kitchen that stays clean.
It’s all about building small, consistent habits that prevent stubborn, polymerized grease from ever taking hold. A few simple actions, done regularly, make a world of difference and give you more time to actually enjoy your kitchen.
Simple Habits for a Cleaner Kitchen
Weaving a few quick tasks into your routine is the easiest way to keep grease under control without even thinking about it.
- Daily Wipe-Down: After you finish cooking, give your stovetop a quick once-over with a soapy cloth. This literally takes less than 60 seconds and nixes fresh splatters before they turn into cement.
- Use Splatter Guards: Frying up something delicious? A simple mesh splatter guard over your pan is your best friend. It dramatically cuts down on the oil that ends up on your backsplash and counters.
- Monthly Filter Check: Your range hood filter is the unsung hero of your kitchen. Give it a clean once a month to make sure it’s trapping airborne grease effectively.
But the ultimate proactive step? It’s managing used cooking oil right at the source. Instead of letting a greasy pan sit for hours or dumping oil down the drain (a huge no-no), solidifying it right after cooking is the smartest move for a clean, hassle-free kitchen.
Smart Disposal with FryAway
A huge part of any grease prevention plan is figuring out what to do with all that used cooking oil. When you've just made a batch of crispy onion rings or beer-battered fish, you're left with a pan full of oil that needs to go somewhere.
For this, we always recommend FryAway. It's a plant-based powder that turns messy oil disposal into a clean, simple, three-step routine. No more greasy jars under the sink or clogged pipes.
Here’s how easy it is:
- Sprinkle and Stir: Just add the powder to your hot cooking oil and give it a quick stir until it all dissolves.
- Cool Down: Let the pan sit and cool completely. You'll see the oil transform into a solid, organic block.
- Toss into household trash: Scoop the hardened oil right out of the pan and toss it into your regular trash can.
Adopting this single habit is the final piece of the puzzle. It turns what used to be a messy chore into a clean, simple action. A truly clean kitchen isn't about endless work—it's about having the right habits in your back pocket.
Got Grease Questions? We've Got Answers
Even the most seasoned home cooks run into tricky grease situations. Let's tackle some of the most common questions that pop up when you're fighting the good fight against kitchen grime.
What’s the Fastest Way to Cut Through Thick, Stubborn Grease?
When you're dealing with that thick, sticky, almost-plastic-like grease on things you can soak (think range hood filters or forgotten baking sheets), heat is your secret weapon. A good long soak in boiling water with a heavy-duty degreasing dish soap will do wonders to break it down.
For surfaces you can't dunk, like the inside of your oven, a simple paste made from baking soda and water is surprisingly effective. Just slather it on, give it about 20 minutes to work its magic, and then scrub it away with a non-abrasive sponge.
Can I Really Use Vinegar on Everything?
Vinegar is a fantastic natural degreaser, but it's not a one-size-fits-all solution. It’s perfect for non-porous surfaces like your glass cooktop, stainless steel appliances, and most ceramic backsplashes.
However, you have to be careful. Vinegar's acidity can permanently damage natural stone like granite and marble, etching the surface and leaving it looking dull. On wood cabinets, it’s a gamble—always use a very diluted solution and test it on a hidden spot first to make sure it doesn't strip the finish.
How Do I Stop Grease from Building Up on My Cabinets in the First Place?
Honestly, prevention is so much easier than a deep clean. The single best habit you can form is to wipe down your cabinets once a week. Use a soft cloth with a bit of warm water and a drop of dish soap. This quick wipe-down removes airborne grease before it has a chance to harden into that stubborn, yellowish film.
Another game-changer? Always, always use your range hood fan when you cook. It's designed to suck up grease and steam right at the source, keeping it from settling all over your kitchen.
My Two Cents: A few minutes of consistent, light cleaning each week will save you hours of heavy-duty scrubbing down the road. It’s the little habits that keep a kitchen looking its best.
Is It Ever Okay to Pour Cooking Oil Down the Drain?
Let me be crystal clear: Never, ever pour cooking oil down the drain. It doesn't matter if you follow it with boiling water or soap. Once that oil travels down your pipes, it cools, solidifies, and mixes with other gunk to create massive blockages called "fatbergs." These clogs are a nightmare for your plumbing and the city's sewer system.
The safest, cleanest, and most eco-friendly way to handle used oil is to solidify it before you toss it. This is where a product like FryAway becomes an absolute kitchen essential, especially if you love making things like crispy chicken wings or homemade donuts. The process couldn't be simpler:
- Sprinkle and Stir: While the oil is still hot, sprinkle in the FryAway powder and give it a quick stir until it completely dissolves.
- Cool Down: Let the oil cool down completely. As it cools, FryAway works its magic, turning the liquid into a solid, organic block.
- Toss into household trash: Once it's completely solid, you can just scoop it out and toss it right into your household trash. No mess, no spills, no clogged pipes.
With these pointers and the right tools, keeping your kitchen grease-free is totally manageable. To make your oil disposal completely mess-free and eco-friendly, check out how FryAway can simplify your cleanup routine. You can learn more at https://fryaway.co.