


· By FryAway
How to Make Fried Donuts From Scratch an Easy Guide
Making fried donuts from scratch really just boils down to a few key stages: getting the dough right, letting it proof properly, frying it to golden perfection, and finishing it off with a delicious glaze or topping.
Whether you're craving a light, airy yeast-raised donut or a dense, satisfying cake donut, I promise you—mastering the process is way easier than you think.
Your Guide to Irresistible Homemade Fried Donuts
Ever bitten into a warm, fresh donut and wondered if you could possibly recreate that magic at home? The answer is a resounding yes. This guide is here to pull back the curtain and show you just how achievable it is, putting you in complete control of every delicious detail.
We’ll walk through the two main paths to donut nirvana: the classic, fluffy yeast-raised donut and its quicker cousin, the tender cake donut. You'll get the full scoop on the essential tools and ingredients you'll need, from picking the right flour to choosing the best oil for that perfect, non-greasy finish.
Yeast Donuts vs Cake Donuts
So, where should you start your donut-making adventure? It usually comes down to what you're in the mood for and how much time you've got on your hands.
Deciding where to start? This quick comparison breaks down the key differences between the two classic donut types to help you choose your first batch.
| Characteristic | Yeast-Raised Donuts | Cake Donuts |
|---|---|---|
| Texture | Light, airy, slightly chewy, and pillowy. | Denser, moist, and tender with a fine crumb. |
| Flavor | Complex, slightly tangy flavor from fermentation. | Sweeter, more straightforward flavor, like a muffin. |
| Leavening | Active dry yeast or instant yeast. | Baking powder and/or baking soda. |
| Time | Longer process (1-3 hours) due to rising time. | Much quicker (under 30 minutes), no proofing needed. |
| Effort | More hands-on with kneading and two proofs. | Simple "mix and fry" process. |
At the end of the day, there's no wrong choice. Yeast donuts are a labor of love that pay off with an incredible texture, while cake donuts deliver that sweet, fried goodness in a fraction of the time.
The biggest difference is time and texture. Yeast donuts demand a little patience for their unbelievably fluffy reward, while cake donuts offer near-instant gratification with a rich, tender crumb.
Tackling the Cleanup
Let's be honest, the one part of frying everyone dreads is the cleanup. So many people shy away from frying at home simply because they don't know what to do with all that leftover cooking oil. Pouring it down the drain is a huge no-no (hello, major plumbing bills!), and stashing greasy jars under the sink is just messy.
Fortunately, there’s a surprisingly simple fix for this. We're big fans of FryAway, a plant-based powder that turns oil disposal into a completely mess-free task.
After you're done frying up a batch of perfect donuts, the process couldn't be easier:
- Sprinkle and Stir: While your cooking oil is still hot, just stir the FryAway powder right into the pan.
- Cool Down: Now, just walk away and let the oil cool down completely. As it does, the FryAway works its magic, turning that liquid oil into a solid, organic puck.
- Toss into household trash: Once it's solidified, you can easily scoop the hardened oil out and toss it straight into your regular trash bin.
This simple trick completely removes the biggest headache of deep-frying. Now you can focus on the fun part—enjoying amazing homemade fried donuts whenever the craving strikes.
Essential Tools and Ingredients for Donut Making
Great donuts don't just happen; they start with the right setup. Before you even think about mixing dough, getting your tools and ingredients in order will make the whole process feel less like a chore and more like the fun it's supposed to be. Think of it as your kitchen pre-flight check.
You don't need a full-blown professional bakery, but a few key items are non-negotiable if you want that perfect, golden-brown finish. The right gear ensures your donuts cook evenly and, most importantly, keeps you safe when you're working with hot oil.
Your Donut Making Toolkit
The single most important tool for frying is a pot that holds and distributes heat like a champ. This is what stands between you and sad, burnt-on-the-outside-raw-on-the-inside donuts.
- A Heavy-Bottomed Pot: A Dutch oven or a sturdy stockpot is perfect. Its thick base is your best friend for maintaining a stable oil temperature, which is the real secret to a donut that isn't greasy.
- Deep-Fry Thermometer: Guessing the oil temperature is a recipe for disaster. A clip-on deep-fry or candy thermometer takes all the guesswork out of it, helping you keep the oil in that critical 350°F to 375°F sweet spot.
- Slotted Spoon or Spider Strainer: You’ll need a safe way to gently lower your donuts into the hot oil and fish them out when they’re golden. A metal spider strainer is fantastic for this.
- Donut Cutter or Biscuit Cutters: For those classic, uniform rings, a dedicated donut cutter is a great little gadget. If you don't have one, no sweat—two round biscuit cutters (one large, one small) work just as well.
- Wire Cooling Rack: Don't let your beautiful donuts get soggy! Placing them on a wire rack lets air circulate all around, keeping them crisp as they cool.
If you’re making yeast donuts, a stand mixer with a dough hook will save you a ton of time and arm muscle. But honestly, kneading by hand on a floured countertop works just as well and can be pretty therapeutic.
Choosing the Right Ingredients
The quality of your ingredients has a direct line to the final texture and flavor of your donuts. Little details here make a huge difference in the end result.
For yeast-raised donuts, bread flour is your best bet. It has a higher protein content that builds a strong gluten network, giving you that light, airy, and slightly chewy texture everyone loves. All-purpose flour will get the job done, but bread flour is what will give you true bakery-style results.
When it comes to cake donuts, the magic is all in the leavening. These fried recipes use baking powder or baking soda to create a tender, cakey crumb. The trick is to mix the batter just until it comes together. Overmixing develops too much gluten and will make your donuts tough.
Selecting the Best Cooking Oil
The cooking oil you fry in is just as important as the flour in your dough. You need an oil with a neutral flavor and a high smoke point—that's the temperature where it starts to break down and smoke. Frying past an oil’s smoke point will make your donuts taste burnt and bitter.
A few excellent, reliable choices include:
- Canola Oil
- Vegetable Oil
- Peanut Oil
- Shortening
These can all handle the high heat required for frying without adding any weird flavors to your donuts. Choosing the right cooking medium is absolutely key to getting that perfect fry every single time. For a much deeper dive, you can learn more about selecting the best oil for frying donuts in our detailed guide.
Crafting Classic Bakery-Style Yeast Donuts
There's just something magical about a real, old-fashioned yeast-raised donut. That first bite into a light, pillowy, slightly chewy ring of fried dough is an experience that fast-food versions can never quite match. Making them at home is a seriously rewarding process, letting you tap into that timeless bakery craftsmanship.
It's no surprise the global donut market, built on these fried masterpieces, was valued at a massive USD 15.6 billion in 2025. In North America alone, which holds over 53.83% of that market, yeast-raised donuts are the clear winners, accounting for 72% of sales thanks to their signature fluffy texture. You can dive deeper into these trends in this global donut market report.
The secret to that perfect texture all starts with waking up your yeast. Get this first step right, and you're well on your way.
Awakening the Yeast and Mixing the Dough
Think of activating yeast as giving it a gentle wake-up call. You'll simply combine it with warm milk—heated to about 100-110°F—and a little bit of sugar. Be careful here: if the milk is too hot, it’ll kill the yeast, but if it's too cold, it won't wake up.
After about five minutes, you should see a nice foamy layer on top. That's your proof that the yeast is alive, bubbly, and ready to get to work.
From there, it’s time to mix the enriched dough. This type of dough, loaded with fats like eggs and butter, is what gives yeast donuts their rich flavor and tender crumb. The easiest path is using a stand mixer to combine your bread flour, sugar, salt, egg, and yeast mixture, but you can absolutely do it by hand with a little elbow grease.
Having the right tools makes a world of difference. This simple visual breaks it down.
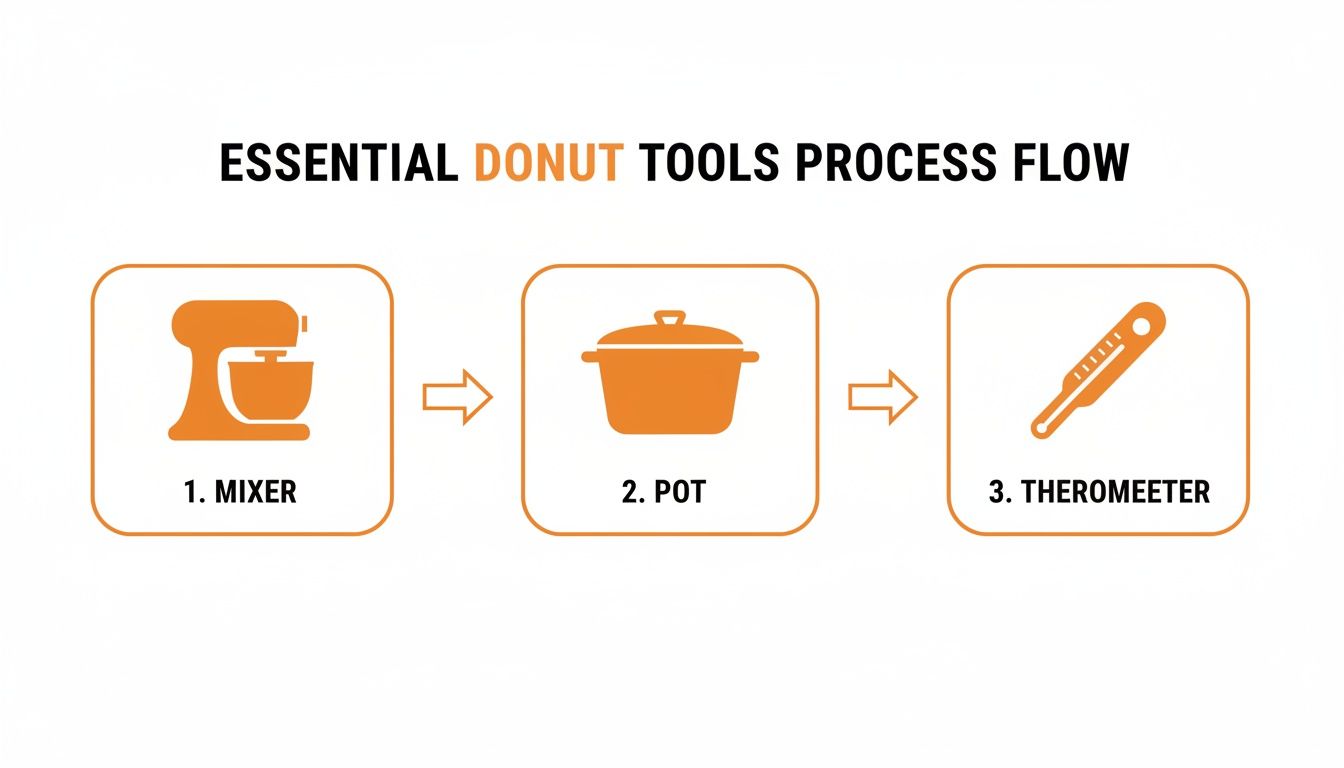
As you can see, a stand mixer, a heavy-bottomed pot, and a trusty thermometer are your three best friends for creating perfect donuts from start to finish.
Kneading to Perfection: The Windowpane Test
Once the ingredients are combined, the real magic happens during kneading. This is where you develop the gluten structure, which is non-negotiable for that classic airy texture. In a stand mixer, this can take anywhere from 10 to 20 minutes. The dough will look pretty shaggy at first, but just be patient. It will eventually transform into a smooth, elastic ball that pulls away cleanly from the sides of the bowl.
So, how do you know when it’s perfectly kneaded? The answer is the windowpane test.
Take a small piece of dough and gently stretch it between your fingers. If you can stretch it thin enough to see light pass through it without tearing, your gluten is perfectly developed. If it rips easily, it needs more time.
This test is the single best way to know your donuts will have the strength to rise beautifully without collapsing. Once it passes, pop the dough into a lightly oiled bowl, cover it up, and let it rise in a warm spot for about an hour, or until it has doubled in size.
Shaping, Proofing, and Frying
After the first rise, gently punch the dough down to release the air. Turn it out onto a lightly floured surface and roll it to about a 1/2-inch thickness. Now, using a donut cutter or even two different-sized biscuit cutters, cut out your rings and holes. Remember to handle the dough gently to keep it from deflating.
Here's a pro tip: place each cut donut on its own small square of parchment paper. This little trick makes transferring them to the hot oil so much easier and safer, and it helps them keep their perfect shape. Cover them loosely and let them have their second proof for about 30-45 minutes, until they look nice and puffy.
Now for the main event: frying. Heat your cooking oil in a heavy-bottomed pot to a steady 350-375°F. A thermometer is absolutely essential here.
- Gentle Placement: Carefully slide the donuts, still on their parchment paper, into the hot oil. The paper will slip right off in a few seconds, and you can pluck it out with tongs.
- Don't Overcrowd: Fry just two or three donuts at a time. If you add too many at once, the oil temperature will plummet, leaving you with greasy, sad donuts.
- Golden Brown: Fry for about 1-2 minutes per side, or until they are a beautiful, deep golden brown.
Use a slotted spoon to transfer the donuts to a wire rack. This lets air circulate all around, keeping the outside perfectly crisp while the inside stays fluffy.
Once the frying is done and your delicious donuts are cooling, you’re left with a pot of used cooking oil. Instead of stressing about the cleanup, just grab FryAway. The three-step process is unbelievably easy.
- Sprinkle and Stir: Carefully stir the FryAway powder into the still-hot oil.
- Cool Down: Let the oil cool completely. You'll see it transform into a solid puck.
- Toss into household trash: Simply scoop the solidified oil out of the pot and throw it right into your garbage bin.
This simple cleanup ensures you can enjoy the entire process of making incredible homemade fried donuts without dreading the aftermath.
Making Quick and Delicious Cake Donuts
When you get a sudden craving for a fresh, warm donut, the cake donut is your best friend. Unlike its yeast-raised cousins that require hours of patience, the cake donut comes together in a flash. It delivers that tender, crumbly, and deeply satisfying experience without the long wait.

This style of donut gets its lift from chemical leaveners like baking powder, which makes the whole process incredibly straightforward. It’s the perfect recipe for a spontaneous baking session, giving you a donut with a slightly crisp outside and a soft, cakey interior that's just begging to be dunked in coffee.
The Secret to a Tender Crumb
The most important part of making fantastic cake donuts happens long before they hit the hot cooking oil. If you want a tender, melt-in-your-mouth texture, the absolute key is to avoid overworking the dough.
When you mix flour with wet ingredients, gluten starts to develop. While that’s exactly what you want for the chewy structure of a yeast donut, too much gluten in a cake donut batter will make it tough and dense.
Your goal is simple: mix the ingredients just until they come together. A few lumps are totally fine—in fact, they're a good sign! This gentle approach is what creates that perfect, delicate crumb.
Handling a Stickier Dough
You’ll notice right away that cake donut dough is much softer and stickier than yeast dough, and that can make it a bit tricky to handle. Resist the temptation to dump in a bunch of extra flour to firm it up; that will only lead to dry, heavy donuts.
Instead, a few simple tricks make all the difference:
- Chill the Dough: After mixing, just wrap the dough in plastic and pop it in the fridge for 20-30 minutes. This one little step firms up the butter and makes the dough much easier to roll and cut without a sticky mess.
- Use a Light Touch: Roll out the dough on a well-floured surface, and don’t forget to flour your rolling pin and donut cutter, too.
- Work Quickly: Try to handle the dough as little as possible to keep it from warming up and becoming a sticky situation all over again.
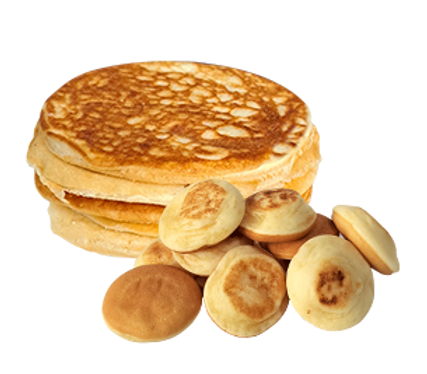
These small adjustments will make the process much smoother and ensure your donuts stay light and tender. For those who enjoy a simpler batter-based breakfast, exploring various pancake recipes can offer similar satisfaction.
Frying Cake Donuts for the Perfect Finish
Frying cake donuts is a little different than frying their yeasted counterparts. You’re aiming for that signature crackled surface and a perfectly cooked-through center. To get it right, heat your cooking oil to around 360-370°F. This slightly higher temperature helps set the crust quickly.
It's no surprise that home frying is part of a massive $14.1 billion global market. With 59% of parents with kids loving donuts, quick cake donut recipes are a guaranteed family favorite. A typical batch fries beautifully in cooking oil at 360°F for just 1-2 minutes per side.
Only fry a few donuts at a time to keep the oil temperature from dropping. They’ll sink for a moment and then pop right back up to the surface. Once they float, let them fry for about 90 seconds per side until they’re a beautiful deep golden brown. If you love this style, be sure to check out our delicious recipe for classic apple cider doughnuts as well.
Once fried, transfer them to a wire rack to cool slightly. The best time to toss them in cinnamon sugar or dip them in a simple glaze is while they’re still a little warm.
When your frying adventure is over, the cleanup can be just as fast as the recipe. With your cooking oil still hot, simply stir in FryAway powder.
- Sprinkle and Stir: Mix the powder into the hot oil until it’s all dissolved.
- Cool Down: Let the pan sit until the oil has cooled down and turned completely solid.
- Toss into household trash: Just scoop the solid puck of oil right into the trash can.
This easy, mess-free method makes the entire process of making fried donuts at home even more enjoyable.
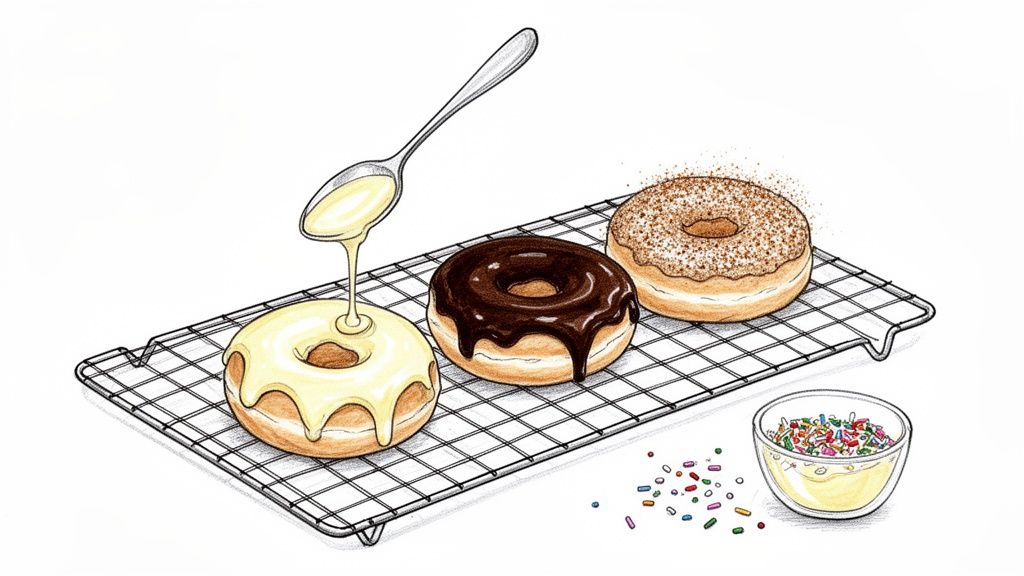
Perfecting Your Glazes and Toppings
An unadorned fried donut is a fantastic starting point, but let's be honest—the finish is what makes it truly unforgettable. This is where you get to have fun with flavors and textures, turning your homemade treats from simple pastries into absolute showstoppers.
Whether you're team simple sugar-dusting or team decadent cream-filling, getting the final touches right comes down to timing and technique.
Here's the secret to a perfect glaze that sets up beautifully instead of becoming a sticky mess: apply it while the donuts are still slightly warm, but not piping hot. If the donut is too hot, the glaze will just melt and slide right off. But if it's completely cool, the glaze won't stick properly. That warm sweet spot is key.
Classic Donut Finishes
Let's kick things off with three timeless toppings. These recipes are reliable, delicious, and the perfect foundation for getting creative later on.
-
Simple Cinnamon-Sugar: This is easily the most comforting coating out there. Just combine granulated sugar with a good amount of cinnamon in a shallow bowl. While your donuts are still warm from the fryer, give them a gentle toss in the mixture until they're evenly coated. The warmth helps every single crystal stick perfectly.
-
Classic Vanilla Glaze: For that iconic, semi-translucent sheen, you'll want to whisk together powdered sugar, a splash of milk or cream, and a teaspoon of vanilla extract. Consistency is everything here; you're aiming for a glaze that's thin enough for dipping but thick enough to cling. Dip the top of each warm donut, lift it, let the excess drip away, and place it on a wire rack to set.
-
Rich Chocolate Frosting: For a richer, more opaque topping, melt butter and unsweetened cocoa powder together. Then, whisk in powdered sugar and a little milk until you have a smooth, spreadable consistency. This frosting works best when applied to donuts that have cooled down a bit more, which allows it to set up nice and firm.
Filling Your Donuts
Ready to take your donuts to the next level? Filling them with jam, custard, or cream is how you get there. You’ll just need a piping bag fitted with a long, thin tip (sometimes called a Bismarck tip).
Gently insert the tip into the side of a cooled donut, pushing it about halfway through. Squeeze the piping bag until you feel the donut expand just a little—that's how you know it's full. Be careful not to overfill, or you'll have a delicious, gooey mess on your hands.
Once the decorating is done, it's time for cleanup. The cooking oil is the biggest part of that, but with FryAway, the whole process becomes completely stress-free.
Here's how easy it is:
- Sprinkle and Stir: Just mix the FryAway powder into the hot cooking oil.
- Cool Down: Let the oil cool and solidify into a solid puck.
- Toss into household trash: Scoop the hardened oil right into your regular trash bin.
It’s the perfect mess-free end to a successful day of making incredible fried donuts.
Mastering Frying and Mess-Free Oil Disposal
Nailing homemade donuts isn't about luck; it's about control. With the right technique, every single donut can come out perfectly golden, impossibly light, and never greasy. The real art is in managing your cooking oil, from picking the right kind to holding that temperature steady.
But let's be honest, the part that makes most of us hesitate is the cleanup. Staring down a pot of used, cooling cooking oil can feel like a chore you just don't want to tackle. This is where a true game-changer like FryAway comes in, making the whole process, from frying to finish, an absolute joy.
The Science of a Perfect Fry
Frying is really a science of heat and time. The goal is to cook the donut fast enough that the outside gets crisp, forming a barrier that stops the dough from soaking up too much cooking oil. This is exactly why temperature is everything.
- Hit the Sweet Spot: You want your cooking oil humming between 350°F and 375°F. A deep-fry thermometer isn't just a nice-to-have; it's the most critical tool for getting that perfect, non-greasy finish.
- Don't Crowd the Pot: Dropping in too many donuts at once will tank your oil temperature. To keep the heat consistent and ensure your donuts cook evenly, fry them in small batches of just two or three at a time.
- Pick the Right Oil: A neutral cooking oil with a high smoke point is a must. Canola, vegetable, and peanut oil are all fantastic choices. Beyond just technique, knowing what oil is best for frying is fundamental to getting that ideal crispy texture and clean flavor.
The Ultimate Fix for Oil Disposal
After you’ve pulled that last perfect donut from the fryer, the question of cleanup looms. We all know pouring cooking oil down the drain is a huge mistake that leads to serious plumbing disasters. A typical batch of fried donuts can easily use over 8 cups of cooking oil, and getting rid of it the wrong way contributes to massive problems like the infamous sewer "fatbergs" in the UK, which cost over £100 million a year to clear.
This is where FryAway completely changes the game. It’s a 100% plant-based powder that makes oil disposal unbelievably simple and clean.
Forget about saving messy jars of used oil under the sink or stressing about clogs. FryAway turns that liquid cooking oil into solid organic waste, making cleanup as easy as taking out the trash.
The process couldn't be more straightforward. For home cooks, FryAway Super Fry is designed to handle up to 24 cups of oil, making it perfect for even the biggest family donut-making sessions.
Your Three-Step Cleanup
Here’s how to use FryAway to turn a dreaded chore into a simple final step.
-
Sprinkle and Stir As soon as you’re done frying, while the oil is still hot, just sprinkle the right amount of FryAway powder into the pot. Grab a whisk or spoon and stir until the powder completely dissolves.
-
Cool Down That’s it for now. Just walk away! Set the pot aside in a safe spot and let the cooking oil cool down completely. As it cools, FryAway works its magic, solidifying the liquid oil into a single, solid puck.
-
Toss into household trash Once the oil is totally cool and solid, use a spoon or spatula to easily scoop the hardened puck right out of the pot. You can toss it directly into your household trash bin. It's really that simple—no spills, no mess, and no plumbing nightmares.
With cleanup this effortless, you can tackle any fried donut recipe with confidence, knowing the aftermath is already handled. For more tips, check out our full guide on how to dispose of cooking oil safely and easily.
Answering Your Top Donut-Making Questions
Even the most perfect-looking recipe can leave you with a few head-scratchers once you actually start mixing and frying. Let's walk through some of the most common issues that trip up home bakers, so you can tackle your next batch with total confidence.
Why Are My Donuts Soaking Up So Much Oil?
This is the number one question I get, and the answer is almost always the same: your cooking oil isn't hot enough. Greasy, heavy donuts are a classic sign of low oil temperature.
When the oil drops below 350°F, the dough doesn't get that instant, crisp sear on the outside. Instead, it just sits there, slowly absorbing oil like a sponge. The sweet spot is a steady 350°F-375°F, and the only way to be sure is with a reliable kitchen thermometer.
The other major culprit? Overcrowding the pot. Tossing in too many donuts at once is a surefire way to make the oil temperature plummet. It might feel slower, but frying in small, manageable batches is the key to light, fluffy, and perfectly cooked donuts every time.
Can I Reuse My Frying Oil?
Absolutely. You can definitely get another use or two out of your cooking oil after a donut session. The trick is to handle it properly.
First, let the oil cool down completely. Then, strain it through a fine-mesh sieve or a couple of layers of cheesecloth to catch all those little crumbs and stray bits of dough. Store it in a sealed, airtight container somewhere dark, like a pantry.
You'll know it's time to toss it when the oil looks dark, smells funky, or starts smoking way too quickly when you heat it up. That's when you should reach for FryAway.
With FryAway, getting rid of old cooking oil is the simplest part of the whole process. It’s a clean, three-step solution that turns a messy chore into something completely effortless—and saves your pipes from a greasy disaster.
Once you're done with your oil for good, just follow these simple steps:
- Sprinkle and Stir: Mix the FryAway powder into the hot oil until it's fully dissolved.
- Cool Down: Let it sit and cool completely. The liquid oil will magically transform into a solid, organic puck.
- Toss into household trash: Scoop the solidified oil right out of the pot and into your household trash.
It makes dealing with used cooking oil for your fried donut recipes completely hassle-free.
Ready for a cleaner, easier way to fry? See how FryAway can transform your kitchen cleanup. Visit https://fryaway.co to learn more.