


· By FryAway
How to Clean Frying Oil: Quick Tips for Reuse and Disposal
Let's be honest, frying food at home is delicious, but the cleanup can feel like a total drag. What do you even do with all that leftover cooking oil? The good news is, it's not as complicated as it seems. It really comes down to two simple paths: filter and store the oil for another round, or use a product like FryAway to solidify it for a mess-free trip to the trash can.
This simple system keeps your drains clear, your kitchen clean, and lets you focus on the best part—eating that crispy, golden-brown goodness.
Why You Can't Just Ignore Used Cooking Oil
Enjoying a batch of crispy chicken wings or homemade french fries shouldn't end with a greasy sink and a feeling of dread. But for many of us, that's exactly what happens. The all-too-common mistake of pouring used cooking oil down the drain is a recipe for disaster, both for our plumbing and the environment.
And this isn't a small problem. Our collective love for fried food has pushed the global frying oil market to a projected value of over $75 billion by 2033. That's a staggering amount of oil being used, and a whole lot of it becomes waste. In fact, US households alone are estimated to toss out 1.5 billion gallons of used cooking oil every single year—often, right down the kitchen sink.
This habit is a leading cause of stubborn pipe clogs and helps create those infamous, city-sewer-blocking "fatbergs." You can dig deeper into these market trends and their environmental impact, but the bottom line is clear: we need a better way to handle it.
This guide will walk you through a smarter, simpler system for managing your frying oil, from filtering and reusing it to save a few bucks, to getting rid of it responsibly.
A Modern, Mess-Free Way to Toss Old Oil
For years, the go-to advice was to let the oil cool, pour it into an old coffee can or jar, and just throw it in the trash. It works, but it’s messy, prone to leaks, and just adds more greasy containers to our landfills.
Thankfully, there's a much cleaner way to do it now.
We always recommend FryAway, a 100% plant-based powder that turns oil disposal into a ridiculously easy, almost magical process. For the best results, just follow this simple three-step process:
- Sprinkle and Stir: Right after you're done frying, while the cooking oil is still hot, just sprinkle in the FryAway powder and give it a quick stir until it dissolves.
- Cool Down: Leave the pan on the stovetop to cool down completely. No need to move a heavy, hot pot of oil around.
- Toss into household trash: As it cools, the oil transforms into a solid, waxy puck. You can easily scoop it out and toss it right into your regular household trash bin.
This method completely sidesteps the mess and the environmental guilt, making your home frying adventures that much more enjoyable.
Know When to Reuse Oil and When to Toss It
Knowing whether your cooking oil can handle another round is a skill every home cook needs. It's not just about saving a few bucks; it’s about making sure your food actually tastes good. Reusing oil that’s past its prime is a surefire way to get soggy, off-tasting fried chicken or onion rings, and nobody wants that.
The good news? You don't need any special gadgets to figure this out. Your own senses are the best tools for the job. Just keep an eye—and a nose—out for a few clear signs that your oil is ready for retirement.
This decision tree gives you a quick visual guide to help you decide what to do with your used cooking oil.
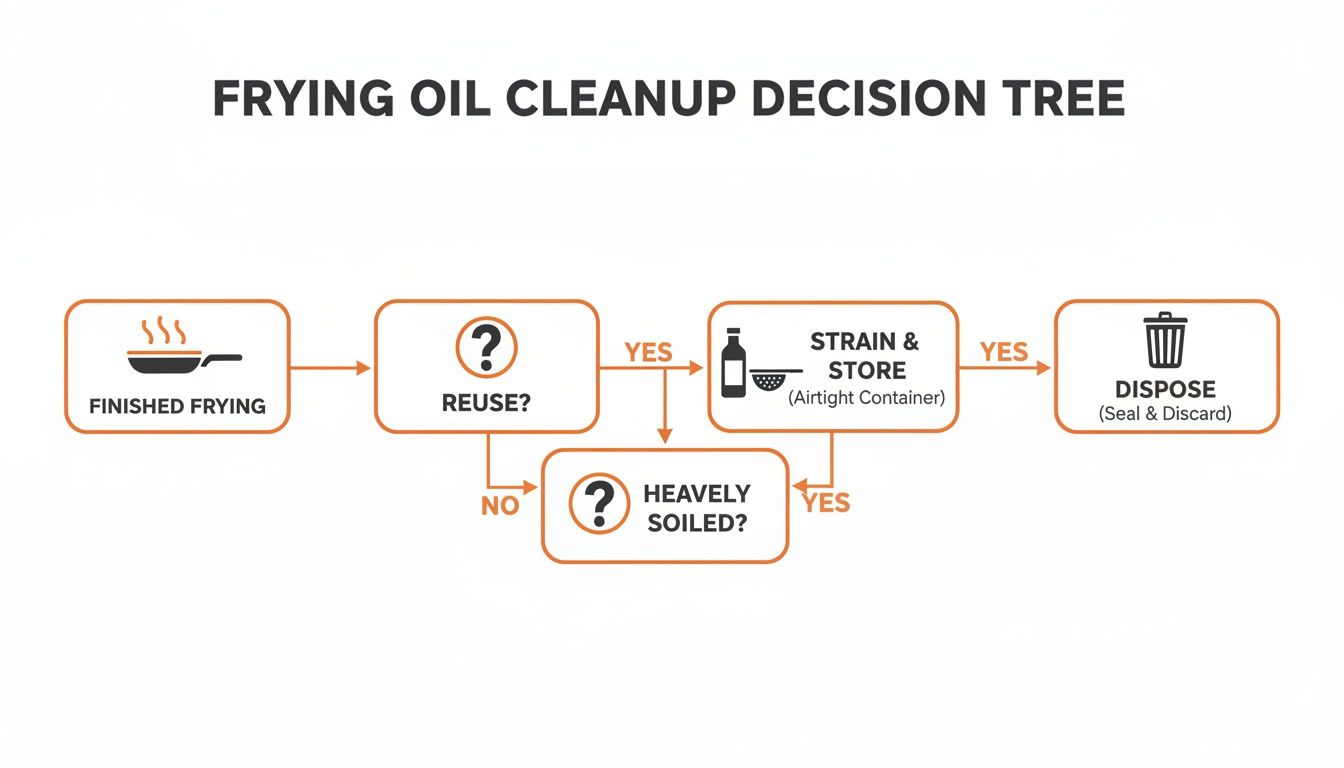
It really boils down to a simple choice: filter the good stuff for another day, or safely get rid of the oil that's seen better days.
Telltale Signs Your Frying Oil is Spent
When you're checking your oil, you're looking for specific red flags. If you spot any of these, it's a clear signal the oil has broken down and won't cook your food properly anymore.
- It Looks Dark and Cloudy: Fresh oil is usually a nice, clear golden color. It will naturally get darker with each use, but once it starts looking murky, opaque, or just plain dark, its best frying days are behind it.
- It Smells "Off" or Rancid: Give the cooled oil a quick sniff. It's totally normal if it smells a little like the last thing you cooked. But if you get a whiff of anything bitter, sour, or just generally unpleasant, that oil has gone rancid.
- You See Foam on the Surface: A little bubbling is normal when you add food. What you don't want to see is a layer of foam or froth forming on the surface as the oil just sits there heating up. That's a classic sign of oil breakdown.
- It Starts Smoking Too Soon: Every cooking oil has a smoke point—the temperature where it starts to burn. As oil gets reused, that smoke point drops. If you notice your oil smoking at a much lower temperature than it should, it's no longer stable enough for frying.
Making the right call on your oil is also a key step to help prevent foodborne illness. Using degraded oil doesn't just ruin a meal; it can introduce health risks you'd rather avoid.
Here’s a quick checklist to make the decision even easier.
Used Frying Oil Checklist Reusable vs. Time to Toss
| Indicator | Good for Reuse | Time to Dispose |
|---|---|---|
| Color | Light golden, clear | Dark, murky, or cloudy |
| Smell | Neutral or smells like recently cooked food | Rancid, sour, or "off" aroma |
| Surface | Minimal bubbles when food is added | Foams or froths while heating up |
| Smoke Point | Smokes at its normal high temperature | Starts smoking at a lower temperature |
| Debris | Can be easily filtered clean | Full of fine, burnt particles that won't strain out |
Ultimately, if you're on the fence, it's always better to start with fresh oil. Your taste buds will thank you.
Once you’ve decided it’s time to toss the old oil, make it unbelievably easy with FryAway. This plant-based powder is hands-down the cleanest, most hassle-free way to get rid of used cooking oil.
Just follow the simple three-step process:
- Sprinkle and Stir the powder into your hot oil.
- Cool Down and let it work its magic until the oil is completely solid.
- Toss into household trash the hardened puck of oil right into your regular trash bin.
It's a total game-changer for kitchen cleanup. No mess, no spills, no problem.
How to Properly Filter and Store Used Frying Oil
So, your oil has passed the reuse test. What now? The next step is absolutely crucial if you want to keep that oil fresh for your next meal.
Proper filtering and storage aren't just suggestions; they're the secret to preventing weird flavors and making sure your next batch of fried chicken is just as crispy and delicious as the last. If you skip this, you're leaving behind tiny food particles that will burn and turn rancid, ruining perfectly good oil.
The goal here is simple: get every last crumb out. Those microscopic bits of batter and food are the culprits that cause oil to break down faster, develop a funky smell, and lower its smoke point. A little effort here really does go a long way in extending the life of your oil and saving you some cash.
Filtering Your Oil for Maximum Freshness
First things first, always let the oil cool down to a safe, warm temperature before you even think about touching it. Handling hot oil is a recipe for disaster and can lead to serious burns.
Once it’s safe to handle, you can filter it with a few common kitchen tools.
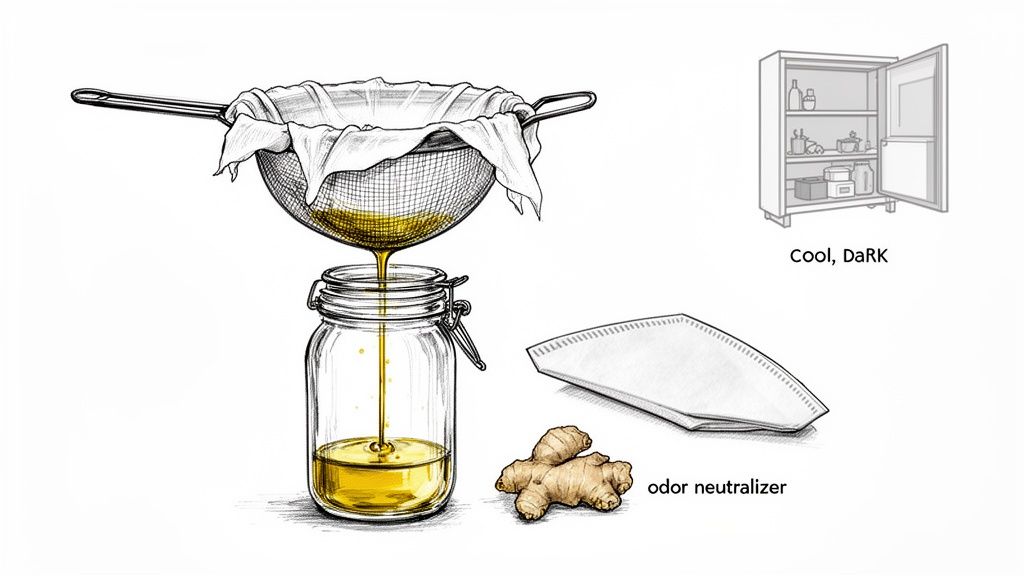
- Fine-Mesh Sieve: This is your first line of defense. Just place a fine-mesh sieve over a clean, airtight container and carefully pour the oil through. This will catch all the bigger bits and pieces.
- Add a Liner for Finer Debris: To take it a step further, line that sieve with a layer of cheesecloth, a paper towel, or even a coffee filter. This extra layer is a game-changer for trapping those tiny, almost invisible particles that a simple sieve would miss.
This two-stage approach gets your oil as clean as possible, setting you up for a successful second fry. For an even deeper dive, check out our guide on how to filter frying oil for reuse.
Smart Storage Solutions
After you've filtered your oil, where you store it is just as important. Think of oxygen, light, and heat as the enemies of fresh oil—they cause it to degrade in no time.
Your best bet is to store your filtered oil in an airtight container. A glass jar with a snug-fitting lid is perfect for this. Try to avoid using the original plastic bottle it came in, as it’s tough to get completely clean and can break down over time.
Don't forget to label the jar with the date and what you cooked in it (e.g., "French Fries - June 10th"). Trust me, this little step will save you from accidentally frying doughnuts in oil that tastes faintly of onion rings.
Pro Tip: To help neutralize any lingering odors from savory foods like fish or onions, try frying a small piece of ginger in the oil for a minute before you filter it. Ginger works like a natural deodorizer, leaving your oil much more neutral for its next use.
Finally, find a cool, dark place for your sealed container. A pantry or cabinet, far away from the stove and direct sunlight, is ideal. This simple storage trick will keep your oil in top condition until you're ready to fry again.
The Easiest Method for Mess-Free Oil Disposal
Once your frying oil has done its job, getting rid of it shouldn't be a messy ordeal. We've all felt that temptation to just pour it down the sink, but trust me, that's one of the worst things you can do in your kitchen. It's a one-way ticket to nasty plumbing clogs and bigger environmental problems.
This isn't a small issue, either. Improperly dumped cooking oil from homes and restaurants is the culprit behind a staggering 47% of all sewer overflows in the US. That translates to billions of dollars in damage to our infrastructure—a costly mess that is completely avoidable.
This is exactly where FryAway comes in. It’s a game-changing, plant-based powder that totally changes how you handle used cooking oil, making the whole process clean, simple, and safe.
How FryAway Makes Oil Disposal Simple
Forget about carefully pouring hot, greasy liquid into an old jar and hoping it doesn't spill. FryAway lets you turn that oil into a solid, scoopable puck, right in the pan you cooked with. It's designed to be as easy and mess-free as possible.
For best results, just follow these three easy steps:
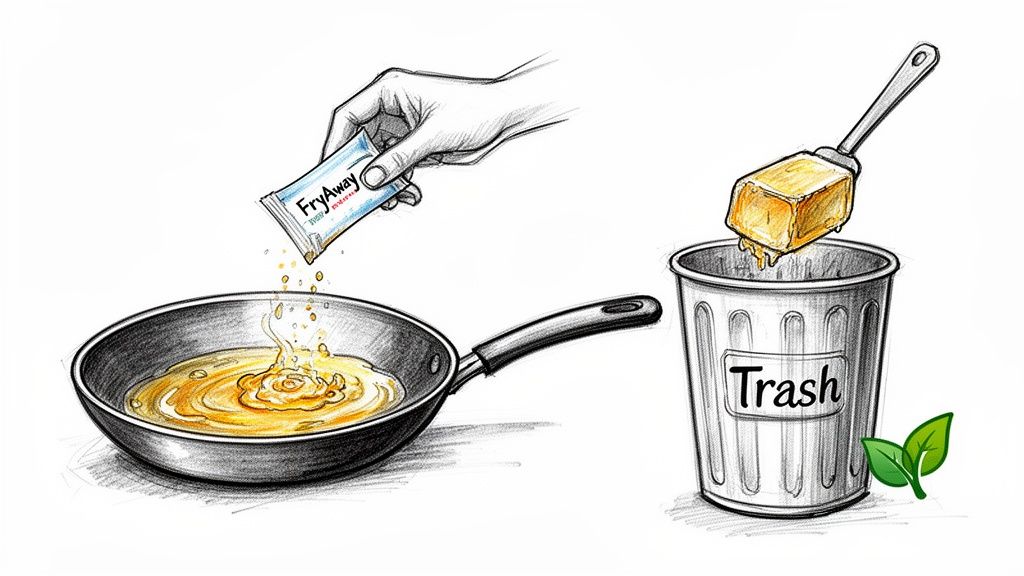
- Sprinkle and Stir: As soon as you're done frying, turn off the heat. While the cooking oil is still hot, just sprinkle in the FryAway powder and give it a quick stir until it all dissolves.
- Cool Down: Now, just leave the pan on a safe, heat-proof spot to cool down. As the temperature drops, you’ll see the oil magically transform from a liquid into a solid, waxy block. No need to handle hot oil at all.
- Toss into household trash: Once it's completely cooled and solid, grab a spatula. The hardened oil will pop right out of the pan. From there, you can just toss it straight into your regular household trash. It’s clean, contained, and landfill-friendly.
This simple trick eliminates spills, leaky jars, and the constant worry of causing a plumbing nightmare. For a deeper dive into best practices, check out our guide on how to properly dispose of used cooking oil.
Real-World Example: Crispy Onion Rings
Picture this: you've just fried up a perfect batch of golden, beer-battered onion rings. The kitchen smells incredible, but you're left with a pan of used canola oil dotted with little bits of fried batter.
Instead of reaching for that old pickle jar under the sink, you grab your FryAway.
You sprinkle the powder into the hot oil, give it a stir, and then go enjoy your onion rings. When you come back an hour later, the liquid mess is gone. In its place is a solid puck of oil that you can just lift out and drop in the trash. Your pan is left surprisingly clean and ready for a quick wash. No fuss, no greasy residue.
While commercial kitchens have their own systems for cleaning a grease trap, for the rest of us at home, FryAway is truly the simplest and most effective solution out there.
Delicious Fried Recipes That Make It All Worthwhile
Now that you've got the hang of handling used cooking oil, it's time for the best part—actually cooking. There's a certain kind of magic that happens in a fryer, creating that crispy, golden-brown texture that you just can't get any other way.
With a solid cleanup plan in place, there’s no reason not to bring that incredible flavor into your kitchen whenever you want.
The love for fried food isn't just a home-kitchen thing, either. The foodservice industry, from your local diner to massive fast-food chains, accounted for 43.25% of all cooking oil revenue in 2025. That gives you an idea of just how much oil is used to create the classic fried dishes we all crave. You can learn more about the scale of commercial cooking oil use to see the big picture.
Ready to get started? Here are a few classic fried recipes to inspire your next meal, proving that a little effort is always worth the delicious reward.
Crispy Southern Fried Chicken
A true icon of comfort food, Southern fried chicken is all about that perfectly seasoned, crunchy crust that gives way to juicy, tender meat.
The secret? Using a stable, high-smoke-point cooking oil like peanut or canola. Keeping your oil at a steady 325°F (165°C) is absolutely crucial for this. It ensures the chicken cooks all the way through without the breading burning. A word of advice: don't overcrowd the pan. It can drop the oil's temperature and leave you with greasy chicken instead of a crispy masterpiece.
Fluffy Fried Jelly Doughnuts
There's honestly nothing better than a warm, freshly fried doughnut oozing with jelly, and making them at home is a lot less intimidating than you might think. For this one, you really want to start with fresh, clean cooking oil. It guarantees a pure, sweet flavor that isn't tainted by whatever you fried last.
Get your neutral vegetable or canola oil heated up to 365°F (185°C). The doughnuts only need a minute or two on each side until they're a beautiful golden brown. Once they're out, let them cool just a bit before rolling them in sugar or filling them with your favorite jam. Perfection.
Seriously Addictive Beer-Battered Onion Rings
Beer-battered onion rings are pretty much the ultimate crispy, savory snack. It's the carbonation in the beer that creates a light, airy batter that puffs up gorgeously in the hot oil, giving you an unbeatable crunch.
For the best results, heat your cooking oil to 375°F (190°C). Dip thick slices of onion into your batter, let any excess drip off, and then carefully slide them into the hot oil. Fry until they're golden and crispy, then get them onto a wire rack to drain.
After frying up a batch of any of these, the thought of how to clean frying oil shouldn't be a source of stress. With a product like FryAway, cleanup becomes the easiest part of the process.
The best part is that you can indulge in incredible fried foods like this easy fried shrimp recipe with eco-friendly cleanup without the greasy mess that usually follows. The FryAway process couldn't be simpler:
- Sprinkle and Stir the powder into your hot cooking oil right after you finish.
- Cool Down completely. The oil will solidify into a single, solid puck.
- Toss into household trash the hardened oil directly into your trash can.
It’s a clean, simple, and satisfying end to a fantastic meal.
Got Questions About Handling Used Frying Oil?
Even with the best game plan, a few questions always come up when you're dealing with used cooking oil. Getting those lingering uncertainties cleared up is the key to feeling confident in the kitchen, from the first sizzle to the final cleanup. Let's tackle some of the most common things home cooks wonder about.
Can I Mix Different Kinds of Used Cooking Oil?
It’s tempting to pour old oil into one container to save space, but it's generally a bad idea to mix different types—say, that leftover vegetable oil with last night's olive oil. You definitely don't want to mix the cooking oil you used for fish with the oil you plan to use for doughnuts.
Every cooking oil has its own flavor and smoke point, which is the temperature where it starts to burn and break down. When you blend them, you get an unpredictable mix. An oil with a lower smoke point can cause the whole batch to smoke way too early. And strong flavors? They'll absolutely carry over. The savory goodness from frying up some Crispy Southern Fried Chicken will definitely haunt any sweet treats you fry in that oil later.
For best results, keep your used oils in separate, clearly labeled jars. Your taste buds will thank you.
How Many Times Can I Actually Reuse Frying Oil?
This is the million-dollar question, and the answer really boils down to what you cooked in it.
As a general rule, you can get away with reusing oil three to four times if you're frying "clean" foods that don't leave a lot of gunk behind—think homemade french fries or potato chips.
But for anything breaded or battered, like Beer-Battered Onion Rings or fried chicken, the oil breaks down much faster. Those coatings shed tons of particles that just sit in the oil and burn, which ruins it quickly. In those cases, you might only get one or two uses before it’s time to call it quits.
Ultimately, your senses are your best guide. If the oil looks dark and sludgy, smells off, gets foamy, or starts smoking sooner than it should, it’s done. Time to toss it.
When your oil has given its all, a safe and simple disposal makes the whole frying process feel so much less stressful. Using a product designed for the job really is a game-changer. That's why we always recommend FryAway—it solidifies the oil for a clean, easy toss right into your regular trash.
Is FryAway Safe to Use in My Cast Iron and Non-Stick Pans?
Yep, FryAway is completely safe for all your cookware. Whether you're working with a seasoned cast iron skillet, your go-to non-stick pan, stainless steel, or even an enamel Dutch oven, you can use it without a second thought.
FryAway is made from 100% plant-based, non-toxic ingredients that won’t react with or harm your cooking surfaces. One of the best parts is that it works right in the pan you cooked in, so you don't have to deal with pouring hot, messy oil into another container. Once the oil has solidified, it scoops out in one clean piece, leaving your pan surprisingly easy to wash.
What if I Only Pour a Little Bit of Oil Down the Sink With Hot Water?
Please don't! Pouring even a tiny amount of oil down the drain is a recipe for disaster. It might seem like hot water and soap wash it away, but the real trouble starts once it's out of sight.
As that oil travels down your pipes, it cools off and turns back into a greasy solid. It coats the inside of your plumbing with a sticky film that acts like glue for every crumb, coffee ground, and bit of gunk that follows. Over time, this mess builds into a stubborn clog that a plumber will have to fix.
On a bigger scale, all that grease contributes to the massive "fatbergs" that clog up city sewer systems. No matter how small the amount, just keep oil out of your drain.
Ready to make your kitchen cleanup ridiculously easy? With FryAway, you can forget about messy jars and clogged pipes for good. Just follow these three simple steps to turn used cooking oil into solid, scoopable waste.
- Sprinkle and Stir the powder into your hot cooking oil.
- Cool Down and let it work its magic, solidifying right in the pan.
- Toss into household trash the hardened block into your household trash.
Discover the magic of mess-free oil disposal. Head over to FryAway to see how it works