


· By FryAway
Best Cleaner for Kitchen Cabinets: Easy Tips for Grease-Free Shine
If you ask ten different people what the best cleaner for kitchen cabinets is, you’ll probably get ten different answers. But the truth is, there isn't one single magic product. The right cleaner always depends on what your cabinets are made of.
For most common finishes, including painted wood, a simple mix of warm water and a few drops of mild dish soap is your safest bet for everyday wipe-downs and cutting through grease. If you've got natural wood, though, you'll want to reach for a cleaner made specifically for wood to protect that beautiful finish.
Your Guide to Spotless Kitchen Cabinets
Choosing the right cleaner is the most important step in keeping your cabinets looking great. It’s so easy to grab the wrong thing and accidentally cause more harm than good. A harsh chemical can strip paint right off, dull a glossy finish, or even warp the material over time. This guide will help you skip the guesswork, whether you're doing a quick daily wipe or a much-needed deep clean.
A little proactive thinking in the kitchen can save you a ton of scrubbing later. Think about it: where does all that greasy buildup come from? Cooking, of course. Managing cooking byproducts right at the source is a game-changer.
After you've fried up some crispy chicken or french fries, you're left with a pan of hot, messy cooking oil. Instead of pouring it into a jar (and inevitably spilling some), you can use a product like FryAway to simplify the whole process.
The FryAway Method for Clean Oil Disposal
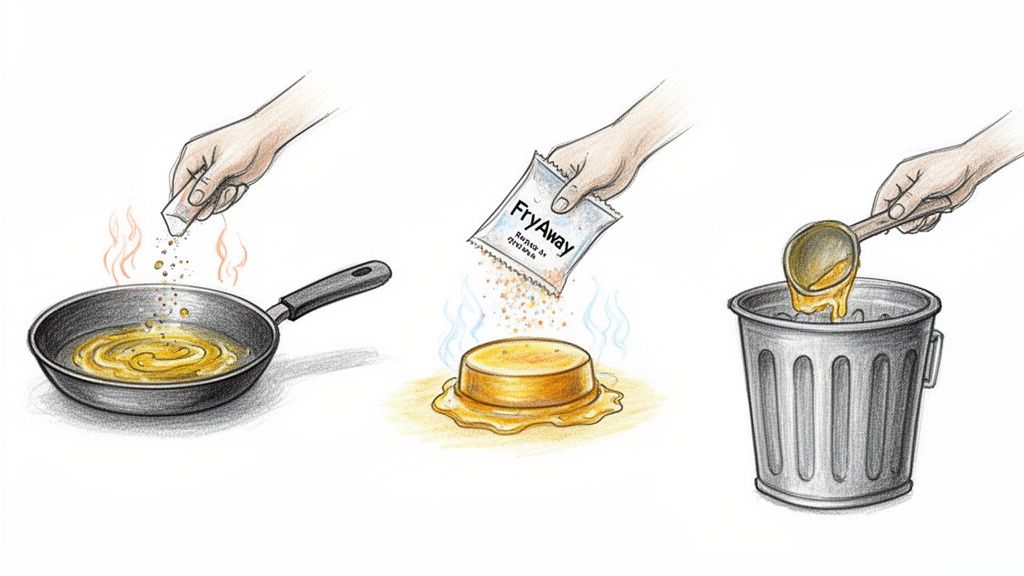
This is a pretty clever way to handle used cooking oil without the mess. It’s a simple three-step process that turns liquid oil into a solid for easy disposal.
- Sprinkle and Stir: Right after you finish cooking, while the oil is still hot, just sprinkle the FryAway powder into the pan and give it a quick stir.
- Cool Down: Now, just let the pan cool down completely. As it does, the oil will magically transform into a solid, almost gel-like puck.
- Toss into household trash: Once it's solid, you can easily scoop the hardened oil out and toss it straight into your household garbage. No spills, no mess.
Using this method does more than just prevent clogged pipes. It also cuts down on the grease that splatters and hangs in the air, which is exactly what settles on your cabinet surfaces and creates that sticky film we all hate.
A cleaner kitchen really starts with smarter habits. When you get rid of messy liquid oil, you're tackling the main source of that greasy buildup on your cabinets, making your cleaning routine so much easier down the line.
It's no surprise that everyone wants a clean home. The demand for effective cleaning solutions is massive—the global cleaning services industry was valued at USD 415.93 billion in 2024 and is only expected to grow. It just goes to show how much we all value a clean and hygienic living space. You can find more insights on the professional cleaning market over at Grand View Research.
To make things easier, I've put together a quick-reference table to help you pick the right cleaner for your cabinets at a glance.
Quick Guide to Cabinet Cleaners by Material
Here's a simple breakdown of what to use—and what to avoid—for the most common types of kitchen cabinets. Think of it as your cheat sheet for keeping them pristine.
| Cabinet Material | Recommended Cleaner | Avoid Using |
|---|---|---|
| Painted Wood | Mild dish soap and warm water | Ammonia, bleach, abrasive scrubbers |
| Solid Wood | pH-neutral wood cleaner or oil soap | Excessive water, harsh degreasers |
| Laminate | All-purpose cleaner or diluted vinegar | Abrasive powders, solvent-based cleaners |
| Veneer | Damp microfiber cloth with mild soap | Wax polishes, excessive moisture |
Always remember to test any new cleaner in a small, hidden spot first, just to be safe. Happy cleaning
Choosing the Right Cleaner for Your Cabinet Type
Picking the best cleaner for your kitchen cabinets isn’t about finding one miracle product. It’s about knowing what your cabinets are made of, because different materials need entirely different care. Using the wrong cleaner can be a disaster—we're talking stripped paint, dulled finishes, or even warped wood.
Think of your cabinet's finish as its first line of defense. The goal is to clean the grime without hurting that protective layer. What works wonders on a tough laminate surface could permanently ruin a delicate painted finish. Before you grab any old spray bottle, take a second to identify what you're working with. This one simple step will save you from costly headaches down the road.
This little decision tree can help you figure out where to start.
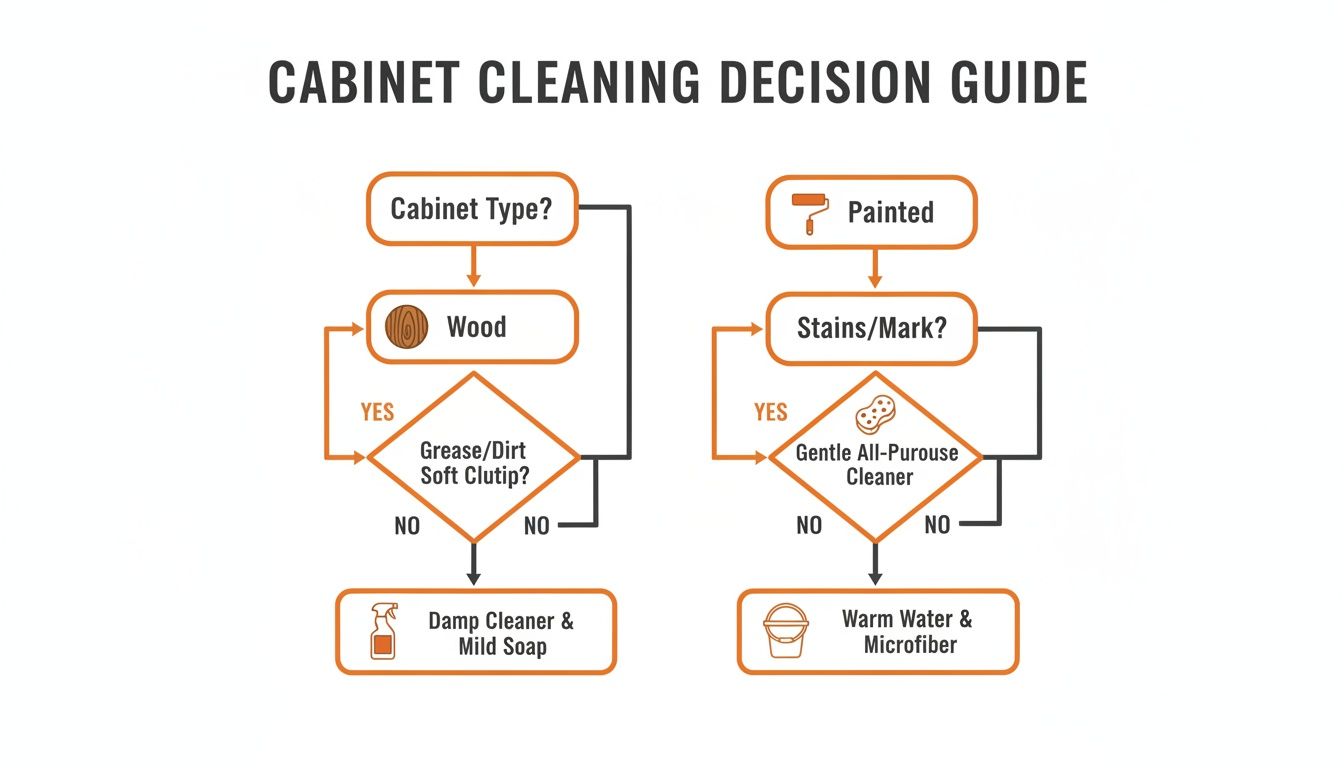
As you can see, the path to clean cabinets splits right away. Whether you have natural wood or a painted surface determines everything that comes next.
Safely Cleaning Solid Wood and Veneer
Solid wood and wood veneer cabinets bring a certain warmth to a kitchen, but they’re also really sensitive to moisture and harsh chemicals. Too much water is the enemy here; it can cause the wood to swell, crack, or even peel over time. For that reason, you should never drench the surface.
Your best bet is a pH-neutral cleaner made specifically for wood, like an oil soap. These products are designed to lift grime gently while also conditioning the wood, helping it keep that natural luster.
Always apply the cleaner to a soft microfiber cloth first—not directly onto the cabinet—and wipe in the direction of the wood grain. When you're done, immediately follow up with a clean, dry cloth to buff away any leftover moisture.
Best Practices for Painted Cabinets
Painted cabinets look sharp and modern, but that beautiful finish requires a delicate touch. The paint can easily be scratched or stripped by the wrong chemicals. Stay far away from aggressive cleaners that contain ammonia or bleach, as they’re known to cause discoloration and break down the paint.
For day-to-day cleaning, a simple mix of warm water and a few drops of a mild dish soap (like Dawn) is all you need. It’s a fantastic grease-cutter, which is perfect for a kitchen, but it’s gentle enough that it won't harm the finish. Just like with wood, use a soft cloth, wring it out so it's just damp, and dry the surface completely when you’re done.
Pro Tip: Always test a new cleaning solution on a small, hidden spot first, like the inside of a cabinet door. This quick check ensures the cleaner won't cause any unexpected damage or discoloration to your finish.
Tackling Laminate and Thermofoil Surfaces
If you have laminate or thermofoil cabinets, you're in luck. These surfaces are known for their durability and stain resistance, which makes them pretty easy to clean. Most of the time, an all-purpose cleaner or a diluted solution of white vinegar and water will cut right through daily grime.
The main thing to avoid here is anything abrasive. That means no scouring pads, powdered cleaners, or solvent-based products. These can create tiny scratches that, over time, will make the surface look dull and worn out. A microfiber cloth is your best friend—it grabs dirt without damaging the finish.
While these cleaning methods are great for getting rid of grime, preventing it in the first place is even better. If you want to learn more about tackling stubborn grease, you might be interested in our guide on finding the best grease cleaner for kitchen surfaces. A lot of that sticky film comes from frying food.
Imagine you just finished making a batch of delicious Southern fried catfish in cooking oil. Instead of letting that used oil sit around and create a greasy mess, you can deal with it instantly using FryAway.
It’s a simple, mess-free process:
- Sprinkle and Stir: While the oil is still hot, just sprinkle in the FryAway powder and give it a quick stir.
- Cool Down: Let the pan cool completely. You'll see the oil transform into a solid, waxy puck.
- Toss into household trash: Scoop the hardened oil right into your trash bin.
This quick step not only simplifies cleanup but also reduces the amount of airborne grease that settles on your cabinets, making your next cleaning day that much easier.
How to Deep Clean Stubborn Grease and Grime
Let's be real—the cabinets around your stove are probably the grimiest spots in your kitchen. This is ground zero for that sticky, yellowish film that seems impossible to remove, and it’s where a simple daily wipe-down just won’t cut it.
When you're facing layers of built-up grease, you need a more focused approach. The good news is that one of the best cleaners for this exact scenario is probably already in your pantry.
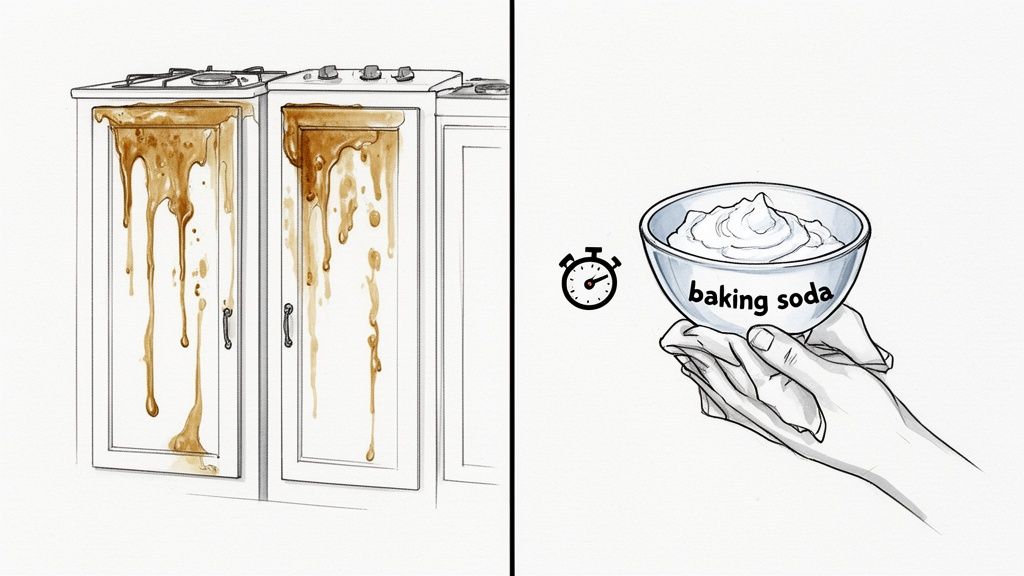
A simple paste made from baking soda and warm water is my go-to for breaking down that tough, almost plastic-like polymerized grease. Its mild abrasive quality helps lift the grime without scratching most cabinet finishes.
The Baking Soda Paste Technique
This method is a lifesaver for those concentrated greasy spots that feel tacky to the touch.
- Make the Paste: Mix baking soda with just enough warm water to form a thick, spreadable paste. You're aiming for a consistency similar to toothpaste.
- Apply and Wait: Gently dab the paste directly onto the greasy areas. Now, let it sit for about 10-15 minutes. This is the most important part—that dwell time allows the alkaline nature of the baking soda to start dissolving the greasy bonds.
- Wipe Gently: Grab a soft, damp microfiber cloth and wipe the paste away in small, circular motions. You should feel the sticky residue lifting right off.
- Rinse and Dry: Finish up by wiping the area with a clean, damp cloth to get rid of any leftover paste, then dry it completely with another soft cloth to prevent water spots.
This targeted approach is much safer than soaking the entire cabinet with harsh chemical degreasers that can strip or damage delicate finishes. It’s a powerful, low-cost solution that mirrors the kind of deep-cleaning challenges the pros face. In fact, the commercial kitchen cleaning services market was valued at USD 385.7 million in 2024 for a reason—this stuff is tough!
The absolute best strategy for dealing with stubborn grease is prevention. If you can stop grease from landing on your cabinets in the first place, deep cleaning becomes a much rarer, and easier, chore.
Preventing Grease Buildup at the Source
So where does all that sticky grime come from? A huge portion of it is from airborne grease particles created during frying. Every time you cook with oil, tiny droplets are launched into the air and eventually settle on your cabinets, range hood, and backsplash.
The most effective way to stop this cycle is to manage your used cooking oil before it becomes a problem.
This is where a product like FryAway becomes an essential part of a cleaner kitchen routine. Instead of leaving messy, liquid oil in a pan to be dealt with later (or worse, poured down the drain), you can solidify it for easy, clean disposal right after you finish cooking.
For a deeper dive into this, check out our complete guide on how to clean kitchen grease effectively. But here’s how simple the FryAway process is:
- Sprinkle and Stir: While your cooking oil is still hot, just sprinkle the FryAway powder into the pan and give it a quick stir.
- Cool Down: Let the pan cool completely. The powder will work its magic, transforming the liquid oil into a solid, organic puck.
- Toss into household trash: Once it's solidified, you can scoop the hardened oil out and toss it straight into your household garbage. No mess.
By adopting this simple habit, you're stopping grease at its source. You'll drastically reduce the amount that ends up on your cabinets, making future cleaning sessions far less intimidating.
Make Frying Cleanup a Breeze with FryAway
A truly spotless kitchen isn’t about scrubbing harder—it’s about working smarter. While the right cleaner is essential for tackling existing grime, the real secret is preventing that greasy film from forming in the first place. One of the biggest offenders? Airborne grease from frying.
Getting rid of used cooking oil is easily one of the messiest kitchen jobs out there. Spills are almost inevitable, and pouring it down the drain is a guaranteed disaster for your pipes and the environment. This is exactly where FryAway comes in, turning a messy liquid into a simple, solid puck you can toss right in the trash.
This tiny change to your post-cooking routine dramatically cuts down on the grease that splatters and settles on your cabinets, making your next cleaning day so much easier.
Here’s How It Works in a Real Kitchen
Let’s say you’ve just fried up a batch of crispy, golden-brown chicken wings in peanut oil. The kitchen smells incredible, but you’re left with a pan full of hot oil. Instead of fumbling with a jar and risking a greasy spill, you can handle it cleanly in just a few minutes.
The process couldn't be simpler.
- Sprinkle and Stir: While the oil is still hot, just sprinkle the plant-based FryAway powder into the pan. Give it a quick stir to make sure it’s mixed in.
- Cool Down: Set the pan aside and let it cool down completely. As it cools, FryAway works its magic, turning the liquid oil into a solid, organic puck.
- Toss into household trash: Once it's hardened, the puck of oil scoops out easily with a spatula and goes straight into your household trash.
That’s it. No messy liquid, no spills on your countertops or floors, and zero chance of a plumbing nightmare.
By solidifying oil right at the source, you’re stopping grease before it ever becomes a problem. This one habit keeps your entire kitchen—cabinets, backsplash, and range hood included—cleaner from the get-go.
Enjoy Your Favorite Fried Foods More Often
Honestly, one of the best things about this cleanup method is that it removes the biggest headache of enjoying fried foods. Now you can whip up delicious French fries or tempura without dreading the aftermath. It just makes frying feel less like a major production.
Adopting this simple process means you'll spend less time scrubbing stubborn grease and more time actually enjoying your meals. It’s a proactive step that perfectly complements any cleaning routine, ensuring your kitchen cabinets stay looking fantastic with way less effort.
Protecting and Maintaining Your Cabinet Finish
Once you've deep-cleaned your cabinets, the real goal is to keep them looking that good for as long as possible. Long-term maintenance isn’t about more scrubbing; it’s about creating a protective shield that makes your next cleanup session a breeze. A little bit of consistent, gentle care goes a long way and is always better than letting grime build up before blasting it with harsh chemicals.
Think of it as protecting your investment. For solid wood cabinets, this means using a quality furniture polish or wax. It creates a barrier that helps repel dust, moisture, and minor splatters, all while giving the wood a beautiful, warm glow. A good polish actually nourishes the wood, keeping it from drying out and looking dull over time.

Polishing and Buffing Techniques
Here’s a pro tip for polishing wood: always spray the polish onto a soft microfiber cloth, not directly onto the cabinet surface. This simple trick prevents overspray, runs, and ensures you get a nice, even application. Wipe gently in the direction of the wood grain. Then, grab a second clean, dry cloth to buff the surface to a perfect, streak-free shine.
Painted and laminate surfaces need a different touch. You'll want to skip the polish and instead focus on buffing out any minor scuffs with a clean, dry microfiber cloth. If your cabinets are showing some serious wear and tear where a simple cleaning just won't cut it, you might want to look into options like kitchen cabinet refacing to give them a fresh new look and extend their life.
Don't Forget the Details
It's the little things that get overlooked, like the knobs and pulls on your cabinets. When cleaning the hardware, be really careful not to let any cleaner drip down the cabinet face, as it can cause streaks or even damage the finish.
- Spray the cleaner onto your cloth, not the hardware. This gives you total control.
- Clean around the base of the hardware. This is a favorite hangout spot for grime.
- Dry it thoroughly. This prevents water spots and protects the finish underneath.
The secret to a beautiful kitchen isn't one big cleaning marathon—it's consistent maintenance. A proactive approach prevents long-term damage and keeps everything looking its best.
A Smarter Way to Handle Grease
Preventing grease buildup in the first place makes all this maintenance so much easier. When you're frying up something delicious in vegetable oil, that airborne grease has to land somewhere, and it's usually your freshly cleaned cabinets. Using FryAway to solidify used cooking oil is a huge step in the right direction.
Just follow the simple three-step process:
- Sprinkle and Stir: Add the powder to your hot cooking oil and give it a mix.
- Cool Down: Let the pan cool completely, and the oil will turn into a solid puck.
- Toss into household trash: Scoop it out and throw it away. No mess, no clogged drains.
This one simple habit keeps so much grease out of the air and off your cabinets. For more great ideas on keeping things pristine, check out our guide to non-toxic kitchen cleaners.
Got Questions About Cabinet Cleaning? We’ve Got Answers.
Even with a solid plan, a few questions always come up right when you’re about to get started. Let’s tackle some of the most common ones I hear, so you can clean your cabinets with confidence.
One of the first things people ask is how often they really need to clean their cabinets. For daily maintenance, a quick wipe-down with a damp microfiber cloth is perfect for handling little splatters and fingerprints. A real deep clean to cut through grease buildup should happen every few months, though you might want to do it more often for those cabinets right next to the stove.
Can You Use Magic Erasers on Cabinets?
This is a big one, and the short answer is: be very careful. Magic erasers are amazing, but they’re essentially a super-fine abrasive, kind of like microscopic sandpaper. While they can be a lifesaver for getting stubborn scuffs off a tough laminate surface, they can just as easily dull a glossy finish or even strip the paint right off your cabinets.
If you’re tempted to try one, always test it on a small, hidden spot first—like the inside of a cabinet door. If you notice any change in the sheen or color, put the eraser down and stick with a soft cloth and a gentle cleaner.
How Do You Get That Sticky Residue Off?
Sticky gunk from old shelf liners or a forgotten syrup spill can be a real pain. Before you reach for a scraper (which can easily scratch the finish), try this gentler approach that actually works.
- Try a Warm Compress: Soak a cloth in very warm water, wring it out well, and just lay it over the sticky spot for a few minutes. The warmth and moisture can often soften the adhesive enough to wipe it away.
- Fight Stickiness with Oil: For the really stubborn stuff, dab a little cooking oil or mineral oil onto the residue. Let it sit for about 10-15 minutes to break down the adhesive, then gently wipe it away with a clean cloth.
- Give It a Final Clean: After the residue is gone, you'll want to remove any oily traces. Just wipe the area with your go-to mild dish soap and water solution.
And what about the metal bits? For stainless steel handles or nearby appliances that got splattered, using the right product is key to keeping them looking sleek. You can find some great tips for picking out a commercial stainless steel cleaner that won't leave streaks.
The big takeaway here is to always start with the gentlest method first. It's rare that you'll need an aggressive cleaner, and going too strong too soon often does more harm than good.
Of course, the best way to have clean cabinets is to prevent the mess in the first place. After you’ve fried up something delicious, like a batch of homemade onion rings in canola oil, don't let that used cooking oil sit around.
- Sprinkle and Stir FryAway powder into the still-hot oil.
- Cool Down completely until the oil turns into a solid.
- Toss into household trash for a clean, simple disposal.
Making this a habit means less grease splattering and settling on your cabinets in the first place, which makes your next deep clean that much easier.
Ready to make your kitchen cleanup simpler and more eco-friendly? Try FryAway today and see just how easy it is to get rid of used cooking oil without the mess. Shop now at FryAway.co and take the first step toward a cleaner kitchen.