


· By FryAway
How to Filter Frying Oil for Safe Reuse
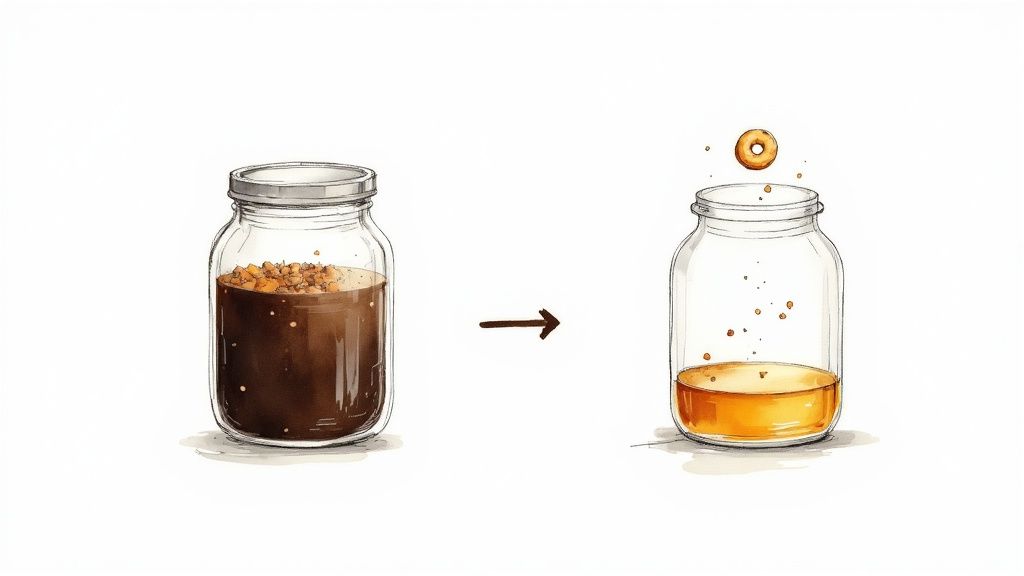
Knowing how to filter frying oil is one of those simple kitchen skills that makes a world of difference. It’s what separates good fried food from great fried food. The process is straightforward: let the oil cool down to a safe temperature, then strain it through a fine-mesh sieve, cheesecloth, or even a coffee filter to get rid of all those leftover food bits.
This little bit of effort extends the life of your oil, saves you money, and makes sure your next meal tastes exactly how it's supposed to.
Why You Should Start Filtering Your Frying Oil Today
Filtering your used cooking oil isn't just about being frugal—it's a core technique for anyone who wants consistently delicious results.
Think about it: every time you fry something, tiny pieces of batter, breading, and food break off and get left behind in the hot oil. If you just leave them there, they keep on cooking. Eventually, they burn and sink to the bottom as dark, sad sediment.
These burnt particles do more than just make your oil look murky. They release a bitter, acrid flavor that can completely ruin whatever you cook next. Filtering gets rid of this sediment, preserving the oil’s clean, neutral taste. That means your fresh batch of donuts won't have a lingering, savory memory of last night's fried fish.
Better Flavor, Better Health
Beyond just taste, filtering also slows down the natural breakdown of the oil. When oil gets heated over and over, undesirable compounds can start to form. By removing the food debris that speeds up this degradation, you’re left with a much higher-quality cooking medium.
This isn’t just some home cook’s trick; it’s a big deal in the commercial world, too. In fact, the commercial cooking oil filter market was valued at $1.5 billion and is expected to keep growing as more people focus on food quality and safety.
Proper oil management is also a huge win for the environment. When it’s finally time to get rid of old oil, knowing what to do is critical. Pouring it down the drain is a recipe for disaster, leading to serious plumbing clogs and environmental harm. If you want to dive deeper, check out our guide on the hidden environmental cost of used cooking oil.
Taking a moment to filter your oil delivers clear advantages. Here’s a quick look at why it’s worth the small effort.
Key Benefits of Filtering Frying Oil
| Benefit | Impact on Your Cooking | Long-Term Advantage |
|---|---|---|
| Purer Flavor | Prevents burnt particles from transferring unwanted tastes to new dishes. | Every meal tastes fresh and clean, just as it should. |
| Cost Savings | Extends the life of your cooking oil, allowing for multiple uses. | Reduces how often you need to buy expensive cooking oil. |
| Healthier Cooking | Slows the formation of potentially harmful compounds by removing debris. | Maintains a higher quality cooking medium for longer. |
Ultimately, a few extra minutes after frying pays off in better food, a healthier wallet, and a happier planet.
The Best Final Step for Oil Disposal
Eventually, even the most carefully filtered oil will reach the end of its life. When that day comes, the easiest and most eco-friendly way to handle it is with a product like FryAway. This plant-based powder gives you a simple, totally mess-free way to deal with used oil.
The process couldn't be simpler:
- 1) Sprinkle and Stir: Right after you finish cooking, while the oil is still hot, just sprinkle in the FryAway powder. Give it a good stir until it’s all dissolved.
- 2) Cool Down: Now, just let it be. The oil mixture will cool down and solidify completely. Depending on how much oil you have, this might take a few hours.
- 3) Toss into household trash: Once it’s a solid puck, you can easily scoop it out of your pan or fryer and toss it right into your household trash can.
This little trick eliminates the need for messy jars of sloshing liquid oil and guarantees your pipes stay clean and clog-free. It makes the entire frying experience—from cooking all the way through cleanup—so much more enjoyable.
The Right Tools for Perfectly Clean Frying Oil
You don’t need a fancy professional kitchen to learn how to filter frying oil like a pro. Honestly, the right tools make all the difference, turning what could be a messy headache into a quick and simple routine. And the best part? You probably already have most of what you need.
The trick is to have your filtering station ready to go before you start pouring. A little prep work is the secret to a spill-free, efficient process.
Everyday Items That Get the Job Done
For most of us cooking at home, a few common kitchen gadgets are more than up to the task. It’s really about picking the right tool for the kind of gunk you’re trying to filter out.
- Fine-Mesh Sieve: This is your go-to first line of defense. A good, sturdy sieve is perfect for catching those bigger bits of batter and crispy pieces left over from frying things like tempura shrimp or onion rings. It won’t grab the super-fine particles, but it’s a fantastic starting point.
- Cheesecloth: When you layer two or three pieces of cheesecloth inside your sieve, it becomes a filtering powerhouse. It’s amazing for trapping the much smaller sediment that a sieve alone would miss. Think of it as your secret weapon after frying breaded items like chicken cutlets.
- Coffee Filters: Want the absolute cleanest, clearest oil? A standard paper coffee filter is surprisingly effective. The only catch is that it’s slow. The oil drips through at a snail's pace, so this method is best for smaller batches or when you need pristine results after cooking something delicate, like vegetable fritters.
Sometimes, the best approach is to combine them. A sieve lined with a few layers of cheesecloth strikes a great balance between speed and filtering power.
Pro Tip: Before you pour the oil through any filter, use a slotted spoon or skimmer to scoop out the biggest floating bits. This one simple step keeps your filter from clogging up and makes the whole process go much faster.
Gear for Storage and Safety
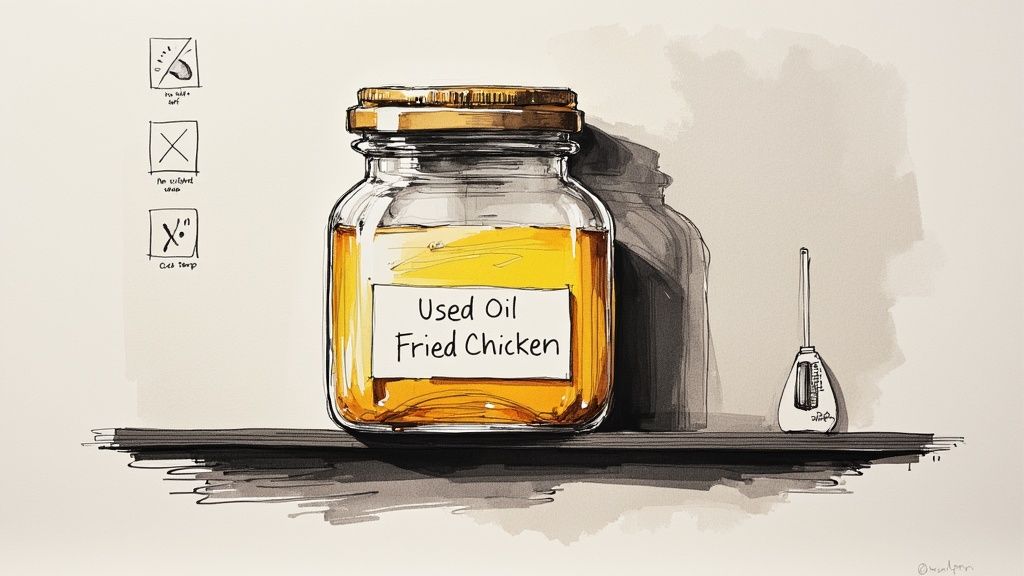
Once your oil is sparkling clean, where you keep it matters just as much as how you filtered it. And since you’re dealing with warm oil, a little safety-consciousness goes a long way.
You need a container that can take the heat while protecting the oil from its two biggest enemies: air and light. Never, ever pour warm oil into a plastic container—it can melt or leach chemicals into your oil. Instead, reach for heat-proof glass jars with tight lids or a stainless steel pot. These materials won’t react with the oil and will help keep it fresh.
And please, don't forget about yourself. A good pair of heat-resistant gloves gives you a much more secure grip on a warm, heavy pot of oil and protects your hands from any accidental splashes or burns.
When You Might Want an Upgrade
If frying is a regular part of your cooking routine, you might get tired of the DIY methods and want to invest in something a bit more specialized.
A cone filter with a stand is what you’ll see in many restaurant kitchens, and for good reason. The cone shape gives it a massive surface area, which lets the oil filter through quickly while still trapping all those tiny particles. It’s a durable, reusable option that makes the whole process feel less like a chore and more like a professional technique.
Ultimately, what you use comes down to how often you fry and what you’re cooking. Start with what you’ve got in your kitchen. You’ll quickly figure out the perfect system for keeping your frying oil clean and ready for its next delicious job.
A Practical Guide to Filtering Your Frying Oil
Once you've gathered your tools, you’re ready for the real deal: learning how to filter frying oil. This quick routine is the secret to getting more life out of your oil and making sure every single fried dish comes out tasting clean and delicious. After you do it a couple of times, it’ll become a fast, no-mess part of your kitchen cleanup.
The whole process starts with safety, and that means paying attention to the temperature. You have to let the oil cool down quite a bit before you even think about moving it. The sweet spot for filtering is somewhere between 150-175°F (65-80°C).
At this temperature, the oil is cool enough that a small splash won't give you a serious burn, but it’s still warm enough to flow smoothly through your filter. If you let it get completely cold, it turns thick and sludgy, which makes filtering a slow, frustrating mess.
Preparing Your Filtering Station
Before you even touch that pot of used oil, get your station set up. The first step is to place a clean, heat-proof storage container (a big glass jar works great) in your sink or on a baking sheet. This will catch any drips and save you from a greasy cleanup later.
Next, set a fine-mesh sieve right over the container's opening.
If you want an even deeper clean, line that sieve with a few layers of cheesecloth or a single coffee filter. This double-filtering method is fantastic for trapping the tiniest bits of sediment, leaving you with beautifully clear oil. It's a small extra step, but it’s totally worth it after frying something with a heavy breading, like panko-crusted pork chops.
The Filtering Process Made Simple
With your station ready and the oil cooled to the right temperature, the rest is a breeze. First, grab a skimmer or a slotted spoon and scoop out any big, floating pieces of food or batter. This simple step keeps your filter from clogging up immediately.
Now, carefully and slowly pour the warm oil through your sieve and cheesecloth setup. Don’t rush this. A steady pour prevents splashes and gives the filter time to do its job without overflowing. You'll immediately see the oil coming out the other side looking much lighter and cleaner.
A Quick Tip: I always try to leave that last little bit of oil at the bottom of the pot. That’s where the heaviest, gunk-filled sediment settles. Sacrificing a tablespoon or two of oil is a small price to pay to keep the rest of your filtered batch as pure as possible.
This visual guide shows some of the common tools people use, from simple DIY setups to more professional gear.
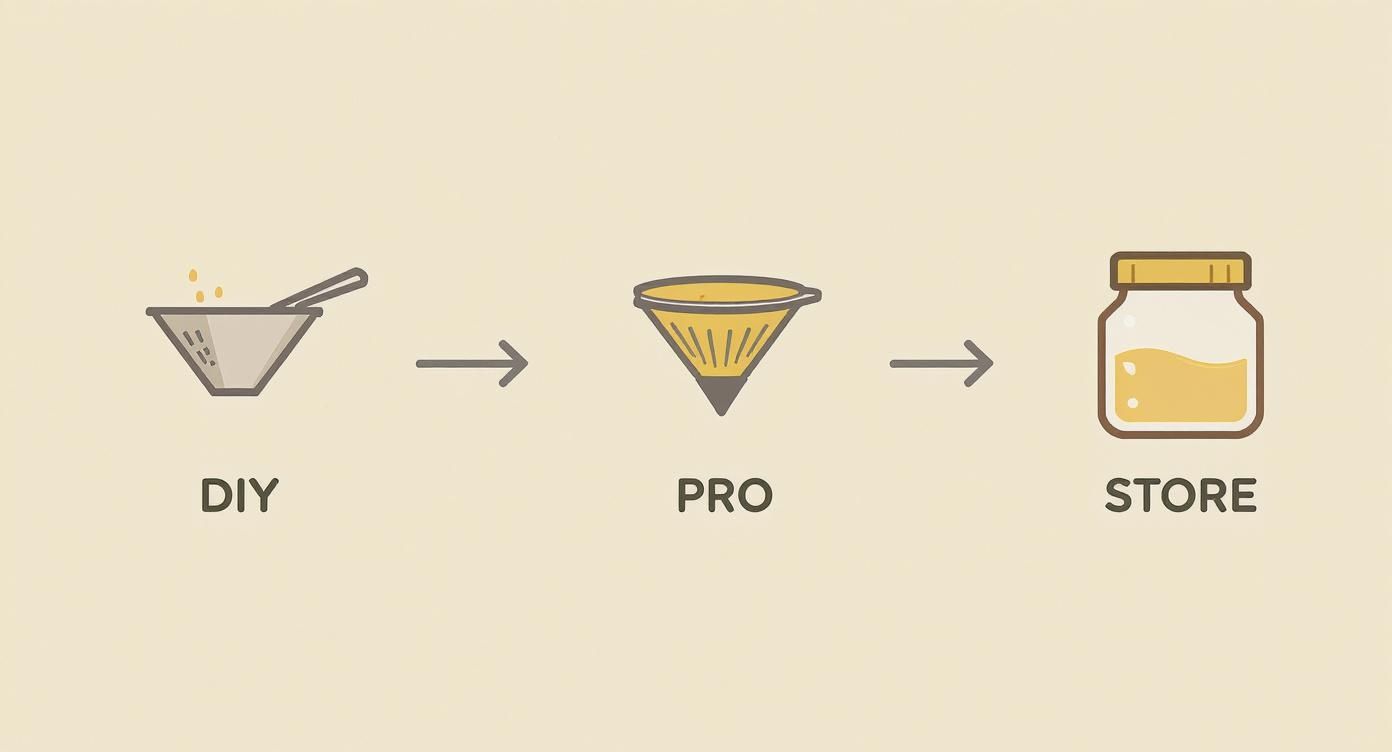
As the infographic shows, you can get great results with basic kitchen items, but dedicated tools can make the job even easier if you fry often.
This focus on high-quality filtration isn't just for home cooks; it’s a huge deal in the commercial food industry. The global market for continuous oil filtration systems used on industrial fryers was valued at about $1.25 billion and is expected to nearly double. That growth comes from restaurants and food manufacturers who know that clean oil is non-negotiable for efficiency and food safety. You can discover more insights about the continuous oil filtration market and what's driving its growth.
What to Do When the Oil Can't Be Saved
No amount of filtering can make oil last forever. Once it gets too dark, smells funky, or starts smoking at lower temperatures, it's time to say goodbye. And pouring it down the drain is never, ever an option—it leads to serious plumbing clogs.
This is where a product like FryAway comes in to save the day with an easy, mess-free disposal method. It's a 100% plant-based powder that magically solidifies used cooking oil, making cleanup unbelievably simple.
Here’s how to use FryAway to get the best results:
- 1) Sprinkle and Stir: Right after you're done frying and while the oil is still hot, just sprinkle the FryAway powder into the pan. Give it a gentle stir until it all dissolves.
- 2) Cool Down: Now, just walk away and let the pan cool down. As the oil cools, it will transform into a solid, waxy puck. This can take a few hours, depending on how much oil you used.
- 3) Toss into household trash: Once it's completely solid, you can easily scoop the whole thing out with a spatula and toss it right into your household trash bin.
FryAway gets rid of those gross, messy jars of waste oil sitting under your sink and keeps your pipes safe. It’s the smartest way to handle the end of your oil’s life. Imagine making a batch of perfect beer-battered fish and chips and then having the cleanup done in minutes with zero liquid waste. That’s the kind of convenience we’re talking about.
Properly Storing and Reusing Filtered Oil
Learning how to filter frying oil is only half the battle. If you want to get the most out of that liquid gold, proper storage is what truly preserves its quality. Once your oil is beautifully clear, you need to protect it from its three biggest enemies: light, air, and heat. Any one of these will speed up oxidation, turning your oil rancid and unusable much faster than you'd like.
The best home for your filtered oil is a cool, dark place. Think of a pantry or a cupboard that’s far away from the stove or any sunny windows. Heat and light are the fastest ways to degrade oil, so keeping it in the right environment is a critical step in extending its life.
Choosing the Right Container and Labeling System
Your storage container is just as important as where you keep it. An airtight container is non-negotiable, since oxygen is a primary cause of rancidity. I find that a simple glass jar with a tight-fitting screw-top lid works perfectly—it's non-reactive and creates a great seal.
To avoid any culinary mix-ups (nobody wants donuts fried in last week's fish oil), get into the habit of labeling. A piece of masking tape and a marker are all you need. On it, jot down two key pieces of information:
- The date you last used the oil.
- What you fried in it (e.g., "French Fries" or "Chicken Wings").
This simple system keeps you organized and helps you track the oil's age. For a deeper dive, check out our guide on how to properly store cooking oil to maximize its freshness.
Knowing When to Discard Old Oil
So, how many times can you actually reuse frying oil? There isn't a single magic number. It really depends on what you're frying and the type of oil you're using. Oil that cooked breaded chicken, for example, will break down much faster than oil used for potatoes. But no matter what, there are universal warning signs that tell you it's time to let it go.
Pay close attention to your senses—they are your best guide. If the oil looks, smells, or acts differently than it did when it was fresh, its quality has likely degraded, and it's time to dispose of it.
If you spot any of the signs below, your oil is definitely past its prime. It's always better to start with a fresh batch than to risk ruining a perfectly good meal with subpar oil.
Signs Your Frying Oil Needs to Be Discarded
This quick reference table will help you spot the tell-tale signs that your oil has gone bad.
| Indicator | What to Look For | Why It Matters |
|---|---|---|
| Dark Color | The oil has become murky, dark brown, or cloudy. | Darkening signifies that the oil has broken down and is full of microscopic sediment that will burn easily. |
| Foul Smell | It has a rancid, fishy, or "off" aroma, even when cold. | The unpleasant smell is a clear sign of oxidation and will transfer directly to your food, ruining its flavor. |
| Smoking Point | The oil starts smoking at a much lower temperature than usual. | A lowered smoke point means the oil is unstable and will burn before it gets hot enough to cook food properly. |
| Foaming | You see excessive foam or large bubbles on the surface while heating. | This indicates the oil's molecular structure has changed, leading to greasy, poorly cooked food. |
Trust your gut—if something seems off, it probably is. Tossing old oil is a small price to pay for delicious, perfectly fried food.
Recipe Feature: Crispy Fried Calamari
Now that you have that perfectly filtered oil ready to go, let's put it to delicious use. This Crispy Fried Calamari recipe is the perfect way to see what your clean, high-quality oil can do. Using a neutral oil with a high smoke point, like peanut or canola, is the secret to achieving that light, non-greasy finish you find in the best restaurants.
Ingredients:
- 1 lb calamari, tubes and tentacles, cleaned
- 1 cup all-purpose flour
- 1/2 cup cornstarch
- 1 teaspoon paprika
- 1 teaspoon salt
- 1/2 teaspoon black pepper
- Peanut or canola oil, for frying
- Lemon wedges, for serving
Instructions:
- Pat the calamari completely dry with paper towels. This is key for maximum crispiness!
- In a bowl, whisk together the flour, cornstarch, paprika, salt, and pepper.
- Heat about 3 inches of your clean, filtered peanut or canola oil in a heavy-bottomed pot to 375°F (190°C).
- Working in small batches, toss the calamari in the flour mixture until lightly coated, shaking off any excess.
- Carefully add the calamari to the hot oil and fry for 2-3 minutes, just until golden brown and crispy.
- Remove with a slotted spoon and let it drain on a wire rack. Serve immediately with fresh lemon wedges on the side.
Even after you've filtered and reused your cooking oil a few times, it will eventually hit a wall. Once it starts looking dark, getting smoky, or giving off a funky smell, its cooking days are over. But tossing it out the wrong way can create a whole new set of problems.
Pouring old cooking oil down the kitchen sink is one of the absolute worst things you can do. As that grease travels down your pipes, it cools off and solidifies, creating gnarly clogs that lead to gross backups and some seriously expensive plumbing bills. On a bigger scale, this is what causes those infamous "fatbergs" that plague city sewer systems.
This is why knowing how to properly dispose of used cooking oil is just as crucial as knowing how to cook with it. Thankfully, there’s a modern fix that makes the whole cleanup process unbelievably simple.
Introducing FryAway: The Mess-Free Solution
Forget juggling hot grease in old coffee cans or leaky plastic bags. FryAway is a 100% plant-based, non-toxic powder that makes oil disposal practically effortless. It magically turns hot liquid oil into a solid, organic puck you can scoop out and toss right into your household trash.
No spills, no clogged pipes, and no environmental guilt. It takes the messiest part of frying and turns it into a clean, hassle-free task.
The 3-Step FryAway Cleanup
Using FryAway is about as easy as it gets. Just follow these quick steps right after you've finished cooking.
- 1) Sprinkle and Stir: While your oil is still hot, just sprinkle the FryAway powder into the pan or fryer. Give it a quick stir with a spatula until it's completely dissolved.
- 2) Cool Down: Now, just set the pan aside and let it do its thing. As the oil cools down, FryAway works its magic, solidifying the liquid into a waxy puck. This takes a few hours, so you can just walk away and come back to it later.
- 3) Toss into household trash: Once the oil is completely solid, you can easily scoop the whole thing out with a spatula. It comes out clean in one piece, leaving your pan almost spotless. From there, you just toss it right into your household garbage bin. No drips, no mess.
Why It Works So Well: FryAway solidifies the entire volume of oil, not just the surface. This creates a firm, easy-to-handle solid that won't turn back into a liquid in your trash can, making it the cleanest and most reliable way to handle oil disposal at home.
While you're thinking about your drains, it's a good time to remember the other items to never put down your garbage disposal. FryAway keeps oil out of your plumbing and directs it safely to the trash can where it belongs.
Recipe Feature: Perfect Southern Fried Chicken
Now that you know cleanup is a breeze, there's no excuse to hold back on the classics. This Southern Fried Chicken recipe gives you an impossibly crispy crust and juicy, tender meat. It's the perfect reason to break out that frying pan.
Ingredients:
- 1 whole chicken (about 3-4 lbs), cut into 8 pieces
- 2 cups buttermilk
- 2 cups all-purpose flour
- 2 tablespoons salt
- 1 tablespoon black pepper
- 1 tablespoon paprika
- 2 teaspoons garlic powder
- Peanut or vegetable oil, for frying
Instructions:
- Put the chicken pieces in a large bowl and pour the buttermilk over them. Let it marinate for at least 4 hours (or even better, overnight) in the fridge.
- In a separate bowl, whisk together the flour, salt, pepper, paprika, and garlic powder.
- Heat about 2-3 inches of peanut or vegetable oil in a large, heavy-bottomed skillet or Dutch oven until it reaches 350°F (175°C).
- Take a few pieces of chicken out of the buttermilk, letting the excess drip off. Dredge them completely in the flour mixture, making sure every nook and cranny is coated.
- Carefully place the chicken in the hot oil, skin-side down. You'll need to fry in batches—cook for about 6-8 minutes per side until it's a beautiful golden brown and cooked all the way through.
- Move the finished chicken to a wire rack to drain. Let the oil come back up to 350°F before you start the next batch. After dinner, just use FryAway to make cleanup a snap.
Your Top Questions About Filtering Frying Oil
Once you've got the hang of how to filter frying oil, a few more questions always seem to come up. Nailing down the answers is what separates a decent frying session from a truly great one. I've put together this FAQ to tackle those nagging thoughts and help you manage your oil like you've been doing it for years.
The goal here is to take the guesswork out of the process. Let's make deep-frying at home easier, cheaper, and way more delicious.
Which Cooking Oils Are Best for Reusing?
Not all oils can handle a second (or third) act. For filtering and reusing, you need an oil with a high smoke point and good stability. In simple terms, it won’t break down, smoke up your kitchen, or start tasting funky after one use.
Here are a few of my go-to choices for the fryer:
- Peanut Oil: This is the classic for a reason. It has a high smoke point (around 450°F) and a neutral flavor that plays well with just about anything.
- Canola Oil: Another solid contender with a neutral taste and a high smoke point (around 400°F). It’s also easy on the wallet and you can find it anywhere.
- Grapeseed Oil: I love this one for its clean taste and high smoke point (about 420°F). It’s a fantastic all-around frying oil.
On the flip side, stay away from oils with low smoke points, like extra virgin olive oil or unrefined sesame oil. They just can't take the heat and aren't meant for deep frying anyway.
Can I Mix Different Types of Used Oil?
We’ve all been there—you've got half a container of used canola oil and some leftover peanut oil. Can you just mix them? The short answer is no, it's a bad idea.
When you combine oils with different smoke points, you create a real problem. The oil with the lower smoke point will start to break down and burn first, which ruins the entire batch. For the best, most predictable results, always keep your filtered oils separate and make sure you label them clearly.
How Many Times Can I Safely Reuse Oil?
This is the million-dollar question, but there's no magic number. How long your oil lasts depends entirely on what you're frying in it. Heavily battered foods like fried chicken or fish will break down oil much faster than something clean like French fries.
Instead of counting, learn to trust your eyes and nose. It’s time to toss your oil when you spot any of these signs:
- It's dark and murky, even after a good filtering.
- It has a rancid or "off" smell before you even heat it up.
- It starts smoking at temperatures far below its normal smoke point.
- You see a lot of foam or weird bubbles on the surface when you add food.
If you notice any of these red flags, the oil is done. Trying to squeeze one more use out of it will only leave you with greasy, bad-tasting food. It's just not worth it.
What’s the Best Final Disposal Method?
When your oil has finally reached the end of its life, getting rid of it responsibly is a must—for your plumbing and for the planet. Pouring it down the drain is never, ever the answer.
The absolute easiest and cleanest solution I've found is FryAway. It’s a plant-based powder that turns liquid oil into a solid, making disposal a breeze.
The process couldn't be simpler:
- Sprinkle and Stir: While the oil is still hot, sprinkle in the FryAway powder. Give it a good stir until it’s all dissolved.
- Cool Down: Now, just let the pan cool down completely. As it cools, the oil will transform into a solid, organic puck.
- Toss into household trash: Once it’s solid, you can easily scoop the hardened oil out and toss it right in your regular trash can.
This little trick completely eliminates the risk of messy spills and keeps your pipes from becoming a greasy nightmare. It’s the perfect, no-fuss end to any frying day, whether you've been making crispy tempura vegetables or a batch of classic apple cider donuts.
Professionals know that clean oil is key. The hot fryer oil filter market is a huge part of the commercial food industry, valued at around $1.2 billion with over 15 million units sold worldwide each year. This is all driven by a need to extend oil life and improve safety—principles that work just as well in a home kitchen. You can discover more about the hot fryer oil filter market and see how the pros manage their oil.
With these tips in your back pocket, you can fry with total confidence, knowing you’re making incredible food while managing your resources smartly from start to finish.
Ready to make frying cleanup effortless? With FryAway, you can say goodbye to messy jars and clogged drains for good. Our 100% plant-based powder solidifies used cooking oil so you can toss it right in the trash. Experience the magic of mess-free frying and shop FryAway today!