


· By FryAway
Baking Soda and Dish Soap Your Guide to a Grease-Free Kitchen
That simple mix of baking soda and dish soap isn't just an old wives' tale—it's one of the most reliable, science-backed cleaning hacks for any tough kitchen mess. This powerhouse paste cuts right through caked-on grease and scorched food without reaching for harsh, abrasive chemicals.
Why This Simple Cleaning Duo Actually Works
Let's skip the marketing hype you see in the cleaning aisle. The real magic of baking soda and dish soap lies in some straightforward chemistry. Your everyday dish soap is a surfactant, which means its molecules are designed to grab onto both water and oil, lifting grease away from surfaces. It does a decent job on its own.
But when you add baking soda (a mild alkali called sodium bicarbonate), you give that soap a serious upgrade. The alkalinity boosts the soap’s grease-fighting power, while the baking soda itself acts as a gentle scouring agent. It’s just abrasive enough to physically break down burnt-on food without scratching up your favorite cookware. The result is a formidable paste that handles messes soap alone just can't touch.
The Science of Grease Busting
Think of it as a one-two punch. The dish soap surrounds and lifts the grease, while the baking soda provides the muscle to scrub it away for good. This makes the duo a lifesaver after frying. Whether you’ve just finished a batch of crispy buttermilk fried chicken or some beer-battered fish, that greasy, sticky pan doesn't stand a chance.
But this method is about more than just an easier cleanup; it’s about building smarter kitchen habits. For home cooks everywhere, especially in the U.S. where frying is a staple, this chemical-free approach is a game-changer. It helps you tackle the pan without pouring all that residual grease down the drain—a massive environmental hazard.
In fact, an estimated 1.4 million tons of used cooking oil are improperly dumped into sewers each year. This contributes to colossal pipe blockages known as 'fatbergs,' like the notorious 130-ton behemoth discovered under London in 2017.
The real power comes from the synergy between the two ingredients. The soap emulsifies the grease, and the baking soda’s mild abrasive quality provides the scrubbing power to lift it off surfaces completely.
To give you a clearer picture, here's a quick rundown of how to use this combination for common kitchen headaches.
Baking Soda and Dish Soap Uses at a Glance
| Kitchen Problem | Ideal Mixture | Primary Use | Key Benefit |
|---|---|---|---|
| Greasy Pans | 1:1 paste (baking soda to soap) | Post-frying cleanup | Cuts through oil without scratching non-stick surfaces. |
| Burnt-on Food | Thicker paste (more baking soda) | Soaking and scrubbing | Lifts stubborn, caked-on residue effectively. |
| Oily Fabric Stains | Thin paste (more soap) | Pre-treating laundry | Gently lifts oil from fibers before washing. |
| Minor Drain Clog | Baking soda first, then soap & hot water | Loosening buildup | Breaks down minor grease clogs safely. |
This simple table shows just how versatile this humble mix can be, turning two basic pantry items into a multi-purpose cleaning solution.
Smart and Safe Oil Cleanup
Of course, cleaning the pan is only half the battle. What do you do with the cup or two of used cooking oil left behind? We know pouring it down the sink is a definite no-go.
For a truly safe and mess-free disposal, we always recommend using a product specifically designed for the job, like FryAway. This plant-based powder instantly solidifies used cooking oil, so you can just toss it right in your household trash.
The whole process couldn't be simpler:
- Sprinkle and Stir the FryAway powder into the hot cooking oil right in the pan.
- Cool Down and let the mixture solidify into a solid puck.
- Toss the hardened oil directly into your household trash bin.
By pairing the baking soda and dish soap cleaning trick with a smart disposal solution like FryAway, you create a complete, eco-friendly cleanup cycle. If you're looking to green up your entire kitchen routine, you can learn more about incorporating all-natural cleaning methods into your home.
How to Clean Greasy Pans and Cookware
Every pot and pan in your kitchen is different. A scorched stainless steel skillet needs a much tougher approach than a delicate non-stick pan. Thankfully, the classic baking soda and dish soap combo is versatile enough to handle just about anything you throw at it—as long as you know the right technique.
Forget about endless, exhausting scrubbing. The whole point is to let the mixture do the heavy lifting for you. We’ll walk through the best methods for your go-to pans, so you can get them sparkling clean without accidentally causing any damage.
This simple flowchart can help you visualize when this dynamic duo is your best bet for cleaning.
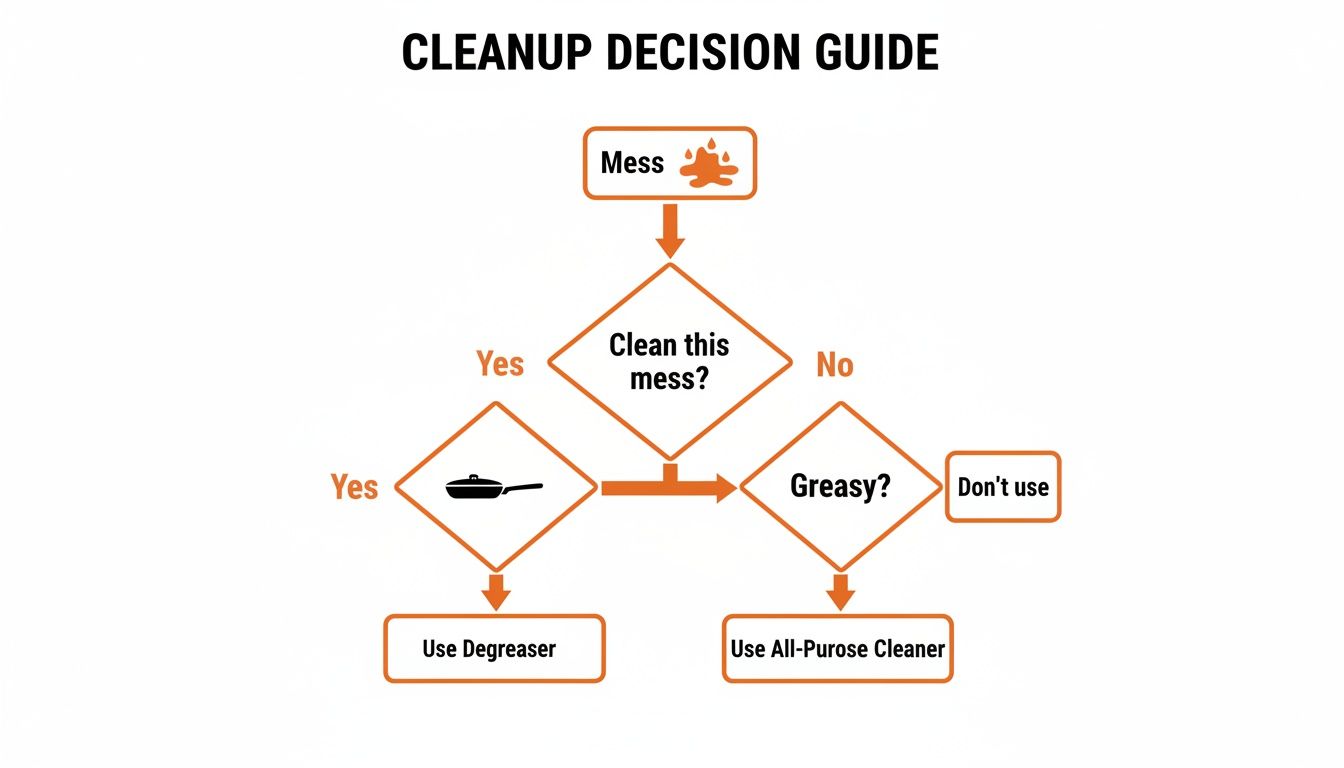
As you can see, this combination is specifically built to cut through greasy, oily messes, which makes it the perfect solution for post-frying cleanup.
For Stainless Steel and Cast Iron
These workhorse pans are tough, so they can handle a more intensive cleaning method. After you've fried up some crispy bacon or seared a few steaks in cooking oil, you’re usually left with a stubborn, burnt-on layer of grease. This is where the ‘simmering solution’ really shines.
First, scrape out any loose bits of food. Next, sprinkle a generous layer of baking soda across the bottom of the pan, add a few drops of dish soap, and pour in about an inch of hot water.
Put the pan back on the stove and bring it all to a gentle simmer for about 10-15 minutes. This process is fantastic for lifting the toughest, most caked-on grime right off the surface. Once it's done simmering, let the pan cool down a bit before giving it a gentle scrub with a non-abrasive sponge. That burnt-on residue should wipe away with almost no effort.
For Non-Stick and Ceramic Surfaces
These surfaces need a much gentler touch to protect their delicate coatings. Aggressive scrubbing or simmering can easily cause permanent damage. For these, you’ll want to use the ‘paste and wait’ method instead.
Make a thick paste using equal parts baking soda and dish soap. After scraping out any food remnants from your cooled pan, spread this paste all over the greasy areas. Let it sit for at least 30 minutes—or even a couple of hours if you're dealing with a really tough job.
The paste will slowly break down the grease without needing any heat or hard scrubbing. Once it's had time to work its magic, just wipe the paste away with a soft sponge and rinse the pan thoroughly.
The real secret to cleaning different types of cookware is patience. Giving the baking soda and dish soap mixture time to work means you'll use far less elbow grease and protect your pans in the long run.
The Power of Baking Soda
The cleaning strength of baking soda isn't just an old kitchen hack; it has a proven history of tackling messes that seem impossible. During the 1940s Manhattan Project, a 2% baking soda solution was used to successfully wash stubborn uranium oxides off cotton when other powerful detergents failed. It's a testament to its incredible stain-lifting power. You can read more about the history of powerful cleaning agents and their surprising uses.
No matter what you've cooked, from deep-fried chicken to pan-seared fish, there's always the question of what to do with the leftover cooking oil. Before you even think about scrubbing the pan, your first step should always be safe oil disposal.
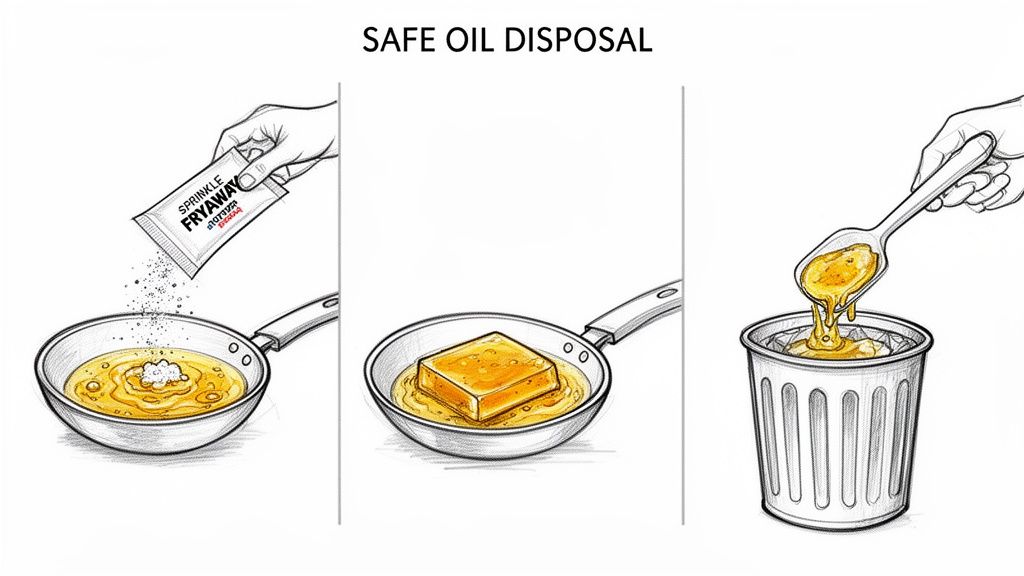
We always recommend using FryAway. Just follow the simple three-step process for best results:
- Sprinkle and Stir the FryAway powder into the hot cooking oil.
- Cool Down and let the oil solidify completely.
- Toss the solid puck of oil directly into your household trash.
This mess-free step keeps your pipes clear and makes the final pan cleanup that much easier.
Safely Disposing of Used Cooking Oil
So, you’ve just fried up a perfect batch of crispy, beer-battered fish or golden-brown french fries. The kitchen smells amazing, but the job isn’t quite done. You're left staring at a pan full of used cooking oil, and what you do next is critical.
Pouring hot grease or oil down the sink is one of the absolute worst things you can do for your plumbing. It might look like a harmless liquid now, but once it cools, it solidifies and clings to the inside of your pipes like glue.
Over time, this greasy buildup traps other gunk and debris, creating stubborn blockages that are a nightmare (and expensive) to fix. These clogs lead to slow drains, foul odors, and can even cause serious plumbing emergencies. And it's not just your home—this grease contributes to massive "fatbergs" in city sewer systems, causing huge environmental problems. Responsible disposal isn't just a good idea; it's essential.
The Smartest and Cleanest Solution
Forget trying to save oily messes in old jars or containers that just end up leaking everywhere. The smartest, cleanest approach is to solidify the oil before it even has a chance to leave the pan.
This is where FryAway comes in. It’s a 100% plant-based, non-toxic powder that works like magic, transforming hot liquid cooking oil into a solid, organic block.
The whole process eliminates the mess and makes disposal unbelievably simple and safe. You can completely sidestep the risk of spills, leaky containers, and clogged pipes, turning your post-frying cleanup into a quick, effortless task.
FryAway’s Simple Three-Step Process
Using FryAway couldn't be easier. It takes just a few moments right after you finish cooking, offering a clean, straightforward method that protects both your plumbing and the environment. For best results, follow this process:
- Sprinkle and Stir: While the oil is still hot in your pan, just sprinkle in the FryAway powder. Give it a quick stir to make sure it mixes in completely.
- Cool Down: Now for the easy part: walk away. Let the pan cool down on its own. As it cools, the FryAway powder gets to work, turning that liquid oil into a solid, almost gel-like substance.
- Toss into Household Trash: Once the oil has solidified, you can easily scoop the entire block out with a spatula or spoon. From there, it goes straight into your household trash bin.
This method completely removes the mess from the equation. There are no sloppy jars to store, no risk of spills on your countertops or floors, and absolutely zero chance of it ending up in your drain.
After you've tossed the solidified oil, that last bit of greasy residue in the pan is much easier to handle. Now’s the perfect time to use your baking soda and dish soap paste to scrub away that final film, leaving your cookware sparkling clean.
For a deeper dive, you can explore our complete guide on how to properly dispose of used cooking oil.
Tackling Fabric Stains and Slow Drains
The cleaning magic of baking soda and dish soap doesn't just stop at cookware. This powerhouse duo can tackle some of the most annoying household headaches, from saving your favorite shirt to keeping your kitchen sink from backing up.
It's a simple, effective solution you probably already have on hand.
We've all been there—a splatter of cooking oil from frying or a drip of salad dressing that seems destined to ruin our clothes. The key is to act fast. A quick pre-treatment paste can lift that grease right out before it has a chance to set in.
How to Lift Fresh Oil Stains from Fabric
For this job, you'll want a slightly thinner paste than you'd use on a scorched pan. Just mix a small amount of baking soda with a few drops of dish soap until it’s smooth and easy to spread.
Gently dab the paste right onto the oil stain, making sure it's completely covered. Try not to rub it in too hard, as that can push the grease deeper into the fabric. Let it sit for at least 30-60 minutes. The baking soda will absorb the oil while the soap gets to work breaking it down.
Once the paste has done its job, you can gently scrape it off and toss the garment in the wash as usual. For really stubborn spots, our guide on how to clean up grease spills has a few more tricks up its sleeve.
Maintaining a Clear Kitchen Drain
The same properties that cut through grease on your pans also work wonders as a preventative measure for your kitchen drain. A little bit of grease from daily dishwashing can build up over time, leading to slow drains and, eventually, a nasty clog.
A monthly maintenance treatment is a great way to keep your pipes flowing freely. Just remember, this is for maintenance, not for a major blockage.
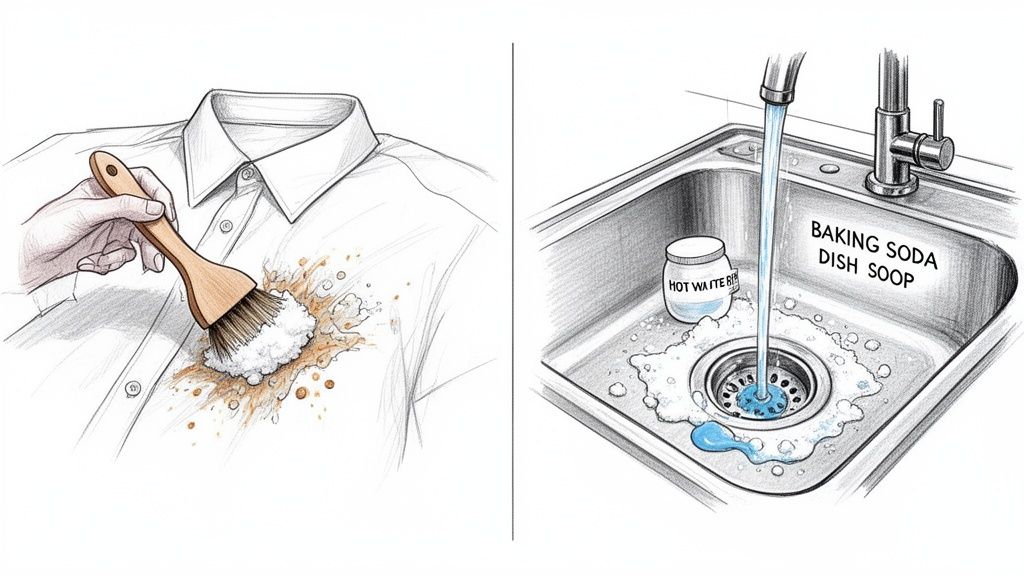
Here's the routine I use about once a month:
- First, pour about a half-cup of baking soda straight down the drain.
- Follow that with a good squirt of dish soap.
- Finally, carefully pour a kettle of very hot (but not boiling) water down the drain to flush everything through.
This simple combo helps dissolve the gunk that lines your pipes, stopping a serious clog before it starts.
Think of this drain treatment as preventative care for your plumbing. A few minutes each month can save you from the headache and expense of a serious blockage down the road.
Of course, the best defense is a good offense. Keeping grease out of your drain in the first place is the ultimate goal. After frying up delicious treats like crispy onion rings or tempura vegetables, always dispose of your used cooking oil the right way.
We recommend using FryAway for a clean, simple solution. For best results, just follow these three easy steps:
- Sprinkle and Stir FryAway powder into the hot cooking oil.
- Cool Down and wait for the oil to solidify.
- Toss the solid puck of oil right into the household trash.
And if you're dealing with tough spots on your couch or carpet, there are plenty of simple, effective homemade carpet cleaner solutions that can help you tackle those stains, too.
Common Cleaning Mistakes to Avoid
The combination of baking soda and dish soap is a fantastic cleaning workhorse, but like any good tool, using it the wrong way can cause more trouble than it solves. Knowing what not to do is just as important as knowing the right techniques.
Let's be honest, one of the biggest mistakes is assuming this duo is a one-size-fits-all solution. Its gentle abrasiveness and alkaline nature can actually be destructive on certain materials.
Surfaces to Stay Away From
Some materials just don't play well with the alkalinity or the slightly gritty texture of baking soda. You should always steer clear of using this mixture on:
- Unsealed Wood: Water and abrasion are the enemies of unfinished wood. This combo can easily damage the grain, strip away natural oils, and lead to ugly discoloration or even warping.
- Marble and Granite: These stones might seem tough, but they're surprisingly soft. Baking soda is too abrasive and will leave behind microscopic scratches, slowly dulling that beautiful, glossy surface over time.
- Aluminum Cookware: An alkaline cleaner like baking soda can cause aluminum to oxidize. The result? A pitted, dark, and discolored finish on your pots and pans.
Another common pitfall is going too heavy on the baking soda. A thick, clumpy paste might feel powerful, but it often leaves behind a gritty, white residue that’s a pain to rinse off. You end up trading one mess for another. Always start with a balanced paste and only add more baking soda if you really need the extra scrubbing power.
Don't Overestimate Its Power for Drains
It's really important to have realistic expectations for your plumbing. A baking soda and dish soap flush is great for minor drain maintenance—it can help dissolve small, fresh grease buildups before they become a real problem.
But it is not a miracle cure for a severely blocked pipe. If your sink is completely clogged and water isn't going anywhere, this gentle solution simply won't have the muscle to break through a major obstruction. In those cases, you're better off calling a professional plumber to avoid making the clog worse.
The key takeaway here is to treat this mixture as a targeted tool, not a universal solvent. Understanding where it works—and where it doesn't—is the secret to harnessing its cleaning potential without causing accidental damage.
Of course, the best way to avoid cleaning mistakes is with a little prevention. For home cooks, using this eco-friendly combo for cleanup aligns perfectly with other smart solutions like FryAway, which solidifies used cooking oil for easy trash disposal. Proactively managing grease can reduce pipe clogs by up to 80% in urban apartments. Smart habits make for less work later.
If you're looking to streamline your kitchen and make cleanup easier across the board, these kitchen organization tips are a great place to start.
And the biggest mistake of all? Pouring leftover frying oil straight down the drain. After you've fried up some crispy chicken tenders or perfectly golden doughnuts, you need a safe disposal method. We always recommend FryAway for a mess-free, pipe-safe cleanup.
It’s incredibly simple. For best results, follow this 3-step process:
- Sprinkle and Stir: Just mix the powder into your hot cooking oil right in the pan.
- Cool Down: Let it cool completely until the oil turns into a solid block.
- Toss into Household Trash: Scoop the solid mass out and throw it away with your regular garbage.
Your Cleaning Questions Answered
Even with the best instructions, you might still run into a few specific questions when you put this powerhouse cleaning duo to work. It's a simple combo, but knowing the little details can make all the difference. We’ve pulled together the most common questions we hear to give you clear, straight-up answers.
Believe it or not, the history behind these humble pantry staples is surprisingly interesting. Soap making as a major industry actually owes a lot to a chemical cousin of baking soda.
Way back in 1791, a French chemist named Nicholas Leblanc patented a revolutionary process for making soda ash from plain old salt. This was a massive game-changer for soap production. Soda ash, mixed with fats, became the key ingredient for making soap on a huge scale, and by 1850, it was one of America's fastest-growing industries. You can dive deeper into the history of soap over at the American Cleaning Institute's website.
Can I Mix Baking Soda and Dish Soap Ahead of Time?
It's tempting to want a pre-made batch ready to go, but you really should mix your cleaning paste right before you use it. When you combine baking soda and dish soap, you're creating a dynamic, fizzy mixture that’s most powerful when it's fresh.
If you let it sit around, the baking soda can dissolve or get clumpy, which means you lose that gentle abrasive texture that does all the hard work. For the best scrubbing action, always whip up a new batch for each job.
Is It Safe to Use on All Cookware?
Definitely not. While this mixture is a miracle worker for stainless steel, most cast iron, and many ceramic or enamel-coated pans, you need to be careful with other surfaces.
Steer clear of using this on aluminum cookware. The alkaline nature of baking soda can cause it to oxidize and discolor. You'll also want to keep it away from any pans with a delicate or damaged non-stick coating, as even this mild abrasive can create more scratches.
What if the Paste Leaves a White Residue?
Seeing a chalky white film after you're done? That's usually just a sign that you went a little heavy on the baking soda or didn't rinse the item well enough. It’s an easy fix.
Just give the pan another thorough rinse with warm water. If the residue is being stubborn, dampen a cloth with a splash of white vinegar and give it a quick wipe. The vinegar will cut right through the film, leaving your cookware shiny and clean.
After you've fried up something delicious like crispy fried pickles or classic Southern fried chicken, the most critical part of cleanup is handling that leftover cooking oil the right way. A clean and safe disposal is the final step in any successful frying session, and for that, we always recommend FryAway. The whole process is designed to be completely mess-free.
Here’s the simple three-step method for perfect results:
- Sprinkle and Stir the FryAway powder into the hot cooking oil as soon as you're done frying.
- Cool Down and let the oil completely solidify into a single, scoopable block.
- Toss the entire solid mass straight into your household trash bin.
Ready for a cleaner, safer, and way more convenient way to deal with used cooking oil? Join the thousands of home cooks who have made cleanup a breeze with FryAway. Shop now and transform your post-frying routine!