


· By FryAway
How Often Should You Change Fryer Oil: A Practical Guide
If you're cooking at home, the real answer to how often should you change fryer oil isn't a single magic number. It all comes down to what you're frying.
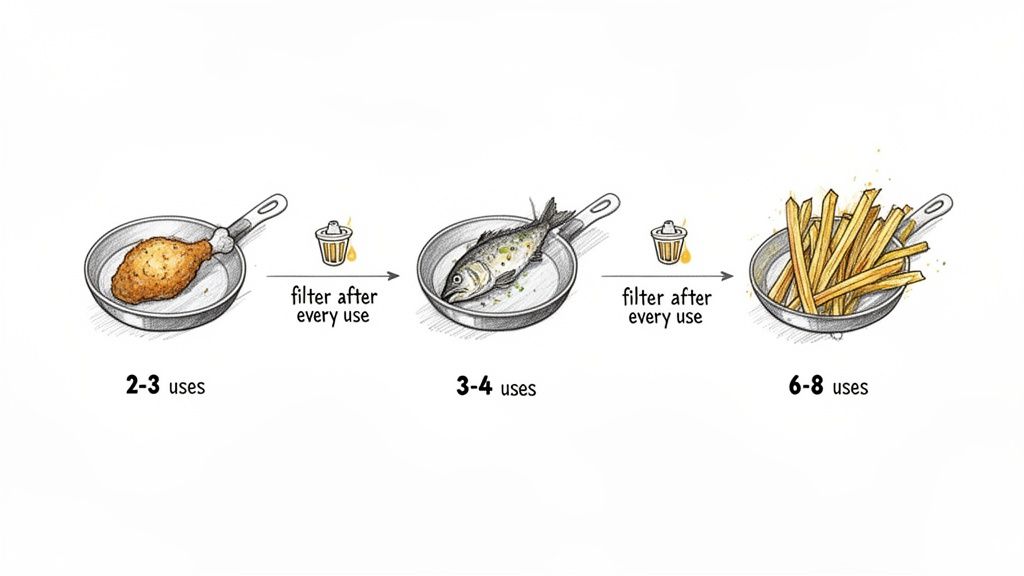
As a general rule of thumb, you can get away with 6-8 uses for something clean like french fries. But for heavily breaded foods like chicken or fish, you’re looking at just 2-3 uses before the oil is shot. The trick is to keep an eye on your oil's condition and, most importantly, filter it after every single use.
The Real Answer to Changing Fryer Oil
Forget counting days on a calendar. The best way to know when to change your fryer oil is to understand how different foods impact it. Frying a batch of potatoes is a completely different ballgame than frying something coated in heavy batter or breading. Each food you cook leaves behind its own unique footprint, and some speed up oil breakdown way faster than others.
This is why you can cook batch after batch of homemade french fries in the same oil and still get fantastic results. Potatoes don't have much protein and obviously no breading, so they release very few particles that can burn and contaminate the oil.
On the other hand, breaded chicken or fish is a whole different story.
Food Type Is The Deciding Factor
All that delicious breading and the proteins from the chicken or fish break down fast in hot oil, releasing tons of tiny particles. These little bits burn, darken the oil, and create off-flavors that will absolutely ruin your next batch of food. That’s why you get far fewer frying sessions out of your oil when you’re cooking these kinds of items.
This decision tree gives you a great visual for how the type of food you're cooking directly impacts how many uses you can expect from your oil.
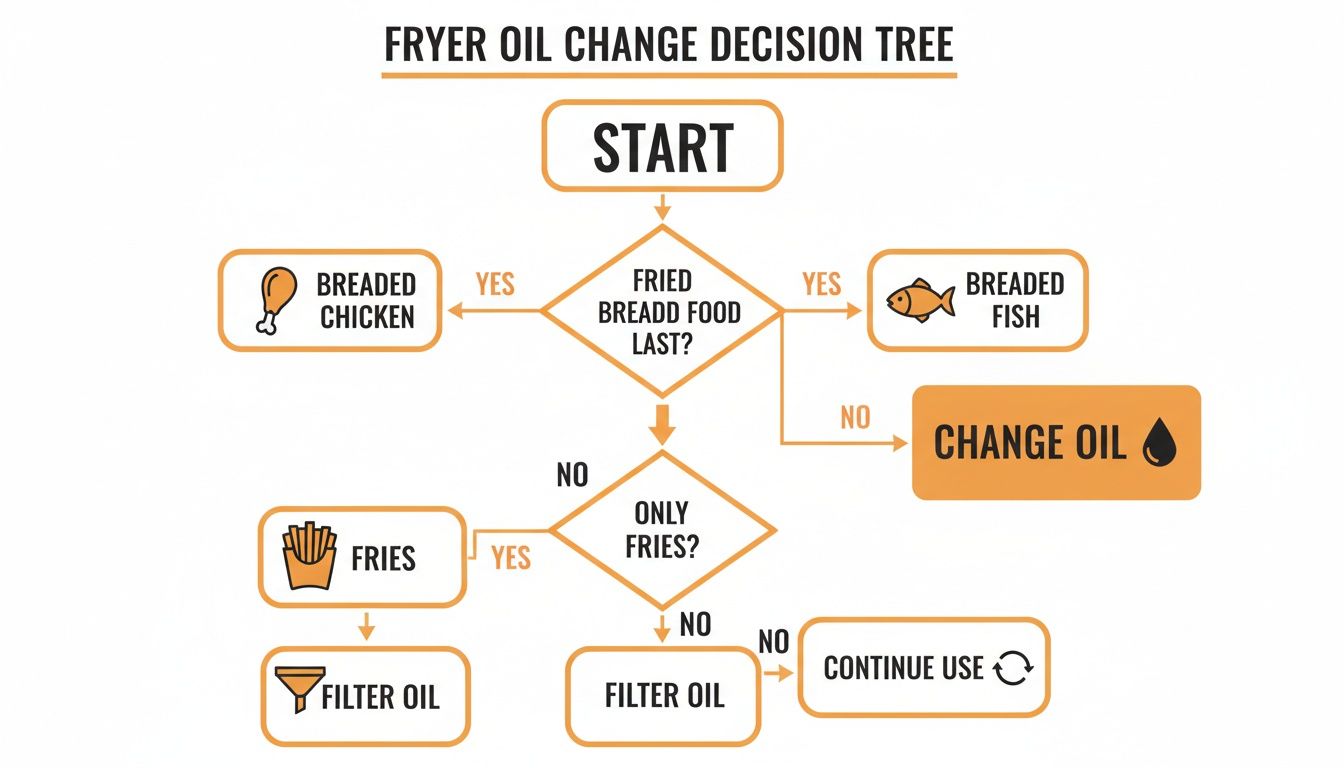
As the chart shows, delicate foods like fish are the toughest on oil and demand the most frequent changes if you want to keep that clean, fresh flavor.
To make it even simpler, here's a quick reference table for home cooks.
Quick Guide to Fryer Oil Change Frequency
| Type of Food Fried | Recommended Uses Before Changing | Insider Tip |
|---|---|---|
| Plain Vegetables (e.g., French Fries) | 6-8 uses | These are the easiest on your oil. Filter well and you'll get a long life out of it. |
| Battered Vegetables (e.g., Onion Rings) | 3-5 uses | The batter leaves behind particles. Diligent filtering is key here. |
| Breaded Poultry (e.g., Fried Chicken) | 3-4 uses | The breading and protein break down quickly. Don't push it past four uses. |
| Breaded Fish | 2-3 uses | Fish is delicate and its flavor easily transfers. Change this oil very frequently. |
This table should give you a solid starting point, but always remember to trust your senses—if the oil looks dark or smells off, it's time for a change, no matter how many uses it's had.
Learning From The Professionals
Believe it or not, high-volume commercial kitchens follow surprisingly similar rules, just on a much bigger scale. Professional guidelines often suggest changing oil for breaded fish every 2-3 batches, for breaded poultry every 3-4 batches, and for french fries only after 6-8 batches.
This strategy is all about preventing flavor cross-contamination and making sure every single dish that leaves the kitchen tastes exactly as it should. You can learn more about commercial practices and how to apply their logic to your home cooking.
Key Takeaway: If you adopt only one habit, make it this: filter your oil after every single use. Removing those tiny food particles stops them from burning during the next fry, which will dramatically extend the life of your oil and save you a good bit of money in the long run.
Trust Your Senses: Telltale Signs of Bad Oil
While guidelines based on food type are a great starting point, your own senses are the ultimate authority on when to change fryer oil. Over time, heat and food particles cause oil to break down in a process called polymerization, which changes its physical and chemical properties. Learning to trust your eyes, nose, and even the sounds of your fryer will help you make the right call every time.
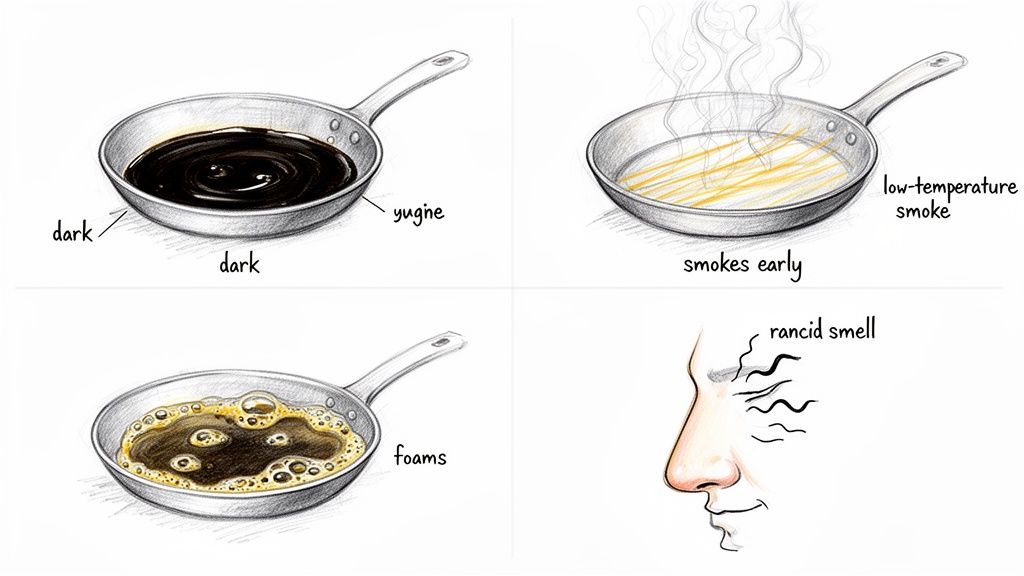
Fresh cooking oil is usually a light, golden color. As you use it, it will naturally darken. But if your oil has turned a deep, murky brown or looks cloudy even when cool, that’s a dead giveaway it’s time for a change. Another visual cue is the thickness; if the oil has become viscous or syrupy, its frying performance will tank, leaving you with greasy, unappetizing food.
Pay Attention to Smoke and Foam
One of the most reliable indicators of degraded oil is a lowered smoke point. Fresh oil should easily reach your target frying temp (usually around 350-375°F) without a problem. If you notice your oil starting to smoke or smell acrid long before it hits that temperature, it has broken down. It's no longer safe or effective for cooking.
Similarly, excessive foaming is a bad sign. A little bubbling is normal when you add food, but oil that foams up aggressively on the surface before you’ve even started cooking is past its prime. This foam shows the oil's structure has degraded, which prevents moisture from escaping properly and results in soggy, sad food. You can discover more about the lifespan of different oils by exploring how long cooking oil lasts and what factors contribute to its decline.
When the Smell Is All Wrong
Your nose knows. Fresh frying oil has a clean, neutral aroma. When oil goes bad, it develops a distinct "off" smell—often described as rancid, fishy, or even soapy. This unpleasant odor will transfer directly to your food, overpowering its natural flavor with a stale, greasy taste. If your kitchen smells more like old grease than delicious fried chicken, your oil is telling you it's done.
Expert Tip: Don't just rely on one sign. Often, you'll notice a combination of these indicators. Dark, smelly oil that foams excessively is definitively ready for disposal.
Once you’ve confirmed the oil is bad, the next step is getting rid of it responsibly. The easiest and cleanest method is with FryAway, a plant-based powder that magically transforms used liquid oil into solid organic waste.
To use it, just follow this simple 3-step process for best results:
- Sprinkle and Stir: While the used oil is still hot, sprinkle in the FryAway powder and stir until it fully dissolves.
- Cool Down: Let the pan or fryer cool down completely. As it cools, the oil will solidify into a solid puck.
- Toss into household trash: Once hardened, you can easily scoop the solid mass out and toss it directly into your household trash bin. No jars, no spills, and no clogged drains.
Extend Your Oil's Life with Smart Frying Habits
Knowing when your oil has gone bad is one thing, but actively keeping it fresh for as long as possible is where the real kitchen savvy comes in. With a few smart habits, you can seriously extend how often you need to change your fryer oil, which saves money and cuts down on waste. It all comes down to minimizing the things that kill oil fastest—heat, oxygen, water, and leftover food bits.
Adopting these pro techniques means you’ll get more delicious, perfectly crispy results from every single bottle of cooking oil. It’s all about working smarter in the kitchen.
Master Temperature Control and Filtration
One of the biggest culprits behind oil going bad too soon is excessive heat. You obviously need high temps for frying, but pushing oil past its smoke point is a guaranteed way to ruin it in a hurry. Try to keep your fryer at or below 375°F (190°C). That's the sweet spot for getting a golden-brown crust without scorching your oil.
Just as important is filtering religiously. After every single cook, you have to get the leftover food particles out. Those tiny bits of batter and breading just sit in there and burn every time you heat the oil, making everything taste acrid and look dark. Consistent filtering isn't optional if you want your oil to last.
Adopt Pro-Level Habits in Your Kitchen
Beyond keeping the temperature in check and filtering, a few other habits can make a massive difference in your oil's lifespan.
- Salt After Frying: Never, ever salt your food before it hits the fryer. Salt acts as a catalyst, speeding up the oxidation that breaks oil down. Always season your fried foods the second they come out of the hot oil.
- Choose the Right Oil: Not all oils are created equal. You need something that can handle the heat. Options like canola, peanut, or sunflower oil have high smoke points, which makes them much more resilient for frying. If you want to dive deeper, learn more about the best oil for high heat cooking.
- Avoid "Topping Off": It seems like a thrifty move to just add a little fresh oil to an old batch, but it’s a big mistake. The old, degraded oil immediately starts breaking down the new oil, contaminating the whole batch and shortening its life.
These practices are standard in commercial kitchens for a reason—they flat-out work. Busy restaurants dealing with breaded items often filter their oil twice a day to keep up with particle buildup. By following their lead—filtering daily, covering the oil when it's not in use, keeping temps below 375°F, and salting after you fry—you'll get way more delicious results out of every batch.
Once you've finally gotten every last fry out of your oil, remember that cleanup doesn't have to be a messy chore. FryAway offers the simplest, most eco-friendly solution for getting rid of it.
The process for best results couldn't be easier.
- Sprinkle and Stir: Just stir the FryAway powder into your used oil while it's still hot. Keep stirring until it dissolves completely.
- Cool Down: Let the oil cool down in the pan or fryer, and watch it turn into a solid.
- Toss into household trash: Once it’s a solid puck, you can scoop it right out and toss it in your household trash bin. No mess, no spills, no problem.
Mess-Free Disposal of Used Cooking Oil
Let's be honest. The best part of frying is digging into that perfectly crispy, golden-brown food. The worst part? Figuring out what to do with all that used cooking oil when you're done.
There's one thing you absolutely must never do: pour it down the sink. It might seem like the easiest way out, but that hot liquid grease quickly cools and hardens inside your pipes.
This mistake leads to stubborn clogs in your own plumbing and contributes to massive blockages in city sewer systems—infamous "fatbergs." These greasy disasters can cause sewage backups and require seriously expensive removal. Protecting your drains is a crucial final step after figuring out how often should you change fryer oil.
Luckily, there’s a brilliantly simple and eco-friendly way to handle the cleanup without the mess or plumbing nightmares. We always recommend FryAway for the job.
The Easiest Way to Dispose of Old Oil
Forget trying to pour cooled grease into old milk cartons or jars. We've all been there, and it usually ends with a greasy spill on the counter. The most effective solution is FryAway, a 100% plant-based powder that magically transforms liquid cooking oil into solid organic waste.
This innovative product takes all the guesswork and mess right out of oil disposal. It’s a total game-changer for anyone who loves frying but dreads the aftermath.
With FryAway, the entire process is so clean and easy that you can just toss the solidified oil directly into your household trash. No more leaky containers, no more greasy sinks, and absolutely no risk of clogging your pipes.
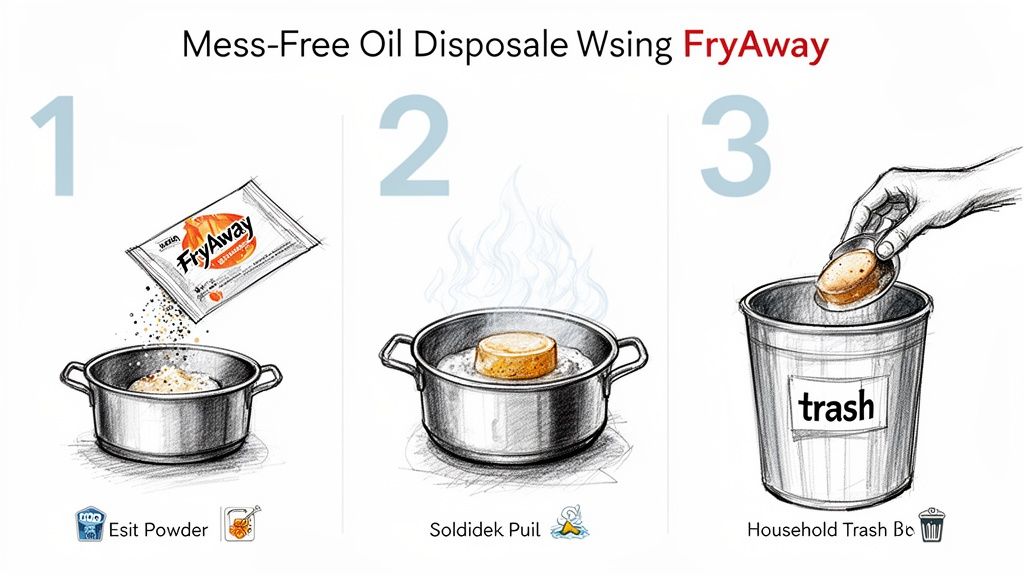
Using it is unbelievably straightforward. Just follow three simple steps for a perfect, mess-free cleanup every single time.
How to Use FryAway for Best Results
Cleaning up after making crispy fried chicken or a batch of perfect golden fries has never been easier. The whole process is quick and happens right inside your pan or fryer.
- 1) Sprinkle and Stir: Right after you finish cooking, while the oil is still hot, carefully sprinkle the FryAway powder into the pan. Give it a good stir until the powder completely dissolves.
- 2) Cool Down: Now for the easy part—just walk away and let it cool down completely. As the temperature drops, you’ll see the oil transform into a solid, scoopable puck of organic waste.
- 3) Toss into household trash: Once the oil has fully hardened, you can easily scoop the solid mass out with a spatula or spoon and toss it straight into your household trash can.
That’s it. No spills, no mess, and no harm to the environment. For more detailed instructions and tips on handling different amounts of oil, check out our complete guide on how to dispose of deep fryer oil.
Fried Recipes to Put Your New Skills to Work
Alright, you've got the theory down. You know when to change your oil, how to read the signs, and how to keep it clean. Now for the fun part: putting that knowledge to the test.
Knowing how often should you change fryer oil is a skill that really pays off in the flavor and texture of your food. These two classic fried recipes are perfect for seeing that science in action. One is a breaded beast, the other is clean and simple. You'll see firsthand why filtering is a non-negotiable step for some foods and a quick task for others.
Ultimate Crispy Fried Chicken
This is the ultimate test for your oil management chops. The heavy breading will shed a ton of particles into the fryer, which is exactly why we're using peanut oil—its high smoke point can handle the job.
- Ingredients: 1 whole chicken (cut into 8 pieces), 2 cups buttermilk, 2 cups all-purpose flour, 2 tbsp salt, 1 tbsp black pepper, 1 tsp paprika, 1 tsp garlic powder, and 48 oz peanut oil.
- Instructions: Let the chicken marinate in buttermilk for at least 4 hours. In a large bowl, mix your flour and seasonings. Dredge each piece of chicken, making sure you get a nice, thick coat. Get that peanut oil heated to 350°F. Fry the chicken in batches for about 6-8 minutes per side, until it's golden brown and cooked all the way through.
- The Aftermath: Take a look at your oil afterward. It’s going to be cloudy and full of sediment. This is where diligent filtering after it cools down becomes absolutely essential if you want to get another use or two out of it.
Perfect Golden French Fries
Now, for a completely different experience. Compared to the chicken, these fries are incredibly gentle on your oil. We're using canola oil here for its neutral flavor, letting that pure potato taste be the star.
- Ingredients: 4 large Russet potatoes, 48 oz canola oil, and salt to taste.
- Instructions: Peel your potatoes and cut them into ¼-inch sticks. Give them a 30-minute soak in cold water, then dry them completely—and I mean completely. Heat the canola oil to 325°F and blanch the fries for 3-4 minutes. They should be soft but not brown. Pull them out and let them cool. Now, crank the oil temp up to 375°F and fry them a second time until they’re golden and crispy. Salt them the second they come out.
- The Aftermath: The oil will look so much cleaner. A quick pass through a filter, and it's ready for many more batches of perfect fries.
The Effortless Cleanup
No matter what you're cooking, cleanup is always the last hurdle. This is especially true if you're thinking bigger, like starting a supper club, where a streamlined cleanup process is key to your sanity.
Once your oil has finally given its all, FryAway offers the simplest, most painless way to get rid of it.
Just follow the easy 3-step process for best results. This method keeps your kitchen clean and your pipes clear, making the whole frying experience more enjoyable from start to finish.
Here’s all you have to do for a perfect cleanup:
- Sprinkle and Stir: While the oil is still hot, just pour in the FryAway powder and give it a stir until it's completely dissolved.
- Cool Down: Now, just walk away. Let the pan or fryer cool down on its own. As it cools, the oil will magically transform into a solid, organic puck.
- Toss into household trash: Once it's solid, you can just scoop the puck out and toss it straight into your household trash. Done.
Got Questions About Fryer Oil? We’ve Got Answers.
Even with a solid game plan, a few questions always seem to pop up when you're trying to get the most out of your fryer oil. Let's tackle some of the most common ones so you can handle any frying situation with confidence.
Can I Mix Different Kinds of Used Oil?
This is a big one, and the short answer is no—it's not a good idea. Different oils have their own unique smoke points and break down at different speeds.
When you mix them, the oil with the lower smoke point starts to burn and degrade first. This ruins the entire batch, creating a smoky mess and giving your food an off-taste. For the best results and cleanest flavor, always stick to one type of oil at a time.
How Should I Store Used Oil, and What About Different Foods?
Proper storage is your best defense against oil going bad before its time. Once you're done frying, let the oil cool down completely. Then, strain it through a fine-mesh sieve or some cheesecloth to get rid of every last food particle. Pour that clean oil into an airtight, light-proof container and stash it in a cool, dark spot like your pantry. Heat and light are the enemies here.
Don't forget that what you fry makes a huge difference in your oil's lifespan.
- Breaded or Battered Foods: Think fried chicken or onion rings. These are tough on oil because they shed a lot of particles that burn and create funky flavors. You'll be changing your oil much more often.
- Non-Battered Foods: Things like potatoes for french fries or plain veggies are much cleaner. They leave very few particles behind, meaning you can get a lot more use out of your oil.
Home vs. Commercial Kitchens: How Often Should I Change It?
The frequency really depends on where you're cooking and how much you're frying. A high-volume restaurant frying for five or more hours a day might change its oil every 2-3 days.
For a home cook using a small countertop fryer for an hour, that timeline stretches out. You might only need a fresh batch every 5-7 days. To see how the pros manage their consumption, you can explore more about commercial oil consumption rates.
The Golden Rule: Your senses are your best guide. If the oil looks dark, smells rancid, or starts smoking before it hits the right temperature, it's time for a change. No matter how many times you've used it.
When that time finally comes, cleanup should be the easiest part. That’s where FryAway comes in, offering a simple, no-mess way to handle used oil.
The 3-step process for best results couldn't be easier:
- Sprinkle and Stir: While the oil is still hot, just sprinkle in the FryAway powder and stir until it's completely dissolved.
- Cool Down: As the oil cools, it will transform into a solid, organic puck.
- Toss into household trash: Once it's hardened, scoop the solid mass out and throw it right into your household trash.
Ready to make your frying cleanup effortless and eco-friendly? With FryAway, you can say goodbye to messy jars and clogged pipes forever. Visit FryAway.co to find the perfect product for your kitchen and fry with confidence!