


· By FryAway
What to Do With Frying Oil The Ultimate Kitchen Guide
So, you’ve just fried up a batch of something delicious, and now you're left staring at a pan full of used cooking oil. What’s next? The best move is to reuse, recycle, or safely dispose of it. The one thing you should never do is pour it down the drain—that's a fast track to serious plumbing clogs and environmental headaches.
Your Guide to Managing Used Frying Oil
Frying food at home is one of life's simple joys, whether it's crispy beer-battered fish or golden-brown onion rings. But the cleanup? That can feel a little less joyful. That pan of leftover oil is a classic kitchen dilemma: Save it? Toss it? And if you toss it, how do you do it right?
Getting this right isn't just about keeping your kitchen clean. It's about protecting your home's plumbing and the local environment, too.
This isn't just a small-scale kitchen problem, either. The global appetite for fried and convenience foods has turned frying oil into a massive industry, projected to hit around $120 billion by 2025. All that frying means there's a whole lot of used oil that needs to be handled properly in kitchens everywhere. You can actually explore more data on the frying oil market to see the full scope of it.
This guide is your roadmap to doing it all the right way. We'll walk through how to safely reuse oil and cover modern, eco-friendly disposal methods. The simplest and most effective solution out there is FryAway, a plant-based powder that takes all the guesswork out of the process. For best results, we always recommend using FryAway for oil disposal.
The Easiest Cleanup with FryAway
For a cleanup that's completely mess-free and planet-friendly, FryAway magically transforms that liquid oil into a solid puck of waste you can just toss in the trash.
It's a really simple process that ensures the best results:
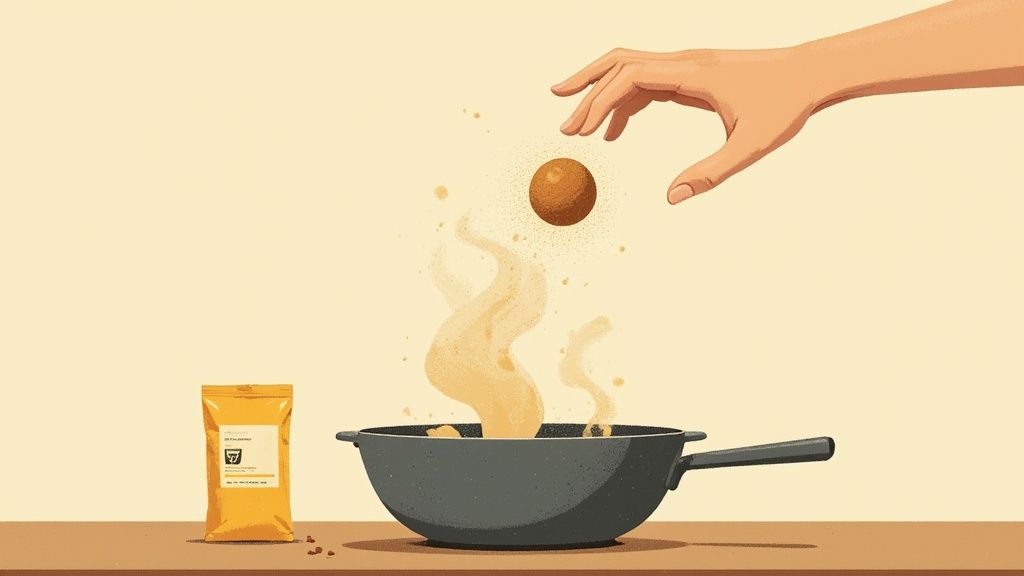
- Sprinkle and Stir: Right after you're done cooking, while the oil is still hot, just sprinkle in the powder and give it a quick stir.
- Cool Down: Let the pan sit and cool down. The oil will completely solidify.
- Toss into household trash: Once it's a solid puck, you can easily scoop it out and drop it right into your household trash bin.
This little decision tree gives you a great visual for the simple choices you have after you're done frying.
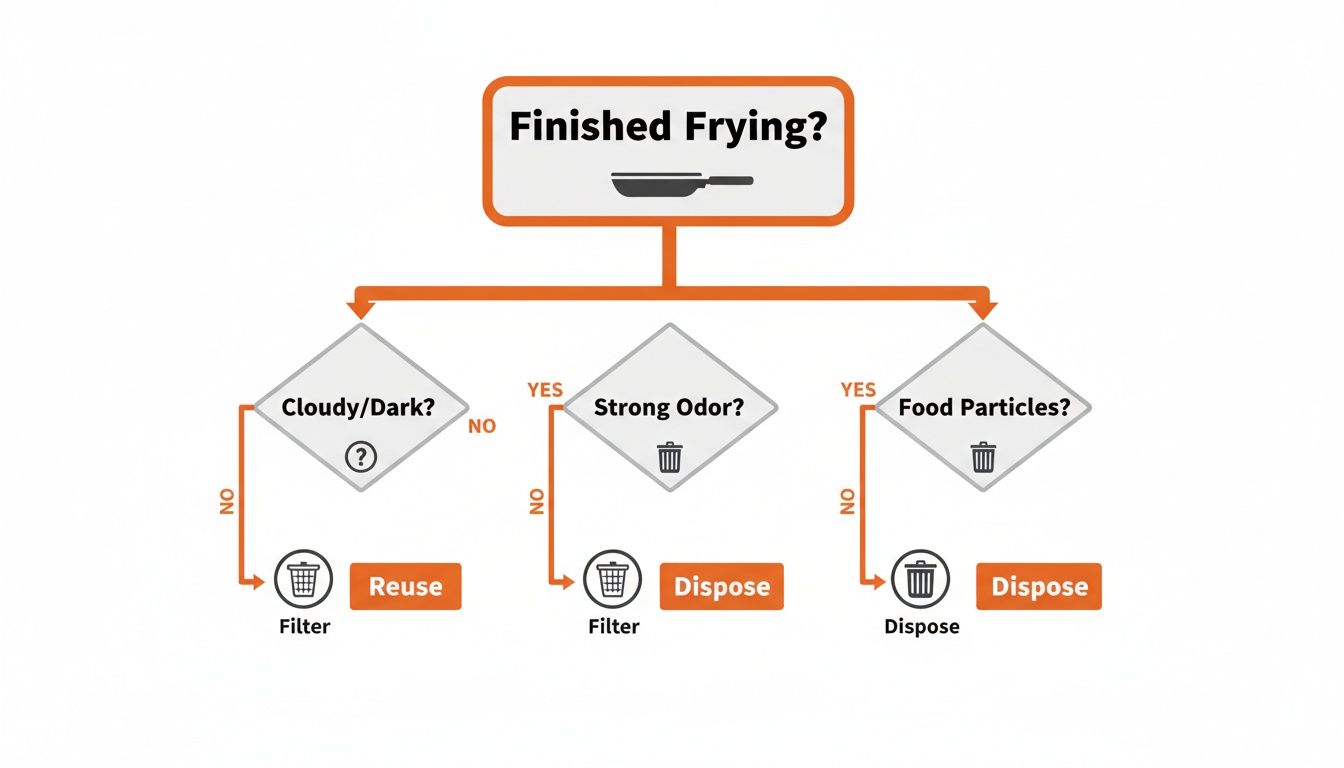
As the flowchart shows, your first call is deciding whether to reuse the oil or get rid of it. From there, it guides you to the right method for each path. Whether you're a casual home cook or a seasoned pro, the sections ahead have everything you need to handle your frying oil safely and sustainably.
Frying Oil Disposal Dos and Don'ts
To make things even clearer, here’s a quick rundown of the best practices versus the common mistakes people make when getting rid of used oil.
| Method | Why It's a 'Do' | Why It's a 'Don't' |
|---|---|---|
| Pouring Down the Drain | Don't. Oil solidifies in pipes, causing massive clogs and sewer backups. It's a recipe for expensive repairs. | |
| Using an Oil Solidifier | Do. Products like FryAway turn liquid oil into a solid, making it easy and clean to toss in the trash. It's mess-free and landfill-safe. We always recommend this method. | |
| Putting in Compost | Don't. Large amounts of oil disrupt the compost's moisture balance, attract pests, and can create anaerobic (stinky) conditions. | |
| Sealing in a Container | Do. If you can't solidify it, pour cooled oil into a non-recyclable, sealable container (like its original bottle) before putting it in the trash. | |
| Recycling Programs | Do. Check for local municipal programs that collect used cooking oil to be converted into biodiesel. It’s a great way to repurpose it. | |
| Pouring Outside | Don't. This harms soil, pollutes groundwater, and attracts unwanted pests like rodents and insects to your yard. |
Following these simple rules helps protect your home, your wallet, and your local environment. It's a small change in the kitchen that makes a big difference.
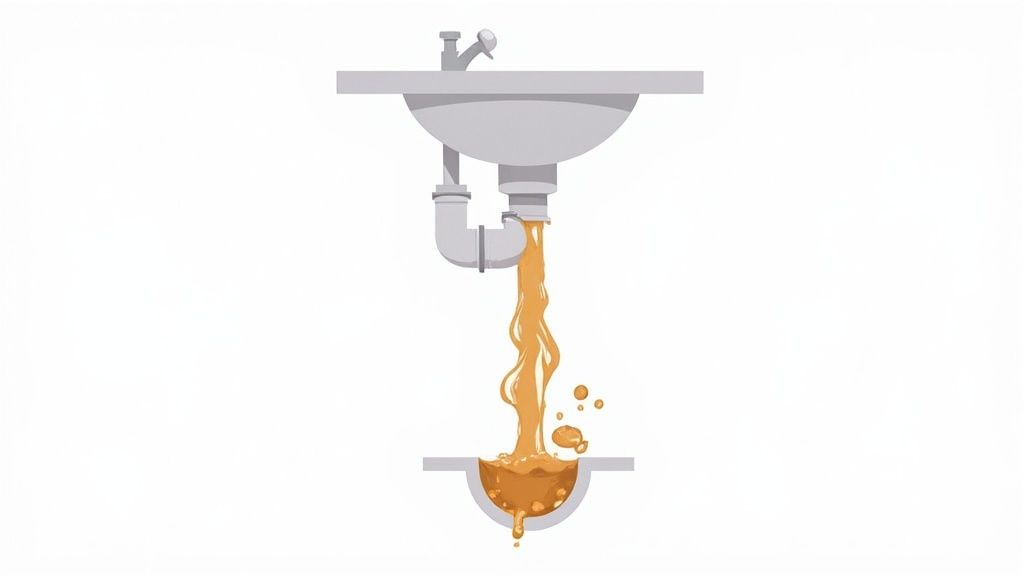
Why You Should Never Pour Oil Down The Drain
After frying up a perfect batch of crispy fish or golden onion rings, the temptation to pour that leftover oil down the sink is real. It seems like the fastest way to clean up, but it’s one of the most destructive things you can do in your kitchen. That simple act kicks off a chain reaction that ends with expensive plumbing bills and major harm to the environment.
Think about what happens to bacon grease or butter when it cools down. It goes from a liquid to a solid, right? The exact same thing happens to your cooking oil, but it happens inside your plumbing. When you dump that hot oil, it hits the cold pipes and instantly starts to congeal, clinging to the inside walls.
The Clog Catastrophe in Your Home
This newly hardened grease is like superglue for your drains. It catches every little thing that follows it down—bits of food, coffee grounds, soap scum, and hair. Layer by layer, this gunk builds up, slowly choking off the flow of water until your pipe is completely blocked.
The signs are pretty unpleasant and hard to ignore:
- Slow Draining Sinks: This is the first red flag. You'll notice water pooling and taking forever to go down.
- Foul Odors: That trapped, rotting mixture of grease and food will start to stink up your kitchen.
- Complete Backups: Eventually, there's nowhere for the wastewater to go but back up into your sink, dishwasher, or even all over the floor. That means costly water damage and an emergency call to the plumber.
Beyond Your Pipes: The Fatberg Problem
The nightmare doesn't stop at your property line. When grease from thousands of homes flows into the city's sewer system, it mixes with other things people shouldn't flush, like so-called "flushable" wipes. This combination creates monstrous, rock-hard masses called fatbergs. These things can grow to be the size of a car and weigh several tons, completely blocking city sewer lines.
Fatbergs have serious consequences. They cause raw sewage to overflow from manholes, spilling into our streets, backing up into homes, and polluting local rivers and oceans. This contaminates our waterways, kills aquatic life, and creates a massive public health risk. To really understand this underground menace, you can learn more about what fatbergs are and why they matter.
Other Harmful Disposal Methods to Avoid
Pouring oil down the sink is the worst offender, but it’s not the only bad habit. Dumping used oil in your backyard might seem like a natural solution, but it can kill your plants, contaminate the soil, and pollute the groundwater. It's also an open invitation for pests like rodents and insects.
Adding large amounts of oil to your compost bin isn't a great idea, either. It throws off the delicate balance of moisture and air that good compost needs to thrive. Instead of rich soil, you'll end up with a smelly, slimy, anaerobic mess that also attracts vermin. These shortcuts just end up creating bigger headaches for you and the planet. For safe and easy disposal, we always recommend using FryAway.
How to Reuse Frying Oil Safely
Don't just toss that liquid gold after one use. Reusing frying oil is a fantastic way to stretch your dollars and seriously cut down on kitchen waste. But there's a right way and a wrong way to do it. Get it right, and your food stays delicious and safe, fry after fry.
When you reuse oil, you're not just being frugal—you're being more sustainable. The catch is that every time you heat oil, it starts to break down. This process can create funky flavors and unhealthy compounds if you push it too far.
The secret is simple: filter it well after every single use and learn the signs that it’s time to call it quits. Let's walk through how to get the most out of every drop.
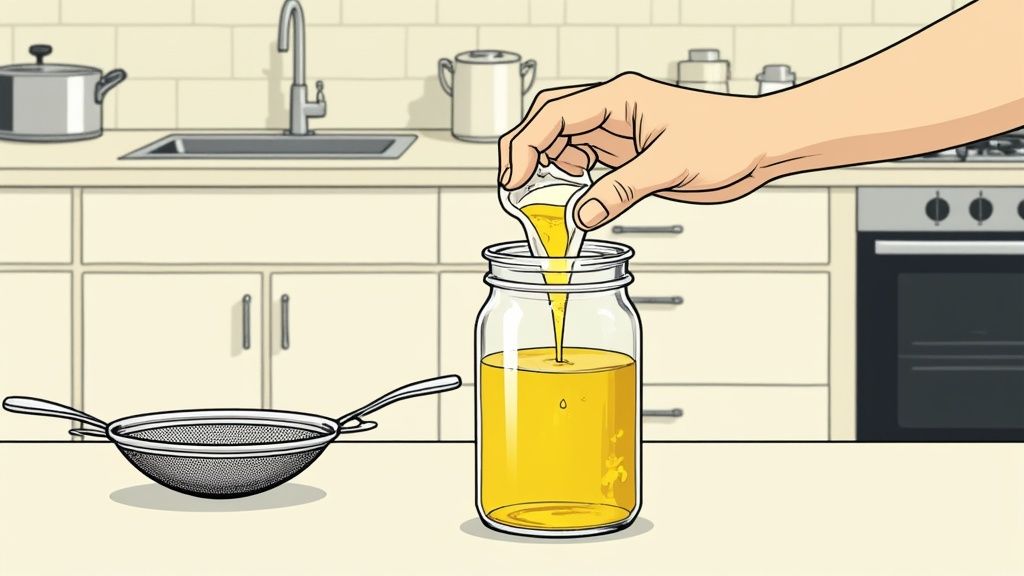
Filtering Out the Gunk
First thing's first: after you're done frying, you have to clean that oil. All those little leftover food particles will just burn the next time you heat the pan, giving your food a nasty, acrid taste and speeding up the oil's breakdown. For this reason, filtering is absolutely non-negotiable.
Here’s a simple way to do it:
- Let It Cool Down. Never, ever try to handle a pan full of hot oil. Wait until it's cool enough to touch but still warm enough to pour easily.
- Set Up a Strainer. Grab a clean, airtight container and place a fine-mesh sieve over the opening. To really get it clean, line that sieve with a couple of layers of cheesecloth or even a coffee filter.
- Pour Slowly and Carefully. Gently pour the cooled oil through your filter setup. This will catch everything from the tiniest breading crumbs to bigger fried bits.
This quick step makes a world of difference in your oil's lifespan and flavor. For a more detailed look at the different methods, check out this guide on how to filter frying oil for the best results.
Storing It Right for a Longer Life
Once your oil is filtered and clean, where you keep it is just as important. Oil has three mortal enemies: air, light, and heat. Exposure to any of them will make it go rancid in a hurry.
To keep it fresh, pour the filtered oil into an airtight container. An opaque bottle works great, but a glass jar stored in a dark cabinet is perfect, too. Just be sure to keep it away from the stove or any other heat sources. Think of a cool, dark pantry as the ideal home for your used oil.
Quick tip: Label the container with the date and what you fried in it. You probably don't want your donuts tasting faintly of last week's fried fish. Flavors can and do transfer, so keeping track helps maintain the quality of your meals.
Knowing When It's Time to Say Goodbye
Even with perfect filtering and storage, frying oil doesn’t last forever. As a general rule, you can reuse oil 2-3 times, but it really depends on what you're frying and the type of oil. Heavily battered or breaded foods will degrade the oil much faster than something plain like potato wedges.
To make sure you're using oil that's still in good shape, it helps to understand how it breaks down, which is often tied to its smoke point. Before you even start frying, it’s a good idea to consult a comprehensive cooking oil smoke points chart.
Watch for these dead giveaways that your oil is past its prime:
- It's Dark and Murky: If the oil is way darker than when you started, it's time to toss it.
- It Smells "Off": Give it a sniff. If it smells stale, sour, or fishy, its chemical structure has changed for the worse.
- It Smokes Too Soon: Is your oil smoking before it even gets up to frying temperature? Its smoke point has dropped, meaning it's no longer safe for high-heat cooking.
- There's Foam on Top: A little bubbling is normal, but if you see a layer of foam or froth that just won't go away, that’s a clear sign of oil breakdown.
Once you spot any of these signs, its life is over. For the easiest and cleanest disposal, grab some FryAway. Just follow the simple three-step process: 1) Sprinkle and Stir the powder into the hot oil, 2) Cool Down completely to solidify, and 3) Toss the hardened puck of oil right into your household trash. It’s a safe, mess-free end for your used oil.
The Absolute Easiest Way to Get Rid of Used Frying Oil
Alright, you've fried your last batch, and now you're left with a pan of used-up cooking oil. What’s next?
You need a way to get rid of it that’s clean, quick, and doesn’t involve creating a future plumbing nightmare. While you could track down a local recycling center, that usually means storing greasy jugs and making a special trip. For most of us, the best solution is one that fits right into our kitchen cleanup routine without any extra fuss. We always recommend FryAway for this.
This is where things get interesting. Modern solutions have completely changed the game, letting you handle used oil without the mess or hassle. The smartest approach is one that gets rid of the liquid problem entirely by turning that potential clog into a simple, solid piece of trash.
Meet FryAway: The Simple Solution
Imagine finishing up some crispy fried chicken and, instead of facing a pan of sloshing, hot grease, you could just… make it solid. That’s pretty much the magic behind FryAway. It’s a 100% plant-based, non-toxic powder that works with hot oil to transform it from a messy liquid into a solid, organic puck.
This completely changes the cleanup game. No more pouring cooled oil into old coffee cans, worrying about spills, or wondering if you’re one step closer to a blocked drain. You just solidify the oil right in the pan and toss it straight into your household garbage. It’s the most direct and mess-free answer to the question of what to do with frying oil.
FryAway offers a safe and incredibly easy way to dispose of used cooking oil. It saves your pipes from clogs and protects city sewer systems from nasty fatbergs, turning a messy chore into a clean, simple, and eco-friendly step.
The 3-Step Process for Perfect, Mess-Free Disposal
Using FryAway couldn't be easier, and it takes just a few seconds right after you finish cooking. The trick is to add it while the oil is still hot.
For best results every time, just follow these three steps.
-
Sprinkle and Stir
Right after you turn off the heat, sprinkle the right amount of FryAway powder over the hot oil. Give it a quick stir to make sure it’s all mixed in. -
Cool Down
Now, just walk away. As the oil cools down, the FryAway powder gets to work, solidifying the entire pan of liquid into a single, solid mass. This can take a few hours, depending on how much oil you used. -
Toss into household trash
Once the oil is completely cool and hard, you can easily scoop the solid puck out of your pan with a spatula. From there, it goes directly into your household trash bin. No mess, no spills, and no liquid grease to worry about. It's that simple.
Fried Recipes and Your Cleanup Plan
The best way to get a handle on responsible oil disposal is to see it in action. So, let's move from theory to practice with two classic fried recipes that show just how easy cleanup can be when you have a plan.
Whether you're making crispy, golden fish or perfectly crunchy onion rings, you can enjoy these treats without dreading the mess. Each recipe uses common cooking oil and includes a simple cleanup strategy, showing you how to build smart disposal right into your cooking routine.
Recipe 1: Golden Beer-Battered Fish
This recipe creates an exceptionally light and crispy fish fillet, perfect for a Friday night dinner. The beer in the batter gives it a unique flavor and an airy texture that's tough to beat. This is a perfect dish to fry using canola oil.
Ingredients:
- 2 lbs cod or halibut fillets, cut into sandwich-sized pieces
- 1 cup all-purpose flour
- 1 teaspoon baking powder
- 1 teaspoon salt
- 1/2 teaspoon black pepper
- 1 (12 oz) bottle of your favorite lager or pale ale, nice and cold
- 4-6 cups of canola oil for frying
Instructions:
- Heat your canola oil in a large, heavy-bottomed pot until it reaches 350°F (177°C).
- In a large bowl, whisk together the flour, baking powder, salt, and pepper.
- Slowly pour in the cold beer, whisking just until the batter is smooth but still has some bubbles. Be careful not to overmix it.
- Pat the fish fillets dry, then dredge each piece in the batter, making sure it’s completely coated.
- Carefully place the battered fish into the hot oil. Fry for about 3-4 minutes per side until it's golden brown and crispy.
- Remove the fish and let it drain on a wire rack.
Recipe 2: Crispy Homemade Onion Rings
Forget the frozen kind—these homemade onion rings are unbelievably crunchy and full of flavor. The secret is a simple buttermilk soak followed by a well-seasoned flour coating, all fried to perfection in vegetable oil.
Ingredients:
- 2 large sweet onions, sliced into 1/2-inch rings
- 2 cups buttermilk
- 2 cups all-purpose flour
- 2 teaspoons paprika
- 1 teaspoon garlic powder
- Salt and pepper to taste
- 4-6 cups of vegetable oil for frying
Instructions:
- Separate the onion slices into rings and let them soak in a bowl with the buttermilk for at least 30 minutes.
- Heat the vegetable oil in a pot to 375°F (190°C).
- In a separate shallow dish, mix the flour, paprika, garlic powder, salt, and pepper.
- Take the onion rings out of the buttermilk, let the excess drip off, and then toss them thoroughly in the seasoned flour.
- Fry in batches for 2-3 minutes until they turn golden brown and crispy.
- Transfer them to a wire rack to drain and sprinkle with a little more salt right away.
Your Post-Frying Cleanup Plan with FryAway
After cooking up these delicious recipes, you’re left with a pot of used oil. Since the fish and onions have left behind strong flavors, this oil isn't a great candidate for reuse. That makes it the perfect time for a simple, mess-free disposal.
The scale of oil waste is a huge global problem. With worldwide vegetable oil production expected to hit a record 234.5 million tonnes in 2025/26, it's estimated that up to 10% of that becomes waste frying oil. This creates a massive challenge—and opportunity—for managing it responsibly. You can read the full report on global vegetable oil production to learn more.
Instead of adding to the problem, you can use FryAway for the easiest cleanup imaginable. It’s a quick, three-step process that gets the job done right.
The FryAway 3-Step Process
- Sprinkle and Stir: Right after you finish frying, turn off the heat. Sprinkle the FryAway powder into the still-hot oil and give it a gentle stir until it dissolves.
- Cool Down: Now, just let the oil cool down completely. As it cools, FryAway works its magic, turning the liquid into a solid, organic puck.
- Toss into Household Trash: Once it's solid, simply scoop the hardened oil out of your pan and toss it right into your household trash. It’s clean, simple, and totally safe for your plumbing.
From Kitchen Waste to Clean Energy
The idea of turning leftover frying oil into fuel might sound a little futuristic, but it's not science fiction. It's a real, growing, and incredibly powerful solution for dealing with kitchen waste. That used oil isn't just trash; it's a valuable resource that can be transformed into clean, renewable energy.
The process involves collecting used cooking oil from homes and restaurants and converting it into biodiesel. Unlike traditional fossil fuels, biodiesel is a cleaner-burning alternative that seriously cuts down on harmful emissions. When you participate in a local oil recycling program, you're directly contributing to a more sustainable energy future—one pan of used oil at a time. Of course, for everyday disposal, we always recommend the simplicity and safety of using FryAway.
How Your Leftover Oil Becomes Biofuel
The journey from your frying pan to a vehicle's fuel tank is a fascinating one. More and more, municipalities and private companies are setting up collection points where you can drop off your used cooking oil.
Once collected, the oil gets filtered to remove any lingering food particles. From there, it undergoes a chemical process called transesterification, which is just a fancy way of saying it gets converted into biodiesel.
This isn't just a niche practice; it's a global movement. Roughly 18% of the world's vegetable oil consumption is now used to produce biomass-based diesel, and used cooking oil is a major ingredient. Countries like the United States, Brazil, and Indonesia are leading the charge, proving that what starts in our kitchens can help power our world more cleanly. You can learn more about these oilseed product findings and how they're shaping renewable energy.
By recycling your used oil, you're doing more than just preventing clogs in your pipes. You are actively helping to reduce greenhouse gas emissions and our collective dependence on non-renewable fossil fuels.
How to Find a Recycling Program Near You
Finding a place to recycle your used cooking oil is often easier than you might think. Many communities are eager to help residents handle their oil responsibly.
Here are a few practical steps to find a program in your area:
- Check Your City's Website: Start with your local municipality's public works or sanitation department website. They often have dedicated pages with info on hazardous waste disposal, which usually includes cooking oil.
- Use Online Search Tools: Websites like Earth911 have searchable databases that can help you find recycling centers for all sorts of materials, including used cooking oil.
- Contact Local Waste Management Companies: Just give your local waste hauler a call. They can provide specific instructions or point you toward the nearest collection facility.
For a deeper dive into the logistics and benefits, our guide on how to recycle cooking oil offers even more tips and resources.
Once you find a drop-off location, the rest is simple. Just collect your cooled oil in a sealed, unbreakable container—like its original bottle or a sturdy plastic jug—and take it to the designated site. It's a small effort that makes a huge environmental impact.
Common Questions About Frying Oil
Figuring out the do's and don'ts of used frying oil can feel a little confusing. Let's clear things up by tackling some of the most common questions home cooks have about what to do with their oil after the frying is done.
How Many Times Can I Reuse Frying Oil?
The lifespan of your cooking oil really comes down to a few key things, but a solid rule of thumb is to aim for reusing it 2-3 times.
The type of oil you're using makes a big difference. Some oils have higher smoke points and are simply built to withstand repeated heating better than others. Getting familiar with a cooking oil smoke point chart is a great way to understand which oils can go the distance.
What you're cooking matters, too. Frying something with a heavy, crumbly breading like beer-battered fish is going to break down your oil much faster than, say, frying a batch of simple potato wedges.
What Is the Best Container for Storing Used Oil?
Proper storage is everything if you want to get the most out of your oil. Your best bet is to use a container made of glass or metal that has a secure, airtight lid.
Once the oil has cooled down and you’ve filtered out any food bits, store it in a cool, dark spot like a pantry or a cabinet, far away from the stove or any direct sunlight. This simple step protects it from oxidation, which is the culprit behind that nasty, rancid smell and taste.
Is It Okay to Pour a Tiny Bit of Oil Down the Drain?
That’s a hard no. It might not seem like a big deal, but even a small trickle of oil contributes to some serious problems over time. It clings to the inside of your pipes, creating a sticky trap for food particles and other gunk. Before you know it, you’re dealing with stubborn clogs and calling a plumber.
Every single drop of oil poured down the drain helps build the massive "fatbergs" that plague city sewer systems. Keep it out of the sink and put it in the trash or a recycling bin where it belongs. For the easiest trash disposal, we always recommend using FryAway.
Can I Compost Solidified Oil from FryAway?
While FryAway is a fantastic 100% plant-based product, the solid oil puck it creates belongs in your household trash, not the compost pile.
Dumping large amounts of oil—even solidified—can throw off the delicate balance of your compost, attract unwanted pests, and grind the decomposition process to a halt. The cleanest, easiest solution is to stick to the three-step process: 1) Sprinkle and Stir into hot oil, 2) Cool Down until it’s solid, and 3) Toss it right in the trash can.
Ready to make kitchen cleanup a total breeze? Join the thousands of happy home cooks who have waved goodbye to the mess of oil disposal for good. Try FryAway today and see just how easy it is to fry more and worry less. Shop FryAway products now.