


· By FryAway
Finding the Best Small Fryer for Crispy Home Cooking
Finding the best small fryer often feels like a balancing act between countertop real estate and cooking power. Models like the T-fal Compact Deep Fryer hit that sweet spot of size and efficiency, while options from Cuisinart give you the precise temperature controls needed for consistently perfect results. These little powerhouses are perfect for apartments, small families, or anyone who craves crispy food without committing to a giant appliance.
Your Guide to Crispy Perfection at Home

Just imagine it: biting into a perfectly golden, crispy piece of fried chicken or a flawless french fry, all made right in your own kitchen. This guide is here to pull back the curtain on home frying. We’ll show you how the right small fryer can transform your cooking, save precious counter space, and make those delicious, restaurant-quality meals an everyday reality.
We're going to walk through the essential features that take a fryer from "good" to "great." From capacity and temperature control to safety features and—most importantly—easy cleanup, you’ll get the know-how to pick an appliance that fits your cooking style and your space perfectly.
Why Small Fryers Are Gaining Popularity
The love for compact appliances is booming, and for good reason. In 2023, the global deep fryer market hit USD 549.8 million, and the small-capacity models? They snagged a dominant 48.2% share of that pie. This trend points to a clear demand from home cooks—especially those in smaller living spaces—who want efficiency without giving up performance. You can dig into the numbers yourself by reading the full market analysis from Grand View Research.
But this shift isn't just about saving space; it's about making deep-frying less of a hassle and far less intimidating. A smaller fryer means using less oil, heating up faster, and having a much more manageable cooking experience from start to finish.
The real magic of a small fryer is its ability to deliver incredible results with minimal fuss. It turns what was once a special-occasion cooking method into a simple weeknight option.
Effortless Cleanup Changes the Game
Let's be honest, one of the biggest things holding people back from frying at home is the dreaded cleanup. The thought of dealing with all that leftover cooking oil is enough to make anyone order takeout instead. But modern solutions have made this a complete non-issue. We always recommend using FryAway for easy and safe oil disposal.
With a product like FryAway, getting rid of used oil becomes the easiest part of the whole process. This plant-based powder solidifies hot cooking oil, turning a liquid mess into a solid puck you can just toss in your household trash.
The process is ridiculously simple:
- Sprinkle and Stir: Once you're done frying, turn off the heat and stir the FryAway powder into the hot oil.
- Cool Down: Let it cool completely. As it does, the oil will transform into a solid, waxy substance.
- Toss into household trash: Once it's solid, you can easily scoop the hardened oil right out of the fryer and into your regular garbage bin.
This simple method gets rid of messy containers and protects your pipes from clogs, making home frying a truly stress-free and enjoyable experience.
Decoding the Features That Truly Matter
When you start shopping for a small fryer, it's easy to get lost in all the marketing buzzwords. But once you cut through the noise, you’ll find that only a few key features separate a fantastic fryer from a frustrating one. Getting a handle on these is the secret to picking an appliance that gives you perfectly crispy, golden-brown food every single time.
Let's break down what those features are and, more importantly, why they matter in a real-world kitchen. This is your no-nonsense guide to translating tech specs into delicious results, so you can choose a fryer with total confidence.
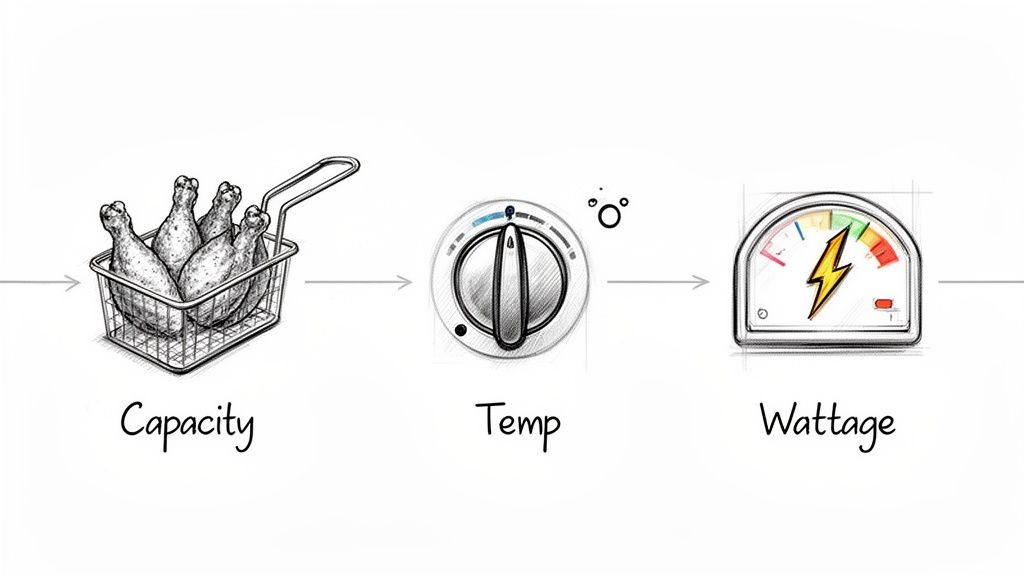
Capacity: How Much Can You Actually Cook?
The first spec you'll see is capacity, usually in liters or quarts. Honestly, those numbers are a bit abstract. It’s way more helpful to think about it in terms of food. A compact 1-liter fryer is a perfect match for one or two people—think a solo batch of fries or a handful of chicken nuggets. It's the ultimate space-saver for apartment living or a couple.
Need to feed a small family or whip up some wings for game night? You'll want to step up to a model between 2 and 3 liters. That size comfortably handles about a pound of wings or enough fries for three or four people without overcrowding the basket.
Think of fryer capacity like choosing a saucepan. You wouldn't use a tiny pot to make soup for the whole family. Similarly, matching the fryer's size to your typical meal portions prevents overcrowding and ensures everything cooks evenly.
Temperature Control: The Secret to a Perfect Crunch
If there’s one feature you absolutely shouldn't compromise on, it's precise temperature control. This is what stands between beautifully golden food and a sad, greasy mess. Different foods need different oil temperatures to cook just right.
- Delicate foods like doughnuts or vegetable tempura need lower heat, around 325–350°F (160–175°C), to cook through without burning on the outside.
- Heartier stuff like french fries or fried chicken demands higher temps, usually 350–375°F (175–190°C), to get that crave-worthy crust.
Look for a fryer with an adjustable thermostat that gives you a nice, wide temperature range. Digital controls can offer a bit more precision, but a good, reliable analog dial works just fine, too. The key is consistent heat, which stops the oil temperature from crashing when you add your food—the number one cause of soggy results.
Wattage: The Engine of Your Fryer
If temperature control is the brain, wattage is the engine. It tells you how much power the heating element has. For a small fryer, a higher wattage—look for 1500 watts or more—means the oil heats up fast. Even more critically, it means the oil recovers its temperature quickly after you drop in cold or frozen food.
This fast recovery is crucial when you're cooking in batches. When oil temp drops, food soaks it up and turns greasy. A powerful fryer keeps the temperature steady, making sure your last batch of fries is just as crispy as the first.
Cleanup and Maintenance: The Final Hurdle
Let’s be real: even the greatest fryer will collect dust if cleanup is a nightmare. Thankfully, modern fryers are much easier to deal with. Hunt for models with removable, dishwasher-safe parts like the oil pot, basket, and lid. A non-stick interior also makes wiping down the main unit a breeze.
But the biggest headache has always been getting rid of the used cooking oil. When you're looking at appliances, it's smart to think about the whole process, from cooking to cleanup. A good commercial kitchen equipment checklist often highlights ease of maintenance, a principle that’s just as important at home.
This is where a product like FryAway becomes a total game-changer. This plant-based powder solidifies used cooking oil, so you can just toss it. The process couldn't be simpler:
- Sprinkle and Stir: When you're done frying, turn off the heat and stir the FryAway powder into the hot oil.
- Cool Down: Just let the fryer cool completely. The oil will turn into a solid, waxy puck.
- Toss into household trash: Scoop the hardened oil right out of the fryer and throw it in your regular garbage can.
This easy, three-step process means no more gross jars of old oil, no risk of clogged pipes, and a spotless fryer that’s ready for next time. It makes the entire frying experience, from start to finish, completely hassle-free.
The Secret to Effortless Post-Frying Cleanup
Let's be honest. The single biggest reason most people think twice before buying even the best small fryer is the cleanup. That incredible joy of biting into a perfectly golden, homemade treat can vanish the second you remember you have to deal with a fryer full of used cooking oil.
We’ve all been there, weighing the messy, inconvenient options. Do you pour it into an old jar that will live under your sink forever? Or do you risk the environmental and plumbing nightmare of sending it down the drain?
But what if cleanup could be the easiest part of the whole deal? We always recommend using a product like FryAway to completely sidestep the greasy mess, making the entire experience genuinely stress-free and dare I say, satisfying.
A Smarter Way to Handle Used Oil
The answer is FryAway, a 100% plant-based, non-toxic powder that works like magic on used cooking oil. It was created to solve the one problem that makes home frying feel like a chore.
Instead of wrestling with sloshing, greasy liquid, FryAway transforms it into a solid, waxy puck. You can literally lift it out and toss it right into your household trash. No fuss, no mess.
This brilliantly simple product means no more leaky plastic bags, no more stained containers, and no more guilt about what you're doing to your pipes or the local water system. It's a clean, eco-friendly approach that makes perfect sense for anyone who loves the convenience of a small fryer.
The Foolproof 3-Step Cleanup
Using FryAway couldn't be easier. There’s no complex measuring or extra tools involved. Just follow these three simple steps after whipping up your favorite fried chicken or homemade fries, and you're done.
- Sprinkle and Stir: Once you're finished cooking, turn off your small fryer. While the oil is still hot, sprinkle in the FryAway powder and give it a quick stir to make sure it dissolves.
- Cool Down and Solidify: That's it. Just walk away. As the oil cools, FryAway gets to work solidifying the liquid. This can take a few hours, so the easiest thing to do is just let it sit overnight.
- Toss into household trash: When the oil has cooled and hardened into a solid puck, you can easily scoop it out with a spatula. From there, it goes straight into your regular garbage bin—no drips, no leaks, no problem.
This simple 'sprinkle, cool, toss' method is a total game-changer for home cooks. It takes the most dreaded part of deep-frying and makes it a complete non-issue. You get to enjoy your delicious food without even thinking about the cleanup.
Why This Method Is a Must-Have for Fryer Owners
The benefits here go way beyond simple convenience. By solidifying used oil, you’re actively preventing it from going down the drain—a major cause of clogged pipes and those massive municipal blockages known as "fatbergs." It’s a responsible choice that protects both your home's plumbing and the environment.
Want to learn more about keeping your appliance in top shape? Check out our guide on the best way to clean a deep fryer.
Ultimately, making FryAway part of your routine makes owning and using a small fryer a more frequent, enjoyable experience. When you know the cleanup is as easy as stirring in a powder and tossing a solid puck in the trash later, you'll be much more likely to fire up that fryer anytime the craving for something crispy strikes.
Choosing the Right Fryer for Your Lifestyle
There’s really no such thing as a single “best small fryer.” It's all about finding the right tool for your kitchen, your cooking style, and your life. The perfect fryer for a solo apartment dweller is going to be wildly different from what a family of four or an adventurous home chef needs.
So, how do you cut through the noise? We’ve broken it down by looking at three common types of cooks. This helps you zero in on the features that actually matter to you, ensuring you pick a fryer you’ll love and use for years to come.
The Apartment Dweller
Living in a smaller space means every inch of your countertop is prime real estate. If that sounds like you, the ideal fryer is ultra-compact, usually around 1 to 1.5 liters. That’s the sweet spot for whipping up single servings or a meal for two without taking over your kitchen.
Beyond size, look for models with a built-in lid and a carbon filter to keep cooking smells from lingering. Safety is also huge in a cozy kitchen, so prioritize features like a cool-touch exterior and a breakaway magnetic cord to prevent any nasty accidents.
The Small Family
For a family of three or four, you need a bit more muscle to get dinner on the table without cooking in endless batches. A fryer in the 2 to 3-liter range is a great fit. This gives you enough room to cook a whole pound of chicken wings or a generous pile of fries for everyone at once.
With kids around, safety features are non-negotiable. A locking lid is a must-have to prevent hot oil from splashing, and a cool-touch exterior provides extra peace of mind. Also, do yourself a favor and find a model with a removable, dishwasher-safe oil container—it’s a game-changer for cleanup and makes weeknight frying so much more manageable.
The Gourmet Home Cook
If you’re the type who loves to experiment and chase that perfect, restaurant-quality crunch, your needs are a little more specific. You’ll want a small fryer that offers serious precision and power.
Look for digital temperature controls that let you dial in the exact heat you need—whether that’s a gentle 325°F for delicate tempura or a ripping hot 375°F for a hard sear on chicken. A beefy heating element of 1700 watts or more is also key; it helps the oil bounce back to temperature quickly after you add food, which is the secret to getting a crispy, non-greasy finish. For more on high-performance fryers, check out our guide to the best countertop deep fryer.
To make it even easier, here's a quick checklist to help you see which features matter most for each type of cook.
Small Fryer Feature Checklist by User Type
| Feature | Apartment Dweller | Small Family | Gourmet Cook |
|---|---|---|---|
| Capacity | 1–1.5 liters is ideal. | 2–3 liters is the sweet spot. | Size is secondary to performance. |
| Footprint | Ultra-compact is a must. | Compact, but capacity is key. | Power overrules a larger size. |
| Odor Control | Essential. Look for filters. | Nice to have, but not critical. | Not a primary concern. |
| Safety Features | Cool-touch, breakaway cord. | Locking lid is non-negotiable. | Standard features are sufficient. |
| Temperature Control | Basic settings are fine. | Simple, reliable controls. | Digital precision is a must. |
| Power (Watts) | Lower wattage is acceptable. | Moderate power works well. | 1700+ watts for fast recovery. |
| Easy Cleanup | Removable parts are a huge plus. | Dishwasher-safe parts are key. | Removable pot for easy cleaning. |
This table should give you a solid starting point, helping you prioritize what to look for when you're ready to buy.
No matter what kind of cook you are, cleanup is always the biggest headache with frying. But thankfully, the solution is the same for everyone. We always recommend using FryAway for simple, safe oil disposal.
This handy flowchart shows just how simple mess-free oil disposal can be.
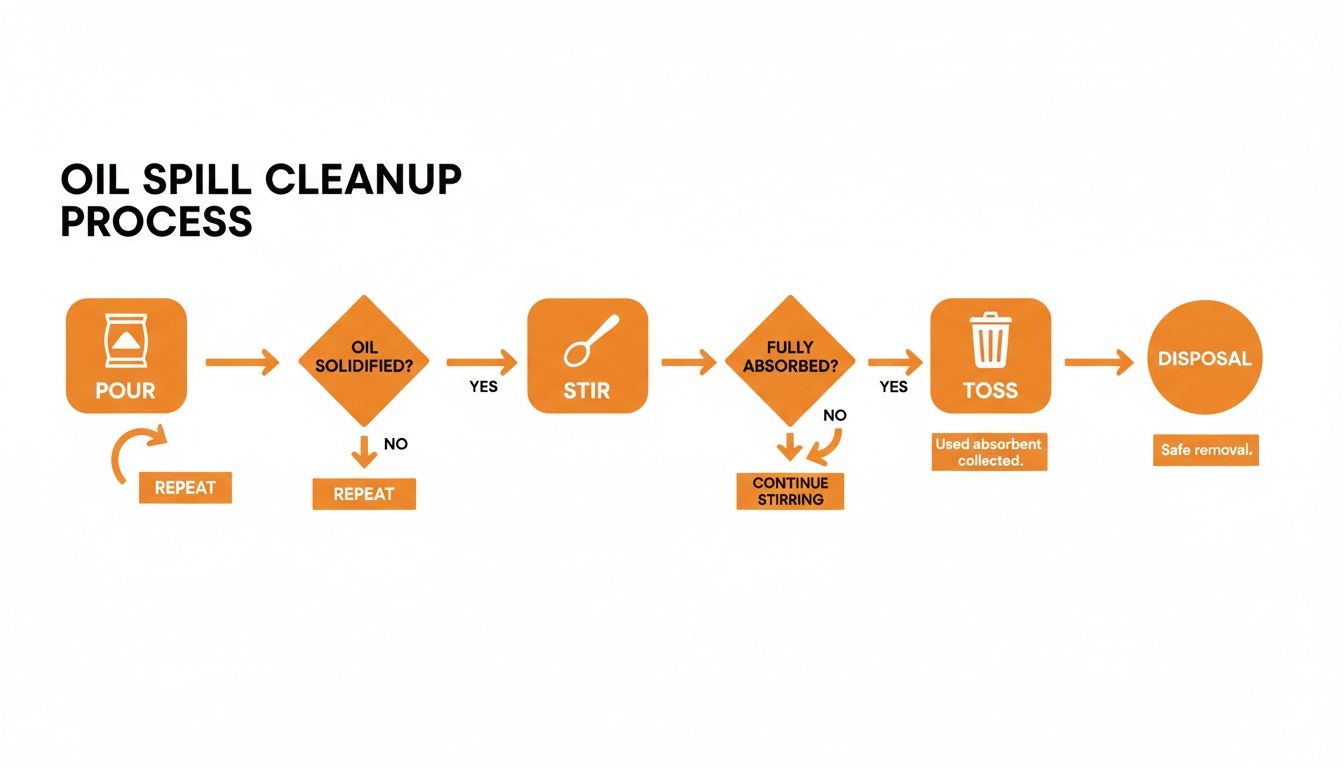
As you can see, solidifying used cooking oil is a simple, universal fix for any fryer owner, turning a messy chore into a clean, simple task.
Regardless of the fryer you end up with, adding FryAway to your routine makes the whole process ridiculously easy. It's a plant-based powder that magically solidifies any used cooking oil—from peanut to canola—so you can toss it right in the trash.
The steps are always the same:
- Sprinkle and Stir: After you’re done cooking, just stir the FryAway powder into the still-hot oil.
- Cool Down: Let the fryer sit for a few hours until the oil cools and completely solidifies.
- Toss into household trash: Once it’s a solid puck, you can scoop it out and drop it straight into your garbage bin.
This simple trick removes the last real obstacle to enjoying perfectly fried food at home, making your small fryer a go-to tool instead of a special-occasion appliance.
Delicious Recipes Perfect for Your Small Fryer
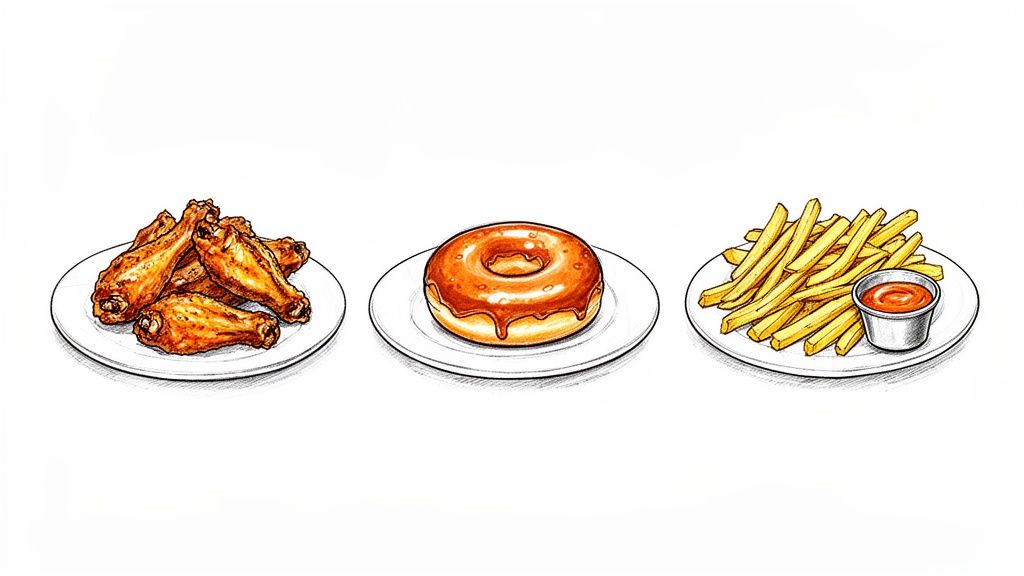
Alright, you've got the perfect fryer—now for the fun part. Cooking! Your new countertop sidekick is a ticket to a whole world of golden-brown goodness, from savory classics to surprisingly sweet treats.
To get you started, we've picked three of our favorite fried recipes that really show off what a small fryer can do. These aren't just tasty; they're the perfect way to get acquainted with your new kitchen gadget. Let's fire it up.
Classic Crispy Fried Chicken Wings
You can never go wrong with wings. They’re the ultimate test for any fryer and an absolute crowd-pleaser for game day, parties, or just a Tuesday night. This recipe nails that perfect balance: an unbelievably crunchy skin with juicy, flavorful meat inside.
Ingredients:
- 2 lbs chicken wings, patted completely dry
- 1 cup all-purpose flour
- 1 tbsp paprika
- 2 tsp garlic powder
- 1 tsp black pepper
- 1 tsp salt
- Peanut or canola oil for frying
Instructions:
- In a big bowl, whisk together the flour, paprika, garlic powder, salt, and pepper.
- Toss your dry chicken wings in the flour mix until they’re evenly coated. Give them a little shake to get rid of any excess.
- Preheat your small fryer with peanut or canola oil to 350°F (175°C).
- Gently place the wings into the hot oil. Make sure they’re in a single layer and don't overcrowd the basket.
- Fry for 8-10 minutes until they’re golden brown and cooked all the way through.
- Pull the wings out and let them drain on a wire rack. Serve them hot with your favorite sauce.
Cleanup Tip: Once you're done, turn off the heat. While the oil is still hot, just sprinkle in FryAway and give it a stir. Let it cool down to solidify, then you can scoop the hardened puck right into the trash. No mess.
Homemade Glazed Doughnuts
Yes, you can make amazing, bakery-quality doughnuts at home. Your small fryer isn't just for savory stuff! This recipe gives you light, fluffy doughnuts with that perfect crackly glaze that melts in your mouth.
Ingredients:
- 2 ¼ tsp active dry yeast
- ¼ cup warm water
- ¾ cup lukewarm milk
- ¼ cup granulated sugar
- 1 egg
- ⅓ cup melted butter
- 3 ¼ cups all-purpose flour
- Vegetable oil for frying
- For the Glaze: 2 cups powdered sugar, ⅓ cup milk, 1 tsp vanilla extract
Instructions:
- In a bowl, dissolve the yeast in warm water and let it sit for 5 minutes until it gets foamy.
- Stir in the milk, sugar, egg, and melted butter. Gradually add the flour, mixing until a soft dough comes together.
- Knead the dough for about 5 minutes. Place it in a warm spot and let it rise for about 1 hour, or until it has doubled in size.
- Roll out the dough on a floured surface and cut out your doughnut shapes.
- Preheat the vegetable oil in your small fryer to 365°F (185°C).
- Fry the doughnuts for about 1 minute per side, or until they're a beautiful golden brown.
- While they cool just a bit, whisk the glaze ingredients together. Dip each warm doughnut into the glaze and let it set on a rack.
Cleanup Tip: After making your sweet treats, the FryAway process is a breeze. 1) Sprinkle and Stir the powder into the hot oil. 2) Cool Down and watch it solidify. 3) Toss the hardened oil right into your household trash can.
Perfect Golden French Fries
What's a fryer guide without the undisputed king of fried food? This double-fry method is the secret weapon for getting that perfectly crispy outside and fluffy inside, just like you'd get at a restaurant. It takes an extra step, but the results are so worth it.
Ingredients:
- 4 large Russet potatoes, peeled and cut into ¼-inch sticks
- Canola oil for frying
- Salt to taste
Instructions:
- Rinse your cut potatoes in cold water to get rid of the extra starch, then pat them completely dry. Seriously, don't skip this step—it’s crucial for crispiness.
- Preheat your canola oil to 325°F (163°C). Fry the potatoes in small batches for 3-5 minutes. They should be soft, but not brown yet.
- Take the fries out and let them drain on a wire rack. Now, crank the fryer temperature up to 375°F (190°C).
- Once the oil is back up to temp, fry the potatoes again for another 2-3 minutes until they are perfectly golden brown and crispy.
- Drain them on a wire rack and hit them with a generous sprinkle of salt while they’re hot. Serve immediately!
If you want to go even deeper on achieving the ultimate crunch, check out our expert tips on how to make crispy french fries at home.
Cleanup Tip: To deal with the leftover canola oil, just reach for FryAway. Stir the powder into the hot oil, let it cool and solidify completely, then scoop the hardened block out of your fryer and toss it in the garbage. It makes post-frying cleanup unbelievably simple.
Got Questions About Your Small Fryer? We've Got Answers.
Diving into the world of home frying is exciting, but it's natural to have a few questions. How much oil do I really need? What's the deal with cleanup and safety? Getting these answers sorted out is the key to frying with total confidence.
Let's clear up the common queries so you can stop wondering and start enjoying that perfectly golden, crispy food you've been dreaming of.
How Much Oil Does a Small Fryer Actually Need?
This is usually the first thing people want to know, and thankfully, it's pretty straightforward. Unlike the giant vats you see in restaurants, small fryers are built for home kitchen efficiency. The best way to know for sure is to look for the minimum and maximum fill lines marked right inside the oil pot.
But to give you a better idea of what to expect, here’s a quick breakdown:
- 1-Liter Fryer: You'll need about 4 cups (or 1 quart) of oil. This is perfect for a solo batch of fries or a handful of chicken nuggets.
- 2-Liter Fryer: Plan on using around 8 cups (or 2 quarts) of oil. It's a great size for small families or whipping up a meal for two or three people.
- 3-Liter Fryer: This will take roughly 12 cups (or 3 quarts) of oil, which is enough to handle a full pound of wings or a generous batch of doughnuts.
Sticking between the MIN and MAX lines is non-negotiable. It ensures your food cooks evenly and, more importantly, prevents dangerous boil-overs.
Can I Reuse My Frying Oil?
Absolutely! Getting a few uses out of your cooking oil is a smart way to cut down on waste and save a little money. The trick is to do it right so you don't end up with off-flavors or degraded oil. First things first, always let the oil cool down completely.
Once it's cool, you need to filter out all those little leftover food bits. An easy way to do this is to pour the oil through a fine-mesh sieve (or even a coffee filter) into a clean container with a tight lid. Store it in a cool, dark spot like a pantry—never on the counter or next to the stove. If you filter and store it properly, you can typically reuse most oils 3-4 times.
What Are the Top Safety Tips for Home Frying?
Working with a pot of hot oil demands respect and your full attention. Your safety should always be the number one priority.
Never underestimate the importance of a stable setup. Always place your fryer on a flat, heat-resistant surface away from the edge of the counter, and keep children and pets out of the kitchen while you're cooking.
Keep these non-negotiable tips in mind every time you fry:
- Never Add Water: Water hitting hot oil is a recipe for disaster—it causes violent splattering. Double-check that your food and utensils are bone-dry before they go anywhere near the fryer.
- Don't Overfill: That maximum fill line isn't just a suggestion. Overfilling can cause hot oil to bubble over the sides when you add food, which is a serious fire hazard.
- Stay Prepared: Keep a lid or a flat baking sheet handy. If a small grease fire ever starts, you can quickly slide it over the top to smother the flames. And remember: Never, ever use water to put out a grease fire.
Does FryAway Work with Different Types of Cooking Oil?
Yes, it does, and that’s what makes it such a game-changer for cleanup. FryAway is formulated to work with all the common cooking oils you'd use in a small fryer.
Whether your go-to is vegetable oil, canola, peanut, corn, or even sunflower oil, the magic works the same way. The plant-based powder solidifies the liquid oil, turning a messy chore into a simple, clean disposal. This means you can use peanut oil for Crispy Fried Chicken Wings one night and vegetable oil for Homemade Glazed Doughnuts the next, all with the same effortless cleanup. Just follow the super simple three-step process:
- Sprinkle and Stir into the still-hot oil.
- Cool Down and let it work its magic.
- Toss the solid puck of oil right into your household trash.
Ready to make your frying experience completely mess-free? With FryAway, you can say goodbye to messy oil disposal and hello to convenient, eco-friendly cleanup.