


· By FryAway
How Long to Deep Fry Chicken Wings for Perfect Crispiness
Ever pulled a batch of golden-brown, shatteringly crisp chicken wings from the fryer, only to wonder how to get them perfect every single time? It’s the ultimate game-day food, but getting it right at home can feel like a guessing game.
So, how long does it take to deep fry chicken wings? The short answer is usually around 6 to 10 minutes in oil heated to 350-375°F. But honestly, the real secret to wing perfection isn't just about setting a timer. It's about the details.
Your Guide to Perfectly Crispy Chicken Wings
Making restaurant-quality wings at home is totally doable. It’s less about a magic formula and more about understanding what’s happening in that fryer. This guide is your new roadmap to mastering the deep fry, so you can stop guessing and start frying with confidence. We'll walk through all the variables that can make or break a good batch of wings.
Key Factors for Perfect Wings
A few key things come together to create that perfect wing experience. Nail these, and your wings will go from pretty good to absolutely unforgettable.
- Wing Size and Type: A tiny wingette is going to cook way faster than a big, meaty drumette. It seems obvious, but it's easy to forget when you're in the zone.
- Fresh vs. Frozen: Frying from frozen? You'll need more time and a slightly lower initial oil temperature to cook them through without burning the outside.
- Oil Temperature: This is the big one. Keeping your oil temperature steady is the single most important factor for getting that crispy skin without drying out the meat inside.
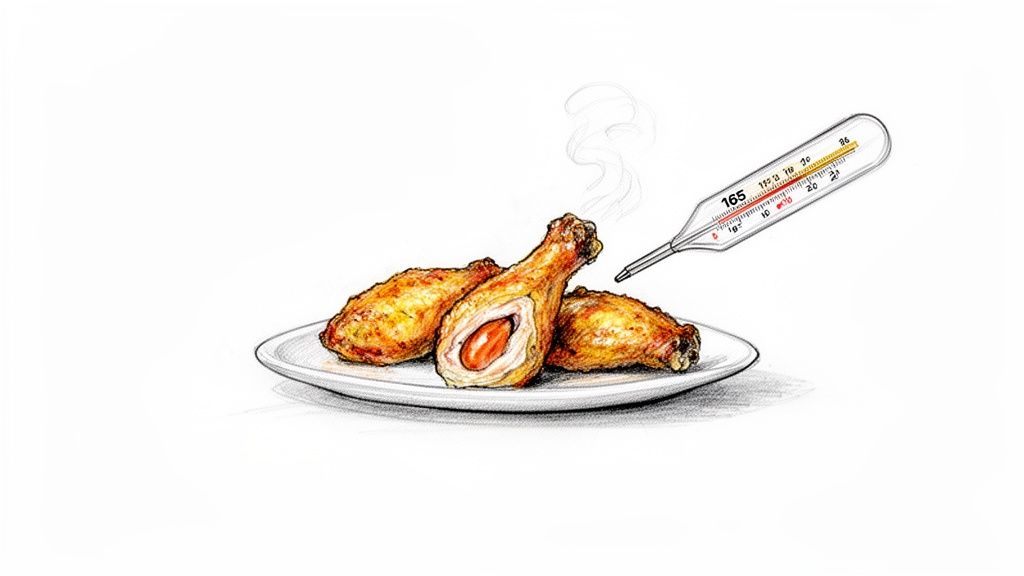
Most culinary pros agree that the sweet spot for deep-frying wings is between 350°F and 375°F. A common go-to is frying at 350°F for about 7 to 10 minutes. This gives the meat enough time to cook through and safely hit that magic 165°F internal temperature. For more tips from the pros, you can check out the insights on wing frying times at jieguankitchen.com.
From Frying to Cleanup
Let's be real—the worst part of frying is the cleanup. No one wants to deal with a big pot of greasy oil after enjoying a delicious meal.
That’s where a game-changer like FryAway comes in, making the whole process—from prep to disposal—ridiculously simple. All you do is 1) Sprinkle and Stir the powder into your hot oil, 2) Cool it Down and let it turn solid, and 3) Toss the whole hardened puck right into the household trash. It makes frying at home a genuine joy, from start to finish.
Preparing Your Wings and Your Frying Station
The secret to incredible fried wings doesn't start when they hit the oil. It begins way before that. Getting your prep right is what separates good wings from truly unforgettable ones, and it all boils down to one simple, non-negotiable step: getting the chicken skin as dry as possible.
Water is the enemy of hot oil. It causes that violent, dangerous spattering that can burn you and make a mess of your kitchen. But just as important, moisture steams the chicken skin instead of frying it. The result? Soft, rubbery wings. To beat this, just lay your wings out on a tray and pat them down with paper towels. Be thorough—press firmly to soak up every last drop of moisture. This is your ticket to that perfect, crispy skin.
Seasoning for Maximum Crunch and Flavor
With your wings bone-dry, it's time to think about flavor and texture. How you season them now can add serious depth and contribute to that final crunch. A couple of tried-and-true methods work wonders, depending on what you're going for.
- Simple Salt and Pepper: A generous shower of kosher salt and freshly cracked black pepper is a classic for a reason. It lets the chicken's natural flavor shine through, creating a perfect blank canvas for whatever sauce you decide to toss them in later.
- A Seasoned Flour Dredge: For an extra-crispy, craggy crust, you can't beat a light coating of seasoned flour. Just mix some all-purpose flour with your favorite spices—salt, pepper, garlic powder, and paprika are a great start—and toss the dry wings until they're lightly coated. Make sure to shake off any excess before they go into the fryer.
Setting Up Your Frying Equipment
Wings prepped? Great. Now let's get your frying station in order. You’ve basically got two options here, and both have their perks. A dedicated deep fryer is fantastic because it takes the guesswork out of temperature control. Its built-in thermostat keeps the heat steady, which is a massive advantage for cooking wings evenly.
If you don't have a deep fryer, a heavy-bottomed pot like an enamel-coated cast-iron Dutch oven is your best friend. Cast iron holds heat like a champ, which means the oil temperature won't plummet as drastically when you add the cold chicken.
No matter which one you use, a reliable thermometer isn't just a nice-to-have—it's your most important tool. Clip a deep-fry thermometer to the side of your pot or keep an instant-read thermometer handy. This is the only way to know exactly how long to deep fry chicken wings at the right temperature for crispy, delicious, and safely cooked results every single time.
Mastering the Fry for Fresh and Frozen Wings
This is where the magic happens. The key to knowing exactly how long to deep fry chicken wings really comes down to one simple question: are you starting with fresh (or thawed) wings, or are they frozen solid? Each has its own path, but don't worry—both lead to ridiculously delicious results.
Before your wings even dream of hitting the hot oil, there are a few prep steps that make all the difference.
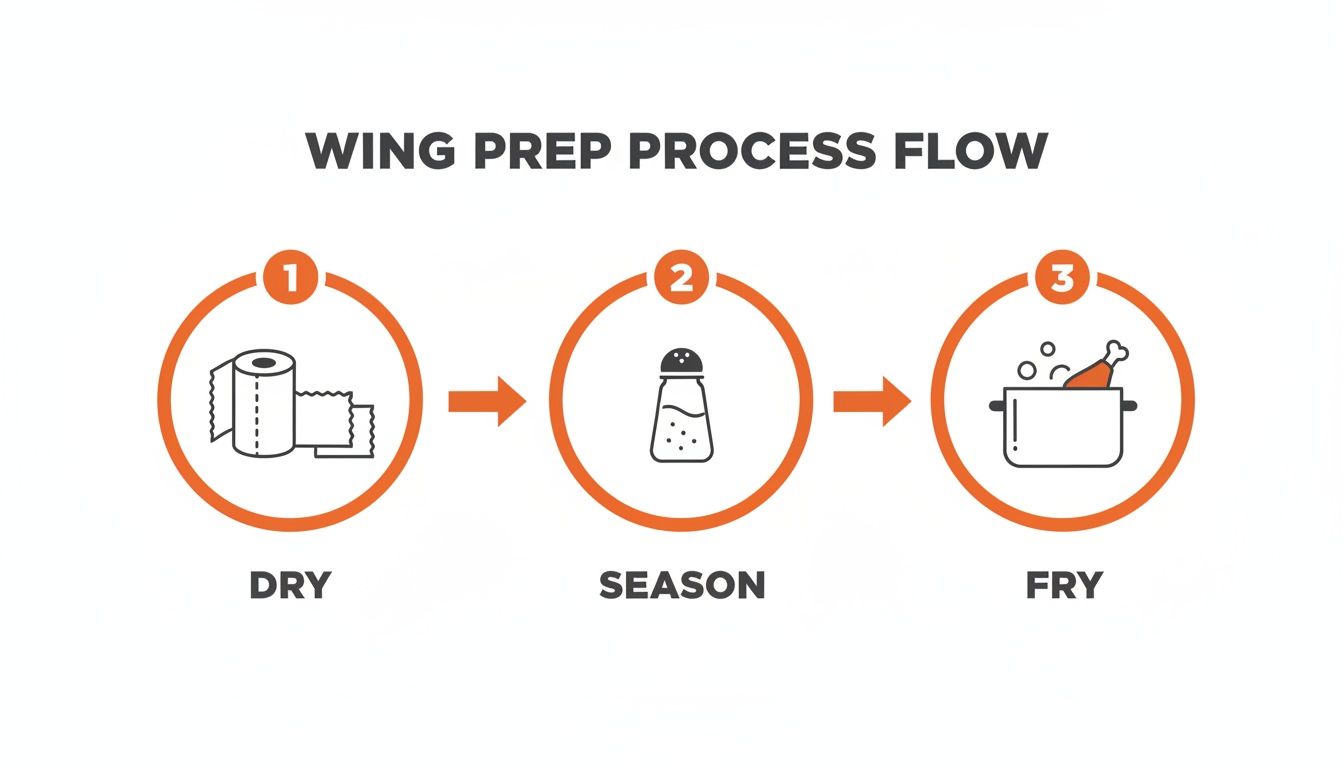
As you can see, whether you start fresh or frozen, the fundamentals—drying, seasoning, and frying—are what separate good wings from great ones.
Frying Fresh or Thawed Chicken Wings
When you're working with fresh or completely thawed wings, you’ve got two fantastic options. The first is the classic single-fry method. It’s the most direct route to crispy wings: just fry them once at 350°F for about 7-10 minutes. The goal is a golden-brown exterior and a safe internal temperature of 165°F. Simple, fast, and perfect for a weeknight wing craving.
But if you want that next-level, shatteringly crunchy skin that restaurants are famous for, you've got to try the double-fry method.
Single-Fry vs. Double-Fry Method Comparison
Deciding between a single or double fry really depends on how much time you have and what kind of texture you're after. The single fry is quick and reliable, but the double fry delivers that legendary, extra-crispy finish that holds up perfectly under any sauce.
Here’s a quick breakdown to help you choose the right path for your wings.
| Frying Method | Process Overview | Best For | Pros | Cons |
|---|---|---|---|---|
| Single-Fry | Fry once at 350°F for 7-10 minutes until cooked through and golden. | Quick weeknight dinners or when you're short on time. | Fast and straightforward; produces a classic crispy wing. | The skin can soften more quickly once sauced. |
| Double-Fry | Fry at 325°F for 6-8 minutes, rest, then fry again at 375°F for 2-3 minutes. | Restaurant-quality results, entertaining, or making wings ahead. | Unbelievably crispy skin that stays crunchy; great for prepping in advance. | More time-consuming; requires two heating stages. |
Ultimately, both methods will give you a great wing. The double-fry just takes it from great to unforgettable.
Expert Tip: The double-fry is a game-changer for parties. You can do the first, lower-temperature fry hours ahead of time. When your guests arrive, just crank up the heat and give the wings that final flash-fry right before serving.
How to Deep Fry Frozen Chicken Wings
Forgot to thaw the wings? No problem at all. You can absolutely fry wings straight from the freezer with a few key adjustments. The biggest difference is the cook time—you’ll need to extend it to around 10-15 minutes to make sure they cook all the way to the bone.
The other critical point is batch size. Since frozen wings will drop your oil temperature significantly, you must fry them in smaller batches. Overcrowding the fryer will cause the temp to plummet, leaving you with soggy, greasy wings instead of crispy ones. Keep your oil steady at 350°F and let it come back up to temperature between each batch.
No matter which method you use, an instant-read thermometer is your best friend. It takes all the guesswork out of the equation and guarantees your wings hit that all-important 165°F internal temp, ensuring they’re perfectly cooked and safe to eat.
Once fried, let your wings drain on a wire rack, not paper towels. This allows air to circulate all around, preventing the bottoms from getting steamy and soft while you finish the rest.
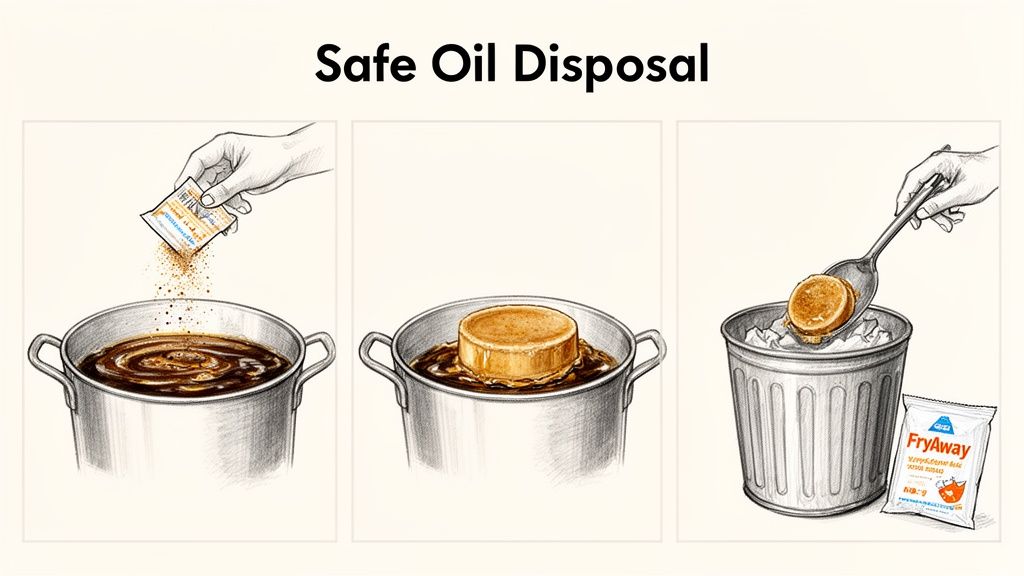
After the last wing comes out of the fryer, your job is almost done—but don't forget the cleanup. Dealing with all that used cooking oil is incredibly simple and mess-free with FryAway. Just follow these steps:
- Sprinkle and Stir: Once you turn off the heat, carefully sprinkle the FryAway powder into the hot oil and stir until it dissolves.
- Cool Down: Now, just walk away and let the pot cool down completely. As it cools, the oil will magically solidify into an organic, solid puck.
- Toss into household trash: Once it’s solid, you can easily scoop the hardened oil out and toss it right into your regular trash bin. It's a clean, safe, and planet-friendly way to clean up.
Pro Tips for Crispier Wings and Avoiding Common Mistakes
Getting that perfect balance of juicy meat and skin that shatters when you bite into it is the ultimate goal. But a few common missteps can quickly turn dream wings into a greasy disappointment. Let's move beyond the basics of timing and temperature and get into the pro tips that take good wings to a truly unforgettable level.
One of the best-kept secrets for unbelievably crispy skin happens long before the wings even touch the oil. After you've patted them completely dry, arrange them on a wire rack set inside a baking sheet. Let them air-dry, uncovered, in the fridge for a few hours or even overnight. This process pulls moisture from the skin, guaranteeing it will fry up golden and crunchy.
Another simple trick? Add a tablespoon of cornstarch to your seasoning blend. Cornstarch is fantastic at absorbing any last bit of moisture and creates an extra-crispy, almost glassy coating when it hits the hot oil.
Fixing Common Frying Mistakes
Even with perfect prep, things can sometimes go sideways. Knowing how to spot and fix a problem on the fly is what separates the novices from the pros.
-
Problem: Greasy or Soggy Wings This is almost always the result of one of two things: overcrowding the fryer or using oil that isn't hot enough. When you dump too many wings in at once, the oil's temperature plummets. Instead of frying, the wings just sort of steam and soak up grease.
-
The Fix: Always fry in small batches, making sure the wings have plenty of room to float around. A good thermometer is your best friend here—make sure the oil comes back up to 350°F-375°F between batches.
-
Problem: The Skin Just Isn't Crisping Up If your wings are cooked through but the skin is still pale and soft, your oil temperature is too low. The heat isn't intense enough to render the fat and crisp the skin before the meat starts to overcook.
-
The Fix: Crank up the heat and get your oil into the proper range. If you've already cooked a batch this way, you might be able to save them with a double-fry. A quick, second dip in hotter oil can often crisp them right up. We dive deeper into this method in our guide on whether double-frying makes food crispier.
Key Takeaway: The single most important tool for preventing these mistakes is a reliable deep-fry or instant-read thermometer. It takes all the guesswork out of the equation and gives you total control, which is essential for figuring out exactly how long to deep fry chicken wings.
Once your wings are fried to perfection, don't forget the final step that makes the whole process truly painless. After you've turned off the heat, just grab your FryAway.
- Sprinkle and Stir the plant-based powder directly into the hot cooking oil until it’s fully dissolved.
- Cool Down and just let the pot sit. The oil will transform into a solid, waxy puck.
- Toss into household trash by simply scooping out the hardened oil and dropping it in your garbage bin.
This simple routine makes frying at home completely hassle-free, from the first wing to the final cleanup.
Delicious Fried Chicken Wing Recipes to Try Tonight
Now that you have the techniques down, it's time to put that knowledge into practice. We've got two killer fried recipes ready for you, each designed to showcase a different frying method so you can get some delicious, hands-on experience.
Get ready to make some truly unforgettable wings.
Classic Crispy Buffalo Wings (Double-Fried)
This one is all about the double-fry. That two-step process is the secret to an unbelievably crispy wing that actually stays crunchy, even after getting tossed in that classic, tangy Buffalo sauce. It’s the gold standard for a reason.
What You'll Need:
- 3 lbs chicken wings, split into drumettes and flats
- 48 oz canola oil, for frying
- 1 tsp salt
- 1/2 tsp black pepper
- 1/2 cup Frank's RedHot sauce
- 4 tbsp unsalted butter, melted
Let's Get Cooking:
- In a large Dutch oven or deep fryer, get your canola oil heated up to 325°F.
- Pat the chicken wings completely dry with paper towels—don't skip this part! Season them all over with salt and pepper.
- Carefully add half the wings to the hot oil for the first fry. Let them cook for 7-9 minutes, then pull them out and let them rest on a wire rack. Repeat with the second batch.
- Crank the heat up. Get that oil to 375°F. Add the first batch of wings back in for their second fry, cooking for another 2-4 minutes until they're deeply golden brown and extra crispy. Repeat with the second batch.
- While the wings are on their final fry, whisk together the melted butter and hot sauce in a large bowl.
- Toss the hot, crispy wings in the sauce until they're fully coated. Serve them immediately with your favorite dip.
Sticky Garlic Ginger Wings (Single-Fried)
For this recipe, we're going with a single-fry method. A light dusting of flour gives the sweet and savory glaze something to cling to in every delicious nook and cranny. Using peanut oil here also adds a subtle, nutty flavor that really works with the Asian-inspired sauce.
What You'll Need:
- 3 lbs chicken wings, split and patted dry
- 48 oz peanut oil, for frying
- 1/2 cup all-purpose flour
- 1 tsp garlic powder
- 1/2 tsp salt
-
For the Glaze:
- 1/2 cup soy sauce
- 1/4 cup honey
- 2 tbsp rice vinegar
- 1 tbsp fresh ginger, grated
- 3 cloves garlic, minced
- 1 tsp sesame oil
Let's Get Cooking:
- Heat your peanut oil in a deep fryer or large pot to 360°F.
- In a bowl, mix the flour, garlic powder, and salt. Toss the dry wings in the flour mixture, making sure to shake off any excess.
- Fry the wings in batches for 8-10 minutes. You're looking for golden brown and an internal temperature of 165°F. Move them to a wire rack to drain.
- While the wings are frying, combine all the glaze ingredients in a saucepan over medium heat. Bring it to a simmer and let it cook for 3-5 minutes, until it's just slightly thickened.
- Toss the freshly fried wings in the warm glaze until every last one is evenly coated.
If you're feeling inspired and want to keep exploring, our guide to making a fantastic Crispy Korean Fried Chicken Wing Recipe at Home is another great one to add to your list.
No matter which recipe you go with, the cleanup process is the same. After you're done frying and the stove is off, make it easy on yourself with FryAway. Just follow the simple three-step process to handle that used cooking oil safely and without any mess.
- Sprinkle and Stir the FryAway powder into the still-hot cooking oil.
- Cool Down and just let the pot sit until the oil solidifies completely.
- Toss into household trash by scooping the solid puck out and dropping it right in your garbage bin.
Easy And Safe Oil Disposal With FryAway
You've just fried up a batch of perfectly crispy chicken wings. The kitchen smells amazing, everyone's happy, but now you're left staring at a pot full of used cooking oil. What a buzzkill, right?
Don't even think about pouring that grease down the drain—unless you want to call a plumber later. And dealing with messy jars is just a hassle nobody has time for. This is where FryAway completely changes the post-frying cleanup game.
FryAway is a 100% plant-based powder that makes getting rid of used oil ridiculously simple and safe. It takes all the mess and guesswork out of the equation, so you can focus on enjoying your wings instead of dreading the cleanup.
The Simple Three-Step Process
Honestly, using FryAway couldn't be easier. It turns that hot liquid oil into a solid, scoopable puck of organic waste in just three moves.
- Sprinkle and Stir: Right after you're done frying and the heat is off, just sprinkle FryAway powder into the hot oil. Give it a quick stir until it's all dissolved.
- Cool Down: Now, just walk away. Let the pot of oil cool down completely on the stovetop or another safe spot. As it cools, the magic happens, and the oil solidifies.
- Toss It Out: Once the oil has turned into a solid puck, you can easily scoop it out with a spoon and toss it right into your household trash. No spills, no jars, no clogs.
This isn't just about convenience; it's a much better choice for the environment. By solidifying the oil, you're keeping it out of our waterways and preventing it from contributing to those massive "fatbergs" that clog up city sewer systems.
If you want to dive deeper into proper kitchen cleanup, our complete guide on how to dispose of cooking oil has even more great tips.
FryAway offers a truly hassle-free solution, making the entire deep-frying experience, from prep to disposal, a seamless and enjoyable part of cooking at home.
While FryAway is the perfect fix for your cooking oil, making your whole kitchen more sustainable is a great goal. If you're also thinking about takeout containers and other disposables, understanding compostable and biodegradable packaging is a great next step toward a greener kitchen.