


· By FryAway
What Temperature to Fry Chicken for Perfectly Crispy Results
Getting that perfect, shatteringly crisp crust on fried chicken isn't magic—it's all about temperature. The sweet spot is generally between 325°F and 375°F (163°C to 190°C), but the right number really depends on what you're frying and how you're frying it.
This guide will walk you through mastering heat control, so you can get juicy, never-greasy results every single time.
The Golden Rule of Frying Chicken Temperature
Ever wonder what makes restaurant-quality fried chicken so incredible? It all comes down to one thing: precise oil temperature control.
Think of hot oil as a protective shield. When chicken hits the oil at just the right temp, the moisture on its surface instantly flashes into steam. This steam pushes back against the oil, creating a barrier that prevents grease from seeping into the coating. The result is that iconic golden crust, while the inside cooks to tender, juicy perfection.
But if the oil is too cool, the chicken acts like a sponge, soaking up grease and turning into a soggy mess. And if it’s blazing hot, the outside will burn to a crisp long before the inside is safely cooked through. Understanding what temperature to fry chicken isn't just a friendly suggestion; it's the foundation for getting it right.
This visual guide breaks down the essential temperature targets you need to hit for success.
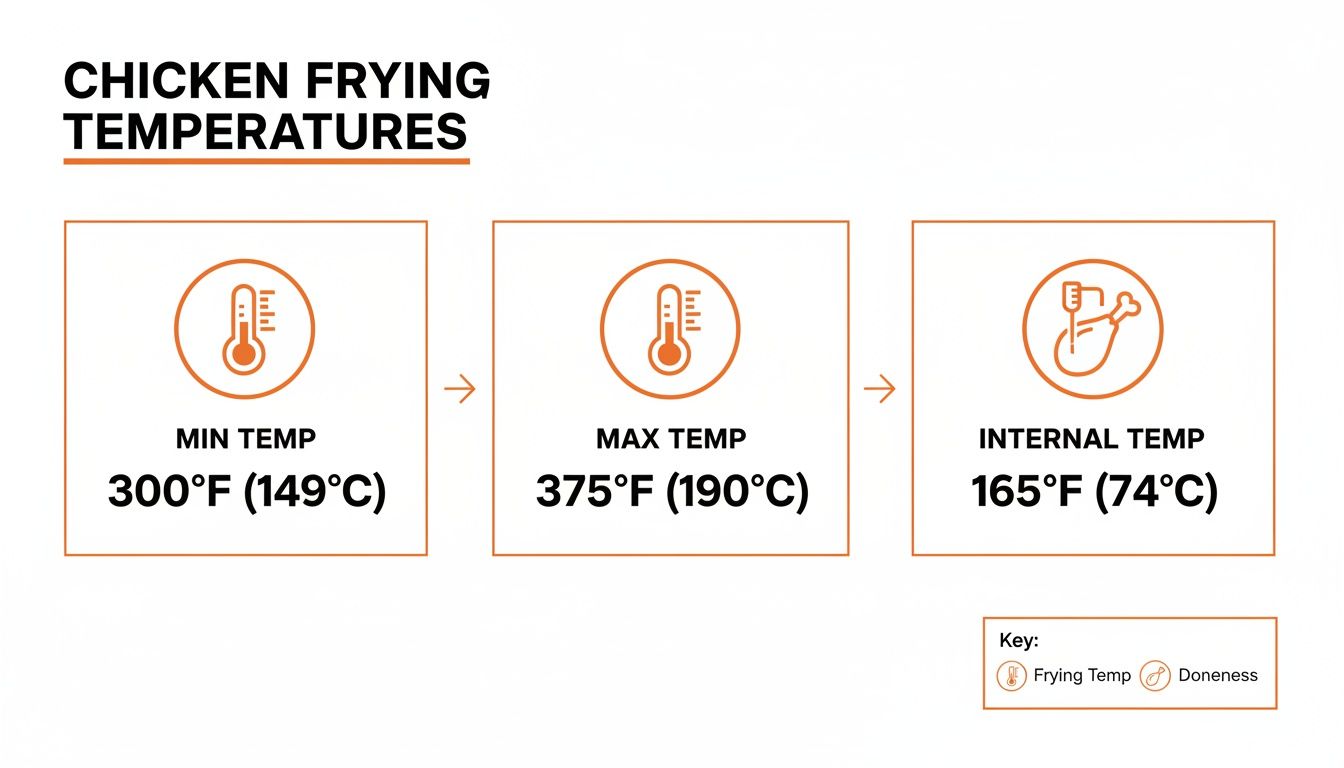
The main goal is simple: keep your oil temperature consistent and make sure the chicken reaches a safe internal temperature of 165°F.
Mastering the Process from Sizzle to Cleanup
The journey to perfect fried chicken doesn’t end when the last piece comes out of the pot. What you do with that used oil is just as important. Pouring hot grease down the drain is a recipe for disaster, leading to serious and expensive plumbing blockages.
With the right technique, you can enjoy delicious fried foods more often, without the cleanup headache. We always recommend a simple solution like FryAway. It transforms messy used oil into a solid, easy-to-handle puck that you can toss right in the trash.
We'll walk you through the science, the techniques, and even the final cleanup. By the end, you'll understand not just what temperature to use, but why it's the single most important part of the process. And if you're wondering which oils can handle the heat, you can learn more about choosing the best oil for frying in our detailed guide.
Deep Frying vs. Pan Frying: How to Adjust Your Heat
The way you cook your chicken completely changes the temperature game. Are you giving it a hot oil bath or searing it in a skillet? Understanding the difference between deep frying and pan frying is the first step to getting that perfect finish, because each method needs its own approach to heat.
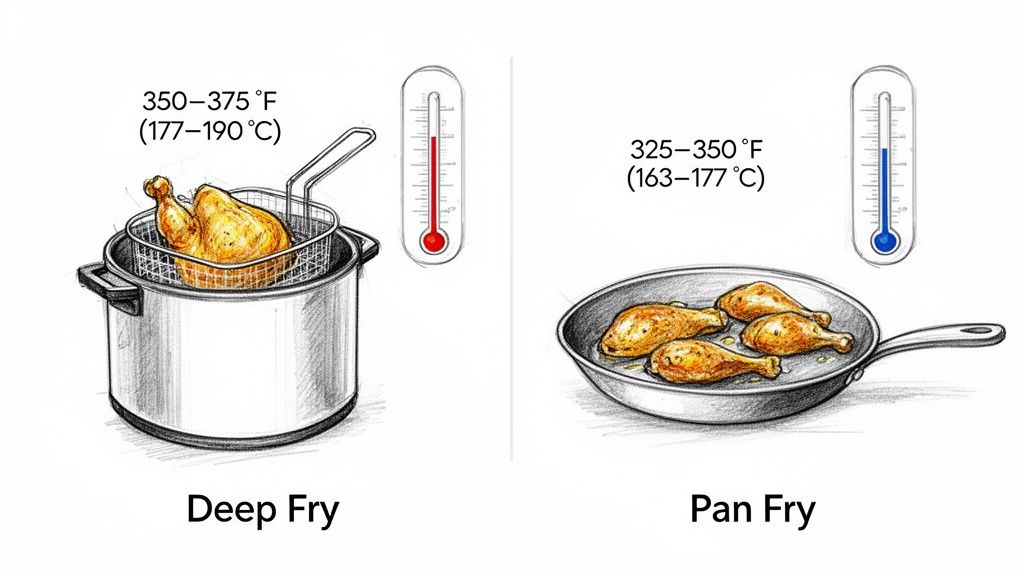
Think of deep frying as total immersion. The chicken is completely submerged in hot oil, which means it gets cooked evenly from every angle at once. This is fantastic for bigger, bone-in pieces that need a little more time to cook through without burning. The key is to keep that oil steady between 350°F and 375°F (177-190°C). At this temperature, the coating turns a beautiful golden brown right as the meat inside gets juicy and perfectly cooked.
Pan frying, on the other hand, is a more hands-on approach. You're using way less oil—usually just enough to come halfway up the chicken—and relying on the direct heat from the pan. For this method, you'll want to dial back the heat just a bit, aiming for 325°F to 350°F (163-177°C). This slightly lower temp prevents the side touching the pan from scorching before the inside is cooked, giving you time to flip it and cook it through evenly.
Finding the Scientific Sweet Spot
Precision is your best friend when frying. It turns out there's some science to back this up. A 2008 study on deep-frying chicken discovered that 180°C (356°F) for six minutes was the magic formula for the best appearance, taste, and texture. At this exact temperature, the chicken developed that ideal golden crust while staying incredibly moist.
No matter which method you choose, the goal is the same: create a crispy, golden exterior that seals in moisture. Getting the temperature right is what prevents a greasy, soggy outcome.
If you're looking for alternatives to traditional frying, a crispy air fryer chicken breast can give you that same satisfying crunch with a totally different way of managing heat. And for a deeper dive, check out our guide on the difference between frying and deep frying.
Easy Cleanup No Matter How You Fry
Let's be honest: the best part of fried chicken is eating it, and the worst part is dealing with the oily mess afterward. Luckily, cleaning up used cooking oil is ridiculously simple with FryAway. It's a plant-based powder that magically transforms hot liquid oil into a solid, so you can toss it right in the trash—no more pouring grease down the drain.
Here’s how easy it is:
- Sprinkle and Stir: Right after you're done cooking, while the oil is still hot, just sprinkle in the FryAway powder and give it a quick stir.
- Cool Down: Now, just walk away. Let the pan or fryer cool down completely. As it does, the oil will harden into a solid puck.
- Toss into household trash: Once it's solid, you can scoop the whole thing out and toss it straight into your household trash bin. It's that simple.
With FryAway, you can enjoy perfectly fried chicken without ever dreading the cleanup again.
The Science Behind the Perfect Sizzle
Ever wonder why hitting the exact right temperature for frying chicken creates that incredible, satisfying crunch? It's not just about cooking the meat through. It's a fascinating chemical ballet that happens the moment your chicken hits the hot oil. Getting this part right is the secret to consistently amazing results.
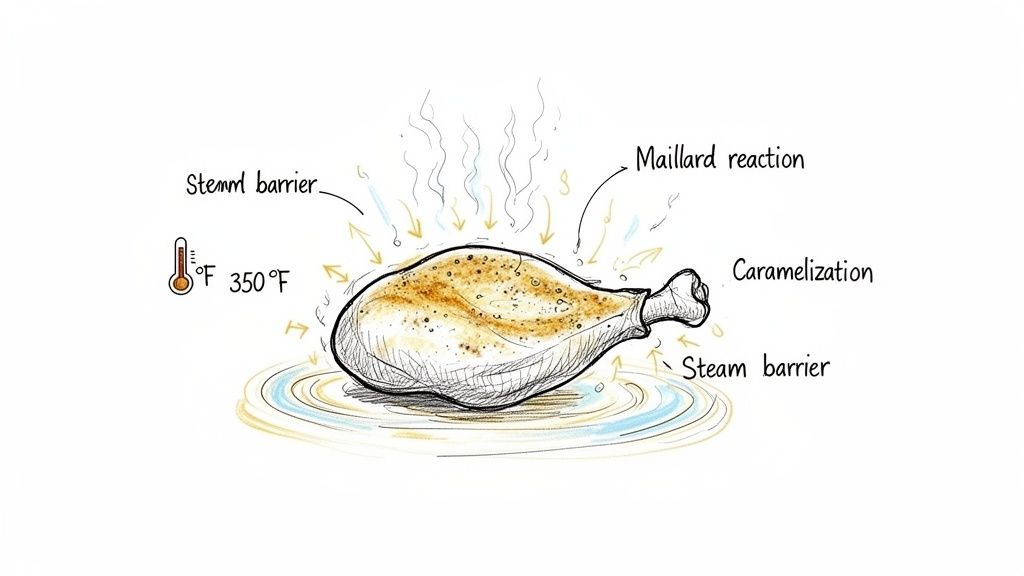
The instant the chicken is submerged, the intense heat kicks off two powerful browning reactions: the Maillard reaction and caramelization. These are the dynamic duo responsible for developing the deep golden-brown color and the complex, savory flavors that make fried chicken so irresistible. It’s the very same science that gives a seared steak its delicious crust and toasted bread its comforting aroma.
At the same time, something else crucial is happening just beneath the surface. The oil's high temperature instantly vaporizes the moisture on the chicken's coating, creating a protective barrier of steam.
The Critical Role of the Steam Barrier
This steam barrier is your secret weapon against greasy, disappointing chicken. It actively pushes back against the oil, preventing it from soaking into the coating. Think of it as a force field that keeps the grease out while allowing the heat to cook the chicken from the inside.
When the oil temperature is perfect, this steam barrier seals the exterior, creating a crispy shell that locks in the chicken's natural juices. This is how you get that perfect textural contrast: a crunchy crust and tender, moist meat.
But this delicate balance is entirely dependent on temperature. If your oil is too cool, the steam barrier won't be strong enough to form properly. The chicken will just sit there and act like a sponge, absorbing oil and turning soggy and heavy. On the other hand, if the oil is scorching hot, the coating will burn long before the inside has a chance to cook through to a safe temperature.
From Perfect Fry to Easy Cleanup
Nailing the right temperature doesn't just make for a better meal; it creates that flawless, crispy seal for a perfect, non-greasy finish. And once you've enjoyed your masterpiece, the cleanup shouldn't be a chore. Dealing with all that used cooking oil is incredibly simple with FryAway.
This plant-based powder makes disposal a total breeze. Just follow these three easy steps:
- Sprinkle and Stir: While the oil is still hot, sprinkle in the FryAway powder and give it a quick stir until it dissolves.
- Cool Down: Let the oil cool down completely. As it cools, it magically transforms into a solid, organic puck.
- Toss into household trash: Simply scoop the solid oil out of your pan or fryer and toss it right into your household trash.
By mastering the science of the sizzle and having a simple cleanup plan, you can make restaurant-quality fried chicken any time you want—without the stress or the mess.
Why Internal Temperature Is Just as Important
That sizzle in the pan creates a perfect golden-brown crust, but the real secret to ridiculously juicy and safe fried chicken lies within. A beautiful exterior means nothing if the inside is raw. This is why a good instant-read thermometer is every bit as crucial as your frying pan.
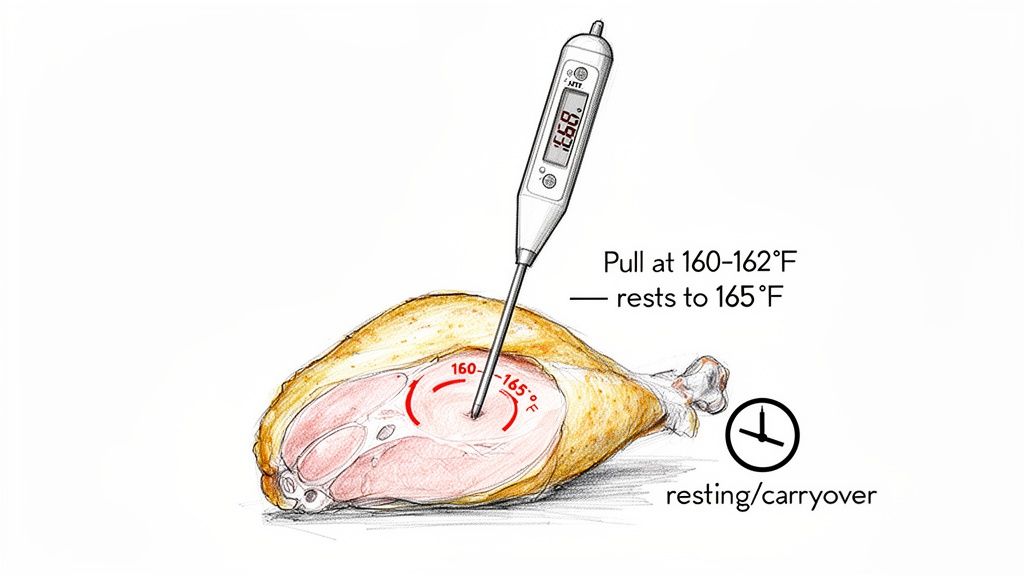
The USDA sets the universal safety standard: chicken must reach an internal temperature of 165°F (74°C). At this point, nasty bacteria like Salmonella are instantly eliminated, making every bite completely safe. Think of this as the non-negotiable finish line for your chicken.
Understanding Carryover Cooking
So, how do the pros get their chicken so tender without a hint of dryness? They use a clever technique called carryover cooking. They know that chicken doesn't just stop cooking the moment you pull it from the heat. The residual heat from the fryer continues to radiate inward, raising the internal temperature by another 5-10°F as it rests.
To make this work for you, pull your chicken from the hot oil when the thermometer reads between 160°F and 162°F. Let it rest on a wire rack for at least 5-10 minutes. During this time, the internal temp will climb to that perfect 165°F, locking in all the juices. Just be sure to insert the thermometer into the thickest part of the meat, avoiding the bone—it can give a false high reading.
While 165°F provides instant pasteurization, food safety is really a relationship between temperature and time. You can achieve the same level of safety at lower temperatures if the chicken is held there for a specific duration.
Food safety science gets pretty interesting here. For example, chicken held at just 150°F (65.6°C) is completely pasteurized in only three minutes. The 165°F guideline is a practical, efficient target for home cooks, but understanding the science behind it gives you far more control over the final texture.
From Perfect Temp to Perfect Cleanup
Once you've nailed both the oil and internal temperatures, the only thing left is cleanup. And it should be just as precise and effortless as your cooking. Instead of stressing over a pan full of used cooking oil, we always recommend FryAway for a simple, mess-free solution.
Just follow these three easy steps for a spotless kitchen:
- Sprinkle and Stir: Right after you finish frying, while the oil is still hot, pour in the FryAway powder and stir until it completely dissolves.
- Cool Down: Let the oil cool. As it does, it will magically transform into a solid, organic puck that’s easy to handle.
- Toss into household trash: Once solid, just scoop the hardened oil out of the pan and toss it straight into your household garbage.
This turns cleanup into a non-issue, so you can focus on what really matters: enjoying that perfectly cooked chicken. And if you want to dial in your timing, check out our guide on how long to deep fry chicken wings to round out your frying expertise.
Time to Cook: Putting It All Together with Delicious Recipes
Alright, you've got the science down—from oil temperatures to checking for doneness. Now for the fun part: putting that knowledge to work in the kitchen. These recipes are designed to give you hands-on practice with different frying methods, temperatures, and cuts of chicken, so you can lock in your heat-control skills and get amazing results every single time.
Each recipe breaks down the best oil to use, the exact temperatures to aim for, and pro tips like not overcrowding the pan.
Classic Buttermilk Deep-Fried Chicken
This is the one for getting that legendary, craggy, golden-brown crust on bone-in chicken. Deep frying is all about maintaining a steady, high heat to cook the chicken through without letting the outside burn.
- Best Oil: Peanut or canola oil are your go-tos here, thanks to their high smoke points.
- Oil Temperature: Keep it locked in at a consistent 350°F (177°C). A deep-fry thermometer is your best friend—watch it closely and let the oil come back up to temp between batches.
- Target Internal Temperature: Pull the chicken when it hits 160-162°F. Set it on a wire rack, and let carryover cooking do the rest, bringing it to a perfectly safe and juicy 165°F.
Ingredients:
- 1 whole chicken (3-4 lbs), cut into 8 pieces
- 2 cups buttermilk
- 2 cups all-purpose flour
- 2 tbsp cornstarch
- 2 tsp salt, 1 tsp black pepper, 1 tsp paprika
- 48 oz peanut or canola oil for frying
Instructions:
- Let the chicken pieces marinate in buttermilk for at least 4 hours, or even better, overnight in the fridge.
- In a separate bowl, whisk together the flour, cornstarch, salt, pepper, and paprika.
- Heat your oil in a large Dutch oven or deep fryer to 350°F.
- Dredge each piece of chicken in the flour mix, making sure it’s completely coated, then gently lower it into the hot oil.
- Fry in batches for about 12-15 minutes, turning the pieces occasionally until they’re golden brown and cooked through.
- Lift them out and let them rest on a wire rack.
Quick and Crispy Pan-Fried Chicken Tenders
When you need a fantastic meal on a weeknight, this is it. Pan-frying uses less oil and a slightly lower temperature to keep the tenders from scorching while still cooking them through in minutes.
- Best Oil: Canola, vegetable, or grapeseed oil work perfectly.
- Oil Temperature: Aim for a slightly cooler range of 325°F-340°F (163-171°C). This is ideal for the direct heat of a skillet.
- Target Internal Temperature: These cook in a flash! Pull them at 162°F and they’ll hit that perfect 165°F in no time as they rest.
Ingredients:
- 1 lb boneless, skinless chicken tenders
- 1 cup all-purpose flour
- 1 large egg, beaten
- 1 cup panko breadcrumbs
- 1 tsp garlic powder, salt, and pepper
- 1-2 cups of canola oil for frying
Instructions:
- Set up your breading station with three shallow dishes: one for flour, one for the beaten egg, and one for the panko mixed with salt, pepper, and garlic powder.
- Pour about an inch of oil into a large skillet and heat it over medium-high heat to 325°F.
- Coat each tender first in flour, then dip in the egg, and finally press it into the panko breadcrumbs.
- Carefully place the tenders in the hot oil. Fry for 3-4 minutes per side until they’re crispy and golden.
- Move them to a wire rack to drain and rest.
No matter which recipe you make, cleanup should be the easiest part. For fast, safe, and mess-free oil disposal, FryAway is the perfect solution.
Here’s how simple it is:
- Sprinkle and Stir: Once you're done frying, just stir the plant-based FryAway powder into the still-hot cooking oil.
- Cool Down: Let the oil cool down completely. You'll see it magically transform into a solid, organic puck.
- Toss into household trash: Simply scoop the hardened oil out of the pan and toss it right into your household trash bin. No mess, no clogged pipes.
Finishing the Job with Easy Oil Disposal
You've just pulled the last perfect, golden-brown piece of chicken from the pan. The best part is about to happen: that first crispy, juicy bite. But then there's the worst part, staring back at you from the stovetop—a pan full of used cooking oil.
For a lot of home cooks, this is where the dread kicks in. The cleanup can feel like a messy chore, and many make the expensive mistake of pouring grease down the drain. That’s a fast track to serious plumbing clogs and a nightmare for your pipes. But it doesn't have to be that way. With the right plan, cleanup can be the easiest part of the process.
Your Three-Step Solution for Mess-Free Cleanup
This is where a product like FryAway completely changes the game. We always recommend it because it’s a simple, plant-based powder that magically turns liquid cooking oil into a solid, scoopable puck. No more leaky bags or greasy jars. You just toss the solidified oil right into your household trash.
It couldn't be more straightforward:
- Sprinkle and Stir: Right after you're done frying, while the oil is still hot, sprinkle the FryAway powder into the pan. Give it a quick stir until it all dissolves.
- Cool Down: Now, just walk away and let it cool down completely. As it cools, the oil will harden into a solid, waxy disc.
- Toss into household trash: Once it’s solid, you can easily scoop the whole thing out and toss it directly into the trash can. Done.
This simple trick does more than just protect your plumbing; it takes away the single biggest headache of frying chicken at home, making the whole experience more enjoyable and sustainable.
After the oil is handled, the final step for any serious cook is maintaining your equipment. If you're using a dedicated fryer, knowing how to clean a commercial deep fryer is key to keeping it hygienic and ensuring it lasts, so you get great results every time you cook.
Got Questions About Frying Chicken?
You're not alone. When you're aiming for that perfect golden-brown crunch, a few questions always pop up. Let's tackle some of the most common ones to help you fry with total confidence.
How Can I Tell the Oil Temperature Without a Thermometer?
While a good thermometer is your best friend for frying, you can definitely get by in a pinch. The classic wooden spoon trick works wonders. Just dip the handle into the hot oil.
If you see a steady stream of bubbles forming around the wood, your oil is ready for action. Another good test is to drop in a small cube of bread; if it turns golden brown in about 60 seconds, you’re right in that sweet spot of 350-375°F.
Can I Reuse Frying Oil?
Absolutely. You can typically get two or three uses out of your oil, especially if you're frying similar breaded foods. The trick is to let the oil cool down completely, then strain it through a fine-mesh sieve or some cheesecloth to get all those little crispy bits out.
Store it in a sealed container somewhere cool and dark. You'll know it's time to toss it when the oil gets dark, smokes up too quickly, or just starts to smell funky.
When it's time to get rid of old oil, the easiest, cleanest way is to solidify it. We always recommend FryAway to turn the liquid into a solid puck you can just toss in the trash. No mess, no fuss.
Why Is My Fried Chicken Greasy Instead of Crispy?
This is the number one frustration, and the answer is almost always the same: your oil wasn't hot enough. When the oil temperature dips below 325°F, the breading acts like a sponge, soaking up grease instead of instantly forming that protective crispy shell.
What causes the temperature to drop so dramatically? Overcrowding the pan. Tossing in too many pieces at once makes the oil temperature plummet.
To fix this, always fry in small batches. Just as importantly, give the oil a minute to get back up to your target temperature before you add the next batch. This little bit of patience is the secret to making sure every single piece comes out perfectly crispy.
Once you've fried up that last beautiful piece of chicken, cleanup is the last thing you want to worry about. With FryAway, it's genuinely simple. Just follow these three steps to solidify your used cooking oil so you can toss it right in the bin.
- Sprinkle and Stir: Pour the powder into your still-hot cooking oil and give it a good stir.
- Cool Down: Let it sit and cool completely. The oil will harden into a solid, waxy puck.
- Toss into household trash: Scoop it out and throw it away with your regular garbage.
Ready to make your next fry day completely mess-free? Give FryAway a try.