


· By FryAway
How to Make Homemade French Fries That Are Actually Crispy
Ever wonder why restaurant fries are so addictively good? It’s not some complicated culinary secret. The magic lies in a simple technique most of us skip at home: the two-stage frying method.
Once you nail this process, using the right starchy potatoes and giving them a quick soak, you’ll unlock fries that have a perfectly fluffy interior and a shatteringly crisp, golden-brown exterior. Every. Single. Time.
Why Bother With Homemade Fries?
Making fries from scratch is about so much more than just slicing up a potato. It's about taking complete control.
- You pick the potatoes and oil. Go for classic Russets and a high-quality cooking oil. If you're not sure which to use, this guide on the best oils for frying is a great place to start.
- You choose the cut. Want delicate shoestrings? Or maybe some hearty, thick-cut steak fries? It’s entirely up to you.
- You control the seasoning. Go beyond plain salt. This is your chance to create a signature flavor blend that’ll have everyone asking for the recipe.
Mastering a Kitchen Classic
It’s easy to forget how much we love fries until you see the numbers. The market for frozen french fries hit around $25.7 billion in 2025 and is only expected to keep growing. That industrial scale relies on flash-freezing and blanching—a process we can easily mimic at home with the double-fry technique to get those same incredible results.
We've broken down the essential steps to help you master the art of the perfect homemade fry. Pay attention to these stages, and you'll be well on your way.
Quick Guide to Crispy Homemade Fries
This table summarizes the core stages for achieving perfectly crispy homemade french fries every single time.
| Stage | Core Action | Why It's Essential |
|---|---|---|
| Potato Selection | Use high-starch potatoes like Russets or Idaho. | Starchy potatoes fry up lighter and fluffier on the inside. |
| Soaking | Soak cut potatoes in cold water for at least 30 minutes. | This removes excess surface starch, preventing sogginess and promoting crispiness. |
| Drying | Thoroughly pat the potatoes completely dry before frying. | Water and hot cooking oil don't mix! Dry potatoes ensure a safer fry and a crispier result. |
| Double Frying | Fry once at a lower temperature, then a second time at a higher temp. | The first fry cooks the inside; the second fry creates that perfect golden, crispy crust. |
Get these simple, non-negotiable steps right, and you’ll never look at a bag of frozen fries the same way again. It's not about a complex recipe; it's all about mastering the technique.
The real secret to exceptional fries lies not in a complicated recipe, but in mastering a few simple, non-negotiable steps: potato selection, soaking, drying, and double frying. Get these right, and you’ll never look at a frozen fry the same way again.
Of course, after you've enjoyed those perfect fries, you’re left with a pan of used cooking oil. Cleanup can feel like a chore, but with FryAway, it's genuinely effortless.
Just follow this simple 3-step process:
- Sprinkle and Stir: Sprinkle the FryAway powder into the hot cooking oil and give it a stir.
- Cool Down: As it cools, the oil magically transforms into a solid puck.
- Toss into household trash: From there, you just scoop it out and toss it straight into your household trash. It’s a clean, simple, and eco-friendly way to handle oil disposal.
Choosing the Right Potato and Cutting for Consistency
Your quest for the perfect homemade french fry doesn't start with a hot pan of oil—it starts in the produce aisle. The potato you bring home is the single most important decision you'll make for that ideal fluffy-inside, crispy-outside texture. Trust me, not all spuds are created equal when it comes to frying.
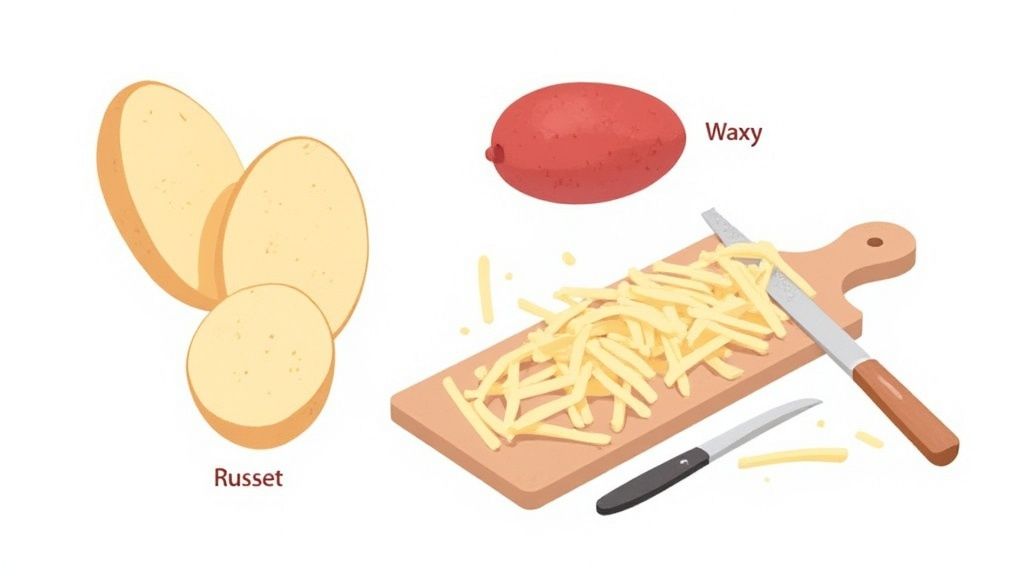
You’re looking for a potato high in starch. Russet potatoes are the undisputed champs here, loved by chefs for their low moisture content. When they hit the hot cooking oil, those starches expand to create a light, airy interior, while the lack of water helps the outside get golden and shatteringly crisp. Idaho and Maris Piper potatoes are also excellent choices.
Starchy vs. Waxy Potatoes
It really helps to know the two main camps of potatoes. You can think of it as a spectrum.
- Starchy Potatoes (Russets, Idaho): These are your best friends for frying. They’re naturally absorbent and turn mealy or fluffy when cooked. They don't hold their shape quite as well, which is exactly what you want for a great fry.
- Waxy Potatoes (Red Bliss, New Potatoes): These guys are low in starch and high in moisture. They keep their shape beautifully, which makes them perfect for potato salads or gratins, but terrible for fries. They often come out dense, heavy, or just plain limp.
A good rule of thumb? If the potato has thick, rough skin, it’s probably a high-starch variety perfect for frying. If the skin is smooth and thin, it’s likely waxy and better for boiling or roasting.
The Importance of a Consistent Cut
Once you've got the right potato, how you cut it is the next crucial step. The goal here is simple: uniformity. If your fries are all different shapes and sizes, they're going to cook at different speeds. You’ll end up with a frustrating batch of burnt bits, soggy sticks, and a few perfect ones all mixed together.
Whether you're going for thin shoestrings (about ¼-inch thick) or thick-cut steak fries (about ½-inch thick), do your best to make every piece the same size. This guarantees even cooking and a predictably delicious result every single time. For some pro-level tips on getting those cuts just right, this detailed fresh cut fries guide has some great pointers.
Regional tastes definitely play a role in what kind of fry people prefer. In North America, which held a massive 43% share of the global french fry market, fast-food restaurants made both skinny and thick-cut fries popular for home cooks, building on the region's long-standing deep-frying traditions.
The One Step You Can't Skip for Maximum Crispiness
You've picked the perfect potatoes and cut them with chef-like precision. Now comes the single most important step in the entire french fry-making journey—and it's the one most people skip. This is what separates limp, greasy fries from those that are spectacularly crispy. It all comes down to a simple cold water bath.
Soaking your cut potatoes is absolutely non-negotiable if you want that coveted crunch. This isn't just about rinsing them; it's a bit of kitchen science in action. The cold water works to pull all the excess starch from the surface of the potatoes. Getting rid of that starchy layer is the secret weapon: it stops the fries from clumping together in the hot cooking oil and helps the outside dehydrate into a beautiful, crispy shell.
How Long Should You Soak Them?
You don't need to leave them overnight, but a little patience here pays off big time. For pretty good results, a 30-minute soak is the bare minimum. If you’ve got the time, letting them sit for a few hours in the fridge will give you even better, audibly crunchy fries.
- Quick Soak: At least 30 minutes in cold water on the counter will do the trick in a pinch.
- Better Results: A 2-3 hour soak in a bowl of cold water in the refrigerator is the sweet spot. This keeps the potatoes extra firm and cool before they hit the hot cooking oil.
- Overnight Option: You can definitely soak them overnight in the fridge. Just be sure to change out the water once if you do, as it will get quite cloudy with all that starch.
Drying Is Just as Important as Soaking
Once they're done soaking, the next phase is equally vital: getting those potatoes bone dry. Any water left clinging to the surface is the ultimate enemy of crispiness. As soon as water hits hot cooking oil, it creates a blast of steam—which is great for cooking broccoli, but a disaster for french fries. Steaming prevents that perfect crust from ever forming.
Any lingering water will cause hot cooking oil to splatter dangerously and will effectively steam your potatoes instead of frying them. Take the extra five minutes to dry them thoroughly—it truly makes all the difference.
A couple of foolproof methods will get your fries perfectly dry before they take the plunge.
- The Kitchen Towel Method: Lay the soaked potatoes out in a single layer on a clean, dry kitchen towel or a few layers of paper towels. Pop another towel on top and gently pat them down until there's no surface moisture left.
- The Salad Spinner Method: For a quicker approach, a salad spinner is a fantastic shortcut. A few good spins will wick away most of the water in seconds. Finish them off with a quick pat-down with a towel just to be sure.
Taking the time to soak and meticulously dry your potatoes is the prep work that guarantees a superior fry every single time. Now, after you've enjoyed those perfect fries, cleanup is the next task—but it doesn't have to be a greasy mess. We always turn to FryAway to make disposing of used cooking oil painless. Just follow the simple three-step process: 1) Sprinkle and Stir into the hot oil, let it 2) Cool Down completely to solidify, and then 3) Toss into household trash. It’s the cleanest and most responsible way to handle your post-frying cleanup.
Mastering the Two-Stage Frying Method
This is where the magic happens. It’s the step that transforms a humble potato stick into a genuinely incredible homemade french fry. The secret used by professional kitchens isn't some fancy ingredient; it’s all about the two-stage frying method. This technique is the key to getting fries that are perfectly fluffy on the inside with that shatteringly crisp shell we all crave.
The double-fry is broken down into two distinct phases, and each one serves a very specific purpose. For deep frying, I always reach for a heavy-bottomed pot like a reliable Dutch oven because it holds a steady temperature, which is absolutely critical. You’ll also want a neutral cooking oil with a high smoke point—think peanut, canola, or vegetable oil. Fill your pot until the oil is at least 2-3 inches deep.
The First Fry: The Blanch
The first stage is often called blanching, and it’s basically a gentle fry at a lower temperature. The goal here is simple: cook the potato all the way through without actually browning it. You're setting the stage for that light, fluffy interior.
Get your cooking oil to somewhere between 325°F and 350°F (160°C to 175°C).
Working in small batches, carefully lower your dried potato sticks into the hot oil. Don't overcrowd the pot! If you add too many at once, the oil temperature will plummet, and you'll end up with greasy, sad fries.
Let them cook for about 3 to 5 minutes. They should look pale, a little limp, and show zero signs of browning. Honestly, they’ll look pretty unappetizing at this point, but that’s exactly what you want. Use a slotted spoon to pull them out and let them drain on a wire rack.
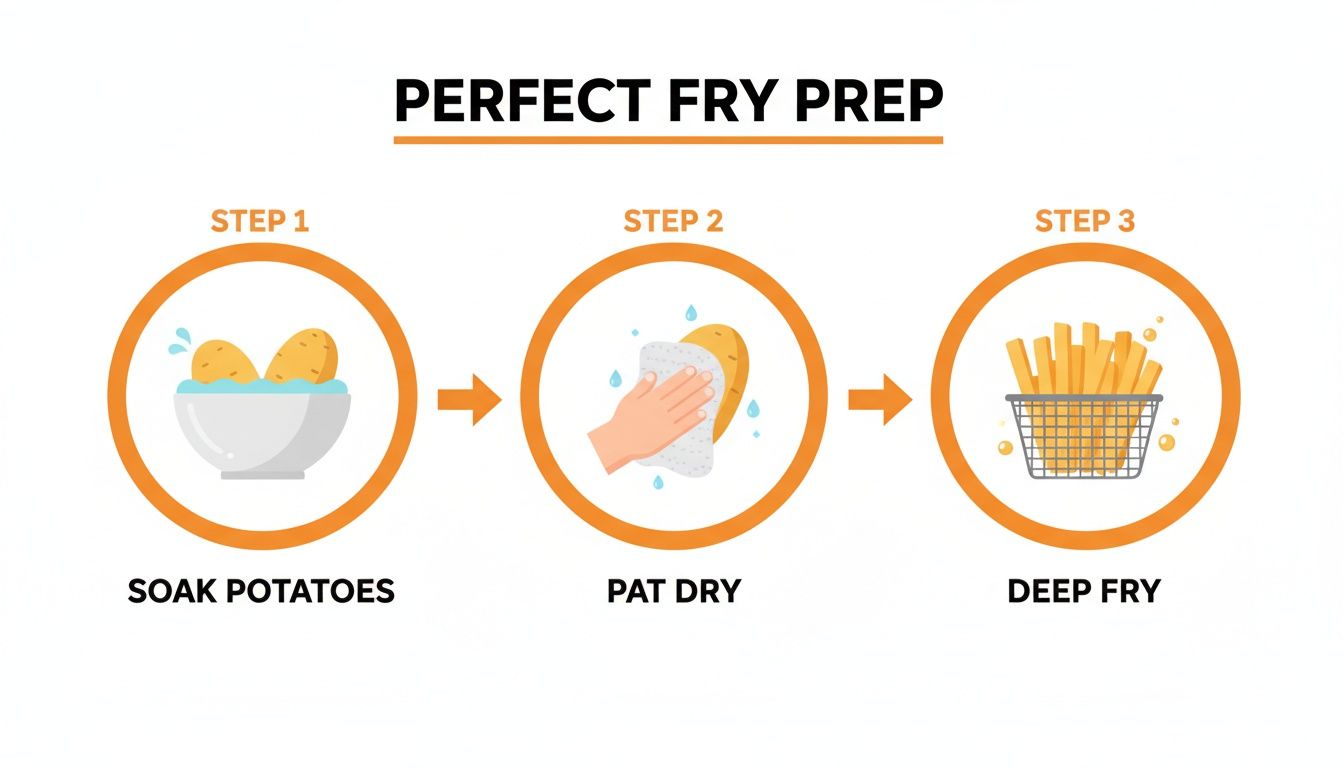
This simple flow—soaking to pull out starch, drying to prevent steam, and frying to cook—is the core of the technique.
After their first bath in the oil, let the blanched potatoes cool down for at least 30 minutes at room temperature. If you have the time, chilling them in the fridge for a few hours (or even freezing them for later) yields even better results.
The Second Fry: The Crisp
Now for the grand finale. This is the step that creates that beautiful golden-brown, crunchy exterior you've been working toward. The science behind it is pretty cool, and if you're curious, you can learn more about why double frying makes food crispier.
Crank up the heat. You want your cooking oil at a much hotter 375°F (190°C) for this round.
Again, working in small batches, carefully add the cooled, blanched fries back into the oil. This time, things will happen fast—they’ll only need 2 to 3 minutes.
Keep a close eye on them. Once they hit that perfect golden-brown color, get them out of there immediately. Let them drain for just a moment on a wire rack before you hit them with your seasoning.
This two-part process might seem like extra work, but it's the only way to guarantee a fry that is simultaneously fluffy and crunchy. The low-temperature blanch cooks the inside, while the high-temperature second fry creates the perfect crust.
Once you’ve created your golden-brown masterpieces, you’re left with a pot of used cooking oil. Instead of stressing about what to do with it, make your cleanup unbelievably simple with FryAway.
- Sprinkle and Stir: Just sprinkle the FryAway powder into the still-hot cooking oil and give it a stir until it’s all dissolved.
- Cool Down: Let the pan cool completely. As it does, FryAway works its magic, turning that liquid oil into a solid, organic block.
- Toss into household trash: Once it’s solid, you can easily scoop the hardened oil right out of the pot and toss it in your regular trash bin. No mess, no clogged drains.
Perfect Seasoning and Effortless Cleanup

You've done it. The fries are golden, impossibly crisp, and pulled sizzling from the hot cooking oil. But don't relax just yet—the final touch is all about timing.
As soon as the fries leave the fryer, they’re coated in a micro-thin layer of oil that acts like the perfect glue for seasoning. You have to act fast. If you wait even a minute, that surface starts to dry, and your salt will just bounce right off instead of clinging to every single fry.
Beyond the Basic Salt Shaker
A sprinkle of sea salt is classic for a reason, but why stop there? This is your chance to really make these homemade fries your own with a custom seasoning blend. It’s what turns a great snack into something truly memorable.
Here are a few simple but fantastic fried recipes to try with your favorite cooking oil:
- Garlic and Herb Fried Chicken: After frying chicken pieces in seasoned flour using vegetable oil, toss them in a mix of melted butter, fresh parsley, and garlic powder for a classic flavor.
- Smoky Paprika Fried Fish: Coat cod fillets in a batter of flour, smoked paprika, onion powder, and a pinch of cayenne. Fry in peanut oil until golden for a crispy, flavorful main course.
- Spicy Cajun Fried Shrimp: Toss shrimp in a zesty blend of Cajun seasoning, then deep-fry in canola oil for a quick and spicy appetizer that pairs perfectly with your homemade fries.
Just toss your hot fries with salt in a big bowl right after they come out of the cooking oil. The residual heat will make them incredibly aromatic and delicious.
Remember the golden rule: Season immediately. The oil on fresh-out-of-the-fryer potatoes is nature's perfect adhesive for salt and spices. Miss that window, and you miss out on flavor.
The Cleanup Everyone Dreads Made Easy
And now for the part of frying that makes most people hesitate: what to do with all that used cooking oil. Pouring it down the sink is a definite no-go (hello, plumber!), and stashing greasy jars under the counter is just a mess waiting to happen.
This is where FryAway completely changes the game. It turns a dreaded, greasy chore into a simple, clean task.
Forget wrestling with hot, liquid oil. FryAway is a 100% plant-based powder that magically transforms used cooking oil into a solid, making disposal ridiculously easy and eco-friendly. It’s the perfect, stress-free ending to your french fry adventure. For more tips on making kitchen life easier, check out our guide to effortless post-frying cleanup.
It really is as simple as it sounds:
- Sprinkle and Stir: While the cooking oil is still hot, just sprinkle in the FryAway powder and give it a quick stir until it dissolves.
- Cool Down: Now, just walk away and let the pan cool down completely. As it cools, the oil will harden into a solid, organic puck.
- Toss into household trash: Once it's solid, you can easily scoop the hardened oil right out of the pan and toss it into your regular trash bin.
That’s it. No spills, no clogs, and no greasy jars. Just a clean kitchen and the satisfaction of knowing you just made the perfect batch of homemade fries.
Common Questions About Making Fries at Home
Even with the best guide, making perfect homemade fries can feel like a bit of a science experiment. You've got questions, and that's a good thing! Let's get into the nitty-gritty of the most common challenges home cooks face, from soggy fries to getting that ideal crisp without a deep fryer.
Can I Get Crispy Fries in an Air Fryer or Oven?
You absolutely can, but let's be real—the texture will be different from a deep-fried fry. It’s a fantastic, less-oily alternative, but it won’t have that same shatteringly crisp crust you get from the double-fry method.
For an air fryer, toss your soaked and bone-dry potatoes with a tablespoon of cooking oil. Cook them at 380°F (193°C) for about 12-15 minutes, but don't forget to shake the basket halfway through. This keeps them from sticking and helps them cook evenly.
If you're using an oven, crank it up to 425°F (220°C). Spread the oiled potatoes on a baking sheet in a single, even layer—no piling! Bake for 20-25 minutes and give them a flip about midway through.
The secret weapon for both methods is making sure the potatoes are completely dry and have plenty of space. If they’re crowded, they’ll just steam each other into a soft, sad pile. You need that hot air circulation to work its magic.
Why Did My Homemade Fries Get Soggy?
Soggy fries are the worst. It’s a culinary tragedy, but thankfully, it’s usually caused by one of three culprits.
- Lingering Moisture: If your potatoes aren't completely dry after soaking, that leftover water turns to steam in the hot cooking oil. Steam is the mortal enemy of crispiness. Pat them dry like your life depends on it.
- Oil Isn't Hot Enough: When cooking oil is too cool, potatoes just soak it up instead of frying. This leads to a greasy, limp mess. A good thermometer is your best friend here—don’t guess!
- Overcrowding the Fryer: Dumping too many fries in at once will cause the cooking oil temperature to plummet. It’s the same problem as above, just a different cause. Fry in small, manageable batches for the best results.
What Is the Best Type of Oil for Frying?
The best cooking oils for frying have two key traits: a high smoke point and a neutral flavor. You need an oil that won't burn or add a weird taste during that second high-heat fry.
Great choices include peanut oil, canola oil, vegetable oil, and grapeseed oil. Steer clear of oils with low smoke points like extra virgin olive oil—it will burn and make your fries taste bitter and unpleasant.
After you're done frying, what to do with all that leftover cooking oil? For a cleanup that's almost unbelievably easy, we swear by FryAway. It completely changes the game for anyone who loves fried food but dreads the aftermath.
The whole process is simple and keeps you from pouring nasty grease down your sink.
- Sprinkle and Stir: While the cooking oil is still hot, just sprinkle in the FryAway powder and give it a quick stir until it dissolves.
- Cool Down: Now, just walk away and let the pan cool completely. As it cools, the oil magically transforms into a solid, organic puck.
- Toss into household trash: Once it's hardened, you can scoop the solid oil out and toss it right into your household garbage. No mess, no clogged pipes, no problem.
With these pointers and a bit of practice, you’ll be churning out restaurant-quality fries every time. And with FryAway, the cleanup is no longer a chore. Enjoy those perfect fries and a perfectly clean kitchen!
Learn more and make your post-frying cleanup effortless today!