


· By FryAway
How to Dispose of Cooking Oil at Home Safely
Pouring used cooking oil down the sink is a tempting shortcut, but it's one that creates massive problems for your plumbing and the environment. I've seen it time and time again—what seems like a quick cleanup ends up causing expensive headaches down the road.
The best way to dispose of cooking oil at home is to solidify it first with a product like FryAway, then simply toss it in the trash. Another great option is collecting it in a sealed container for recycling. Whatever you do, never pour it down the drain.
Why You Can’t Just Pour Oil Down the Drain

It seems harmless, right? A quick tip of the pan and the leftover grease is gone. But that simple action kicks off a costly and destructive chain reaction, both inside your home and beneath your city's streets.
When that hot, liquid oil travels down your pipes, it doesn't stay liquid for long. It cools, solidifies, and coats the inside walls of your plumbing. Think of it like plaque in an artery.
This greasy buildup acts like a magnet for everything else you wash down the sink—food scraps, soap scum, you name it. Over time, this gunk hardens into stubborn clogs that lead to slow drains, nasty odors, and eventually, a complete sewer backup right in your kitchen.
The Problem Beneath the Streets
The issue doesn't just stop at your property line. Once that grease leaves your pipes and enters the municipal sewer system, it joins forces with oil from thousands of other homes. This collective waste mixes with things that should never be flushed, like wet wipes, to form monstrous blockages known as "fatbergs."
These solid masses can grow to be several tons, blocking entire sewer lines and causing raw sewage to overflow into streets and waterways. When you understand the severe consequences, like the need for professional sewer remediation services, it becomes clear why proper disposal is so critical.
Curious about these underground menaces? You can learn more about what fatbergs are and why they matter in our detailed guide: https://fryaway.co/blogs/blog/what-are-fatbergs-and-why-does-it-matter. Trust me, these blockages are more than just a nuisance; they require expensive, labor-intensive removal and cause significant damage to our city's infrastructure.
Environmental and Economic Costs
The ripple effects of improper oil disposal are staggering. Globally, it's estimated that 3.7 billion gallons of used cooking oil are available each year. When even a tiny fraction of this ends up in our drains, it creates widespread environmental damage.
Oil that reaches rivers and lakes forms a suffocating film on the water's surface, which is devastating for fish and aquatic plants. This contamination also drives up the costs for municipal water treatment facilities, a burden we all end up sharing.
Consider this: if just 10% of U.S. households poured grease down the sink once a week, it could add up to over a billion gallons of problematic waste every single year. Proper disposal is a shared responsibility that protects our homes, our cities, and the ecosystems we all depend on.
The Easiest Way to Handle Used Cooking Oil
After you’ve cooked up a delicious fried meal, the cleanup is usually the last thing you want to think about. Who wants to deal with jars of hot, greasy oil or worry about a leaky bag making a mess in the trash can? It’s a real hassle.
Thankfully, there’s a much simpler and cleaner way to handle it: solidifying the oil right in your pan.
This is where a product like FryAway completely changes the game. It’s a 100% plant-based, non-toxic powder that makes kitchen cleanup feel effortless. Instead of trying to manage a sloshing liquid, you just turn it into a solid, organic puck that you can scoop out and toss in the bin.
How Solidifying Oil Works
The idea is refreshingly simple. When you stir FryAway powder into hot cooking oil, it gets to work, magically solidifying the liquid as it cools down. It basically absorbs and traps all the oil, turning a major spill risk into a solid that’s easy to handle.
This method completely gets rid of the need for old containers, funnels, or any of the usual messy steps you might be used to.
Imagine you've just finished frying a batch of crispy southern fried chicken. Your skillet is full of used oil, and the thought of cleanup is already making you tired. With an oil solidifier, the process just becomes another part of your normal kitchen routine, as simple as washing the dishes.
The real win here is the peace of mind. Knowing you can get rid of cooking oil without clogging your pipes, making a mess, or harming the environment makes frying at home so much more enjoyable. It’s a total game-changer if you fry food often.
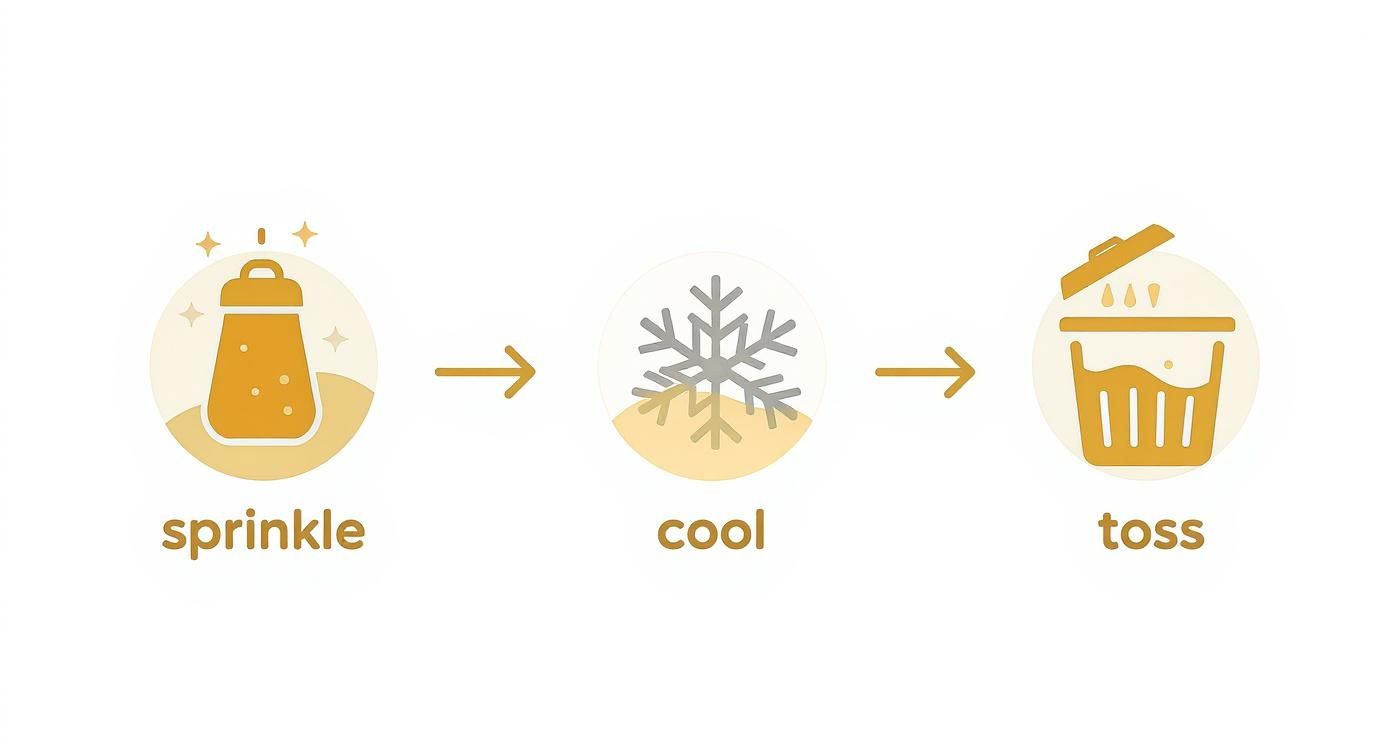
A Simple Three-Step Process
Learning how to dispose of cooking oil with a solidifier is incredibly easy. It takes just a few moments of your time, followed by a cool-down period. It really just boils down to a quick, mess-free routine.
-
1. Sprinkle and Stir
While the oil is still hot in the pan, just sprinkle the FryAway powder over the surface. Grab a spatula and give it a gentle stir for about 30 seconds to make sure the powder completely dissolves. -
2. Cool Down
Now, just walk away and let it do its thing. The pan needs to cool down completely, so you can leave it on the stovetop (burner off, of course!) until it’s at room temperature. As it cools, the oil will transform into a solid, waxy substance. -
3. Toss into Household Trash
Once the oil is totally solid, you can easily scoop the hardened puck out of the pan. It usually comes out cleanly in just one or two pieces. From there, you just toss it right into your household trash. No jars, no bags, no mess.
Not only is this method super clean, but it’s also environmentally responsible since the solidified oil is organic and plant-based.
For anyone who wants to get a better sense of how this works, our guide on how to solidify cooking oil offers a deeper look into the science behind this simple solution. It’s the perfect way to keep your kitchen clean and your pipes clear.
Comparing Different Oil Disposal Methods
While solidifying oil is a clean, modern fix, it’s always smart to know all your options for getting rid of used cooking oil at home. People have been using traditional methods for generations, but honestly, they come with their own set of headaches.
The most common advice you'll hear is to let the oil cool completely, then pour it into a sturdy, sealable container—think an old coffee can or a plastic milk jug with a screw-top lid. Once it's full, you seal it up and toss it in the trash. The main upside here is that it doesn’t require any special products or upfront cost.
But the risk of a mess is huge. If that lid isn't perfectly secure or the container gets punctured in the trash, you’re left with a greasy, foul-smelling leak that’s a magnet for pests.
Traditional Alternatives And Their Drawbacks
Another old-school method involves mixing the cooled oil with absorbent materials. People get creative, using everything from kitty litter and sawdust to sand or even shredded newspaper. The goal is to soak up the liquid to prevent spills before you throw it in the garbage.
This approach can work in a pinch, but it's often messy and inefficient. You usually need a ton of absorbent material to get the job done, which can be just as much of a pain to handle as the oil itself.
The Recycling Option
Recycling used cooking oil is, without a doubt, an excellent choice for the environment. Many local municipalities or waste management services have collection centers that accept household cooking oil, which is often converted into useful products like biodiesel.
The global market for used cooking oil was valued at around $8 billion in 2024, and it's projected to grow to nearly $12 billion by 2030. While restaurants are the biggest source, households contribute a significant amount. However, public adoption is lagging; in the EU, only about half of household used cooking oil is collected properly, which really highlights the need for more convenient solutions. You can read the full research about the used cooking oil market at Grandview Research: https://www.grandviewresearch.com/industry-analysis/used-cooking-oil-market-report.
The biggest hurdle for home cooks is convenience. Finding a nearby collection center, storing jugs of old, smelly oil until you can make a trip, and just remembering to do it can be enough of a hassle to make this option feel impractical for many people.
Comparing Home Cooking Oil Disposal Methods
To make it easier to see how these methods stack up, here’s a quick side-by-side comparison. It breaks down each option by convenience, messiness, and environmental impact, so you can pick what truly works for your kitchen.
| Method | Convenience Level | Mess Factor | Environmental Impact | Best For |
|---|---|---|---|---|
| Container & Trash | Low | High | Low | Emergency disposal when you have a sturdy, leak-proof container on hand. |
| Mixing with Absorbents | Low | High | Low | Situations where you have plenty of absorbent material like cat litter. |
| Recycling Center | Medium | Medium | High | Eco-conscious cooks who have easy access to a local drop-off facility. |
| FryAway Solidifier | High | Low | High | Anyone looking for a fast, clean, and plant-based way to dispose of oil. |
Ultimately, while traditional methods have their place, they often trade convenience for a higher risk of mess and a bigger environmental footprint.
The FryAway Method: A Modern Solution
This brings us back to what I believe is the easiest and cleanest approach: solidifying the oil with FryAway. It was created specifically to solve the problems that make other methods so frustrating.
This simple infographic shows just how straightforward the three-step process is.
As you can see, it completely removes the mess and hassle from the equation.
Here’s exactly how to use FryAway for the best results:
- 1. Sprinkle and Stir: While the oil is still hot, sprinkle the FryAway powder into the pan. Stir for about 30 seconds until it completely dissolves.
- 2. Cool Down: Just let the oil cool down and solidify, right there in your pan. No pouring required.
- 3. Toss into Household Trash: Once it's a solid puck, you can easily scoop it out and toss it straight into the trash.
It eliminates the need for containers, prevents nasty spills, and is made from 100% plant-based ingredients. For a detailed breakdown, you can learn more about FryAway vs. traditional oil disposal methods in our complete study: https://fryaway.co/blogs/blog/fryaway-vs-traditional-oil-disposal-methods-a-comparative-study.
Recipes That Put Your Disposal Method to the Test
There’s no better way to learn how to dispose of cooking oil at home than by actually doing it. Let's move from theory to practice with a couple of classic recipes that are guaranteed to leave you with some leftover oil.
Once you’ve devoured every last crispy bite, we’ll walk through the incredibly simple, no-mess cleanup using FryAway. This hands-on approach shows that a delicious fried meal doesn’t have to end with a greasy headache. It just becomes part of the process.
Crispy Southern Fried Chicken
You just can't beat the satisfying crunch of perfectly seasoned fried chicken. This recipe uses a shallow fry, which leaves just enough oil in the pan to put your new disposal plan into action.
Ingredients You'll Need:
- Chicken: One whole chicken, cut into 8 pieces.
- Marinade: 2 cups buttermilk, 1 tbsp hot sauce, 1 tsp salt.
- Dredge: 2 cups all-purpose flour, 2 tbsp cornstarch, 2 tsp paprika, 1 tsp garlic powder, salt, and pepper to taste.
- Cooking Oil: About 3-4 cups of peanut or canola oil.
Start by marinating your chicken in the buttermilk mixture for at least four hours—overnight is even better if you have the time. When you’re ready to cook, pour your oil into a large cast-iron skillet and heat it over medium-high heat until it hits 350°F.
While the oil is getting hot, mix all your dredge ingredients in a shallow dish. Take each piece of chicken out of the marinade, let the excess drip off, and then give it a good, even coating in the flour mixture.
Carefully place the chicken in the hot oil, making sure not to overcrowd the skillet. Fry for about 6-8 minutes per side until it's a beautiful golden brown and cooked all the way through.
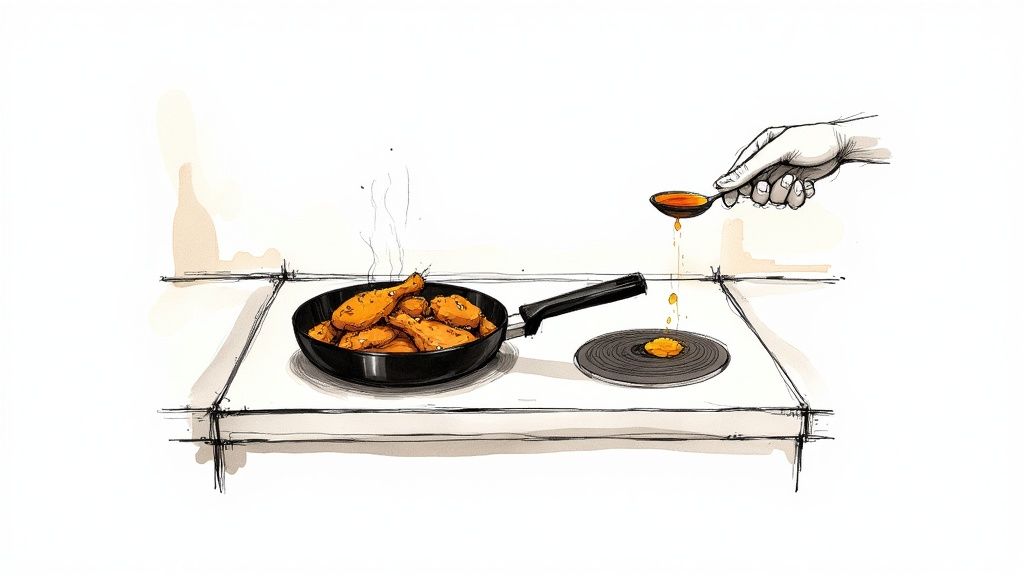
Cleanup with FryAway: After you've taken out the last piece of chicken and turned off the stove, let the skillet cool for just a moment. While the oil is still hot, it’s the perfect time to see how to dispose of cooking oil the easy way.
Here’s all it takes:
- Sprinkle and Stir: Carefully sprinkle the FryAway powder right into the hot oil. Grab a spatula and stir it gently for about 30 seconds until the powder completely dissolves.
- Cool Down: Now, just leave the skillet on the cool stovetop. As the oil cools down to room temperature, you'll see it magically transform into a solid, waxy puck.
- Toss into household trash: Once it’s fully solid, simply scoop the hardened oil out of the skillet and toss it right into your trash can. Your skillet is now ready for a quick wash, completely free of any greasy liquid.
Perfect Golden French Fries
Next up, a true classic: homemade french fries. This recipe calls for a double-fry method to get them extra crispy, giving us another great chance to practice our oil disposal skills.
What You'll Need:
- Potatoes: 4 large russet potatoes, scrubbed and cut into fries.
- Cooking Oil: About 6-8 cups of vegetable or canola oil for deep frying.
- Seasoning: Salt to taste.
First, soak your cut potatoes in cold water for at least 30 minutes. This removes the excess starch and is a non-negotiable step for getting crispy fries. After they've soaked, drain them and dry them completely.
Heat your oil in a deep pot or Dutch oven to 325°F. Fry the potatoes in batches for 3-5 minutes until they're soft but not yet browned. Take them out and let them rest on a wire rack while you bring the oil temperature up to 375°F.
Now, fry the potatoes again in batches for another 2-4 minutes until they’re perfectly golden and crisp.
Once you’re done, turn off the heat and let the oil cool down just a bit. You know the drill by now—the cleanup is just part of the recipe. Sprinkle FryAway into the still-hot oil, give it a good stir, and let it cool completely. Once it’s a solid block, scoop it out and toss it in the trash. It really is that easy.
Common Mistakes to Avoid When Handling Used Oil
Knowing the right way to get rid of cooking oil is only half the battle. Just as important is knowing what not to do. So many well-intentioned cleanup efforts go sideways, leading to sticky messes, unwanted pests, or even damage to your home and the local environment.
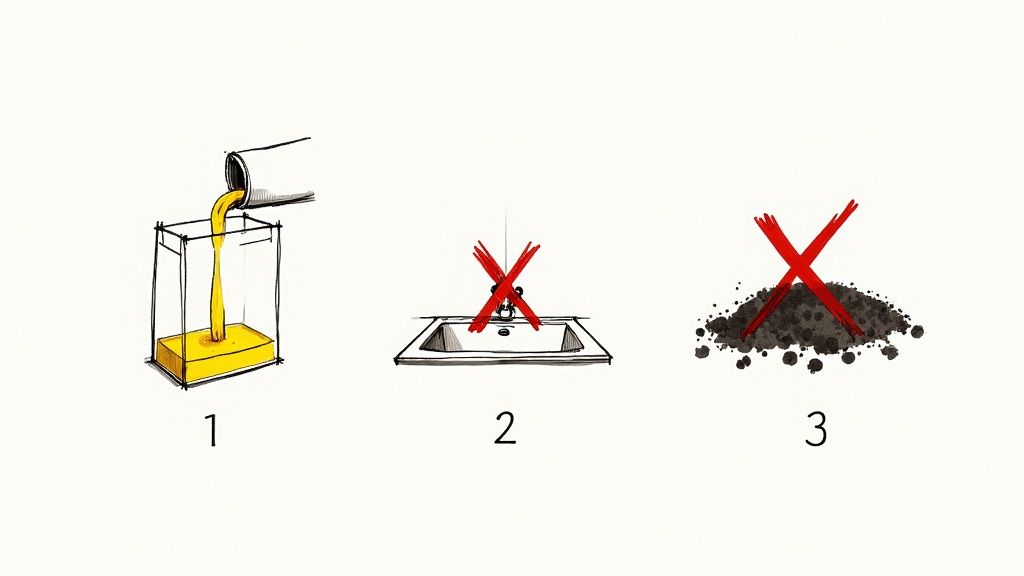
Let's start with the most common mistake: pouring hot oil into a plastic trash bag. It seems like a fast solution, right? But that heat can melt right through the plastic, creating a greasy, smelly leak all over your floor and inside the trash can. It's a huge headache to clean and a major invitation for insects and rodents.
The "Just a Little Bit" Myth
Another classic error is thinking a "little bit" of oil down the drain won't do any harm. Whether it's the last few drops from a pan of sautéed veggies or a spoonful of bacon grease, it all adds up to the same big problem. Those small amounts cool down and solidify inside your pipes, slowly but surely building up into a stubborn clog.
And even when you have the best intentions, spills happen. That’s why knowing the basics of managing absorbent oil spills is a must for keeping your kitchen clean and safe, especially when you're handling used oil.
Why You Should Never Compost Cooking Oil
This one’s a definite "don't"—adding used cooking oil to your compost bin. While oil is technically organic, it just doesn't break down like normal food scraps. Instead, it coats everything else in the pile, slowing down decomposition and throwing the delicate balance of your compost completely out of whack.
An oily layer in your compost is also a magnet for unwanted pests like rodents and flies. Before you know it, your eco-friendly compost pile becomes a neighborhood nuisance. For healthy compost, stick to the good stuff like fruit and vegetable scraps and keep all fats and oils out.
The sheer volume of oil we use makes these mistakes a big deal. Researchers estimate that anywhere from 30–70% of the oil used in baking and frying ends up as waste. With global cooking oil consumption topping 200 million metric tons a year, the ripple effect of improper disposal from our homes is massive. You can learn more about cooking oil waste findings from this report by the USDA Economic Research Service: https://ers.usda.gov/sites/default/files/_laserfiche/outlooks/110935/OCS-25b.pdf.
By steering clear of these common mistakes, you’re not just protecting your own home—you’re contributing to a healthier environment for everyone.
Your Questions About Cooking Oil Disposal Answered
Even with the best game plan, questions pop up. When it comes to getting rid of used cooking oil, you want to be sure you're doing it right. To make sure you feel completely confident, I’ve gathered the most common queries I hear and answered them in a clear, no-fuss way.
Can I Reuse Cooking Oil Before Disposing of It?
Yes, you can often get another one or two uses out of your cooking oil, especially after frying something with a mild flavor. The trick is to let the oil cool down completely first.
Once it's cool, strain it through a fine-mesh sieve or a couple of layers of cheesecloth to get rid of any stray food particles. Nobody wants bits of last night's fried chicken in their donuts. Then, store it in a sealed, airtight container somewhere cool and dark, like your pantry.
However, you've got to know when to call it quits. If the oil is super dark, smells funky (rancid), or starts smoking way earlier than it should, its quality has gone downhill. That's your cue to toss it for good. It’s also smart to avoid mixing different types of oils if you plan on reusing them, since they all have different smoke points.
What Is the Safest Temperature to Handle Oil for Disposal?
Safety first, always. How you handle the oil depends entirely on your disposal method.
If you're using a solidifier like FryAway, you’ll want to sprinkle the powder directly into the pan while the oil is still hot from cooking. This is what allows the product to dissolve and work its magic as the oil cools down.
For any other method—like pouring it into a container to throw away—you must let the oil cool down completely to room temperature. Hot oil can cause serious burns in an instant, and it will melt right through most plastic containers. Trust me, that’s a dangerous, greasy mess you do not want to clean up.
The rule of thumb is simple: solidify it hot, but contain it cold. Never, ever try to pour hot, liquid oil into any kind of disposal container.
Does This Apply to Bacon Grease and Other Animal Fats?
Absolutely. Bacon grease, lard, and other animal fats are just as bad for your plumbing as liquid cooking oils, if not worse. As these fats cool, they turn into a thick, waxy solid that is an expert at creating stubborn clogs in your drains.
You should handle animal fats using the same safe disposal methods. Solidifying them is a fantastic option because it deals with the grease before it even has a chance to get near your sink. Collecting it in a sealed jar for the trash also works perfectly well.
Does FryAway Work with All Types of Cooking Oil?
Yes, FryAway was specifically designed to work with all the common cooking oils and fats you’d use in your kitchen. This includes all the usual suspects:
- Plant-based oils like canola, vegetable, sunflower, and peanut oil.
- Animal fats like bacon grease, lard, and tallow.
Its plant-based powder formulation is what makes it so versatile. It doesn't matter what you've been frying up; the cleanup process is always the same simple three steps:
- Sprinkle and Stir the powder into your hot oil.
- Cool Down and let it turn into a solid block.
- Toss the hardened puck right into your household trash for a mess-free finish.
This takes all the guesswork out of it, giving you an easy cleanup every single time.
Ready to make messy oil disposal a thing of the past? Try FryAway today and see how simple kitchen cleanup can be. Visit https://fryaway.co to find the perfect product for your cooking style.