


· By FryAway
How to Clean Deep fryer Oil for Reuse and Easy Disposal
Perfectly crispy fried chicken and golden fries don't just happen. The real secret? It all starts with clean oil.
Figuring out how to handle used deep fryer oil involves two key things: knowing how to filter it so you can use it again, and knowing how to safely get rid of it when it's past its prime. This guide will walk you through both, setting you up for better-tasting food and a kitchen that stays sparkling clean.
The Secret to Better Frying Is Cleaner Oil
Let's be honest, dealing with a vat of used deep fryer oil can feel like the absolute worst part of an otherwise delicious meal. The lingering smell, the greasy mess, and the "what do I even do with this?" dilemma can turn a fun cooking session into a cleanup nightmare.
But here’s the thing: managing your oil properly isn't just a chore. It's the key to consistently delicious food, a less chaotic kitchen, and even saving a little money.
This guide is designed to turn that dreaded cleanup into a simple, no-fuss routine. We’ll cover everything from easy filtering tricks that give your oil a longer life to the ultimate mess-free way to toss it when you're done. When it's finally time to say goodbye to that oil, we always recommend a product like FryAway because it makes disposal unbelievably easy.
Master the Cleanup from Start to Finish
Picture this: you've just fried up a batch of incredible Southern Fried Chicken in some fresh peanut oil. The crust is shatteringly crisp, the flavor is on point. But instead of facing a greasy disaster zone, you have a clear, simple plan for the aftermath. That’s what happens when you get your oil management down.
When that oil has seen its last fry, FryAway turns a messy job into three quick steps:
- Sprinkle and Stir: Just add the plant-based powder to the hot oil and give it a stir until it dissolves.
- Cool Down: Now, just walk away and let the fryer cool down completely. As it cools, the oil will magically turn into a solid, organic block.
- Toss into household trash: All that's left is to scoop the solid puck of oil out and toss it right into your household trash.
This completely sidesteps the need for old jars, messy spills, and the very real risk of clogged pipes. It makes the entire process, from cooking up Restaurant-Style French Fries to the final cleanup, totally stress-free.
Ready to take control of your frying game from the first sizzle to the final toss? Let's get into it.
When to Reuse and When to Toss Your Frying Oil
Before you can even think about cleaning your deep fryer oil, you've got to ask the big question: is this oil actually worth saving? Reusing oil is a brilliant way to cut costs and minimize waste, but using oil that's past its prime will absolutely ruin your food and stink up your kitchen. Learning to spot the signs of spent oil is a non-negotiable skill for any home frying enthusiast.
The good news is, you don't need any fancy lab equipment to become an oil inspector. Your own senses are the best tools for the job. Just trust what you see, smell, and even how the oil behaves in the pan.
Reading the Signs of Bad Oil
First, just look at it. Fresh oil has that clean, light golden color. As you use it, heat and tiny food particles start to break it down, making it darker and murkier with each fry. If your oil is looking less like cooking oil and more like something you'd put in your car engine, it’s done. Time to toss it.
Next, give it a sniff. Good, clean oil should smell pretty neutral, maybe a little nutty depending on the type. If you catch a whiff of anything rancid, soapy, or just plain "off," that's a dead giveaway. The fats have broken down, and that funky smell will transfer directly to your food, leaving a greasy, stale taste nobody wants.
Another tell-tale sign is the smoke point. If you notice your oil starts smoking at much lower temperatures than it used to, its chemical structure has changed for the worse. You might also see foam bubbling up on the surface that just won't go away, or notice the oil has become thick and syrupy when you pour it.
Pro Tip: Your food will tell you everything you need to know. If your usually perfect fried chicken or crispy fries start coming out greasy, soggy, or with a funky aftertaste, your oil is almost always the culprit. Bad oil just can't deliver that clean, crisp finish we're all after.
This chart breaks down the decision-making process, showing just how much of an impact your oil's quality has on the final dish.
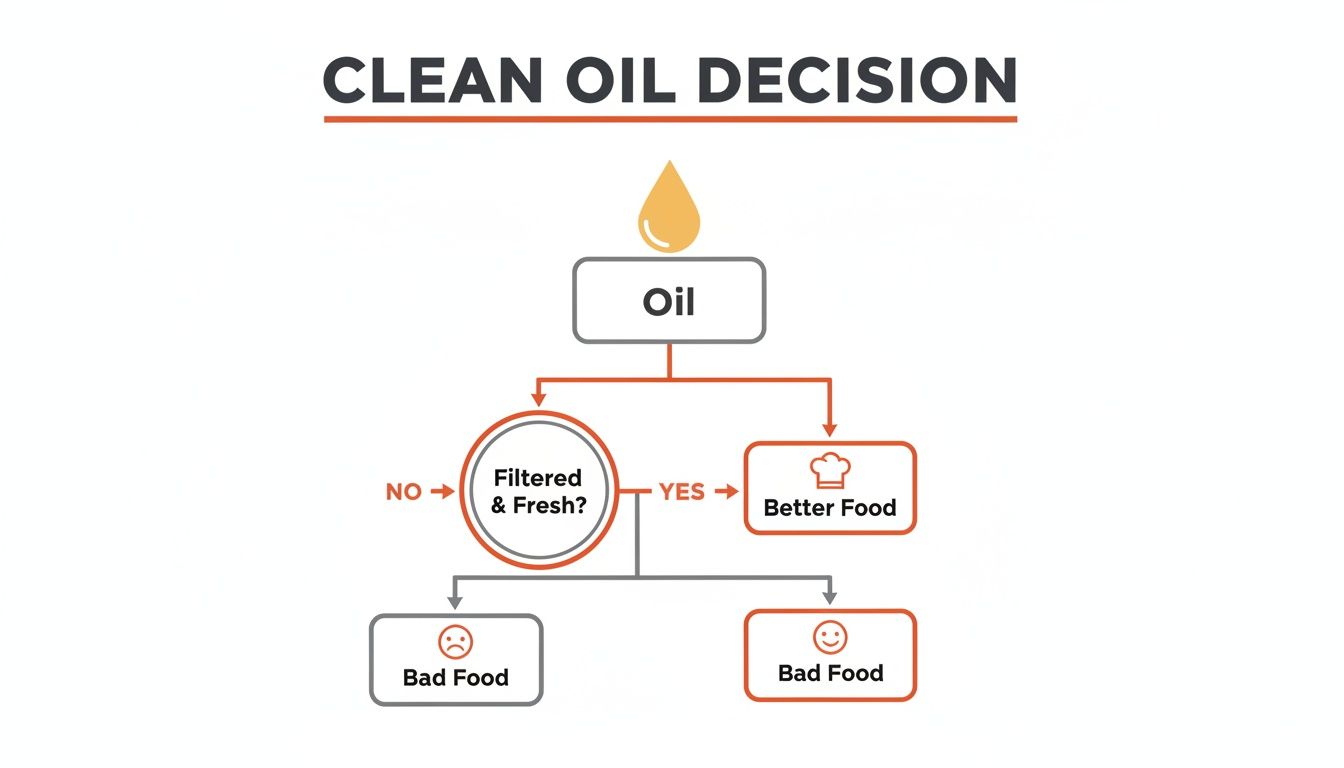
As you can see, the path to delicious, restaurant-quality fried food always starts with clean, high-quality oil.
Cooking Oil Reuse Lifespan Guide
Not all oils are created equal when it comes to longevity. Generally, oils with a high smoke point can handle more reuse, but what you're cooking plays a huge role. Frying heavily battered or breaded foods (like that amazing Southern fried chicken) will degrade oil much faster than something "cleaner" like plain French fries.
Here's a handy comparison to give you a general idea of how many uses you can expect from common frying oils, assuming you're filtering them properly after each use.
| Oil Type | Smoke Point | Average Reuses (With Filtering) | Signs of Degradation |
|---|---|---|---|
| Canola Oil | 400°F (204°C) | 3-4 times | Darkens quickly, develops a noticeable odor |
| Peanut Oil | 450°F (232°C) | 4-6 times | Starts to foam on the surface, becomes thick |
| Vegetable Oil | 400-450°F (204-232°C) | 2-4 times | Becomes smoky at lower temps, smells rancid |
| Corn Oil | 450°F (232°C) | 3-5 times | Looks murky and cloudy, imparts a greasy taste |
Keep in mind these are just averages. Always trust your senses over a number.
When your oil has finally given up the ghost, it’s time to dispose of it properly. We always recommend FryAway because it makes it unbelievably simple. Just stir the plant-based powder into your hot oil, let it cool, and watch it solidify into a solid puck. From there, you can just scoop it out and toss it right into your household trash—no mess, no spills, and definitely no clogged drains.
How to Filter Oil for Maximum Freshness and Reuse
So you’ve decided your oil is good for another round of frying. Great! The next step is absolutely crucial: filtering. This isn’t just about making it look pretty again; you're actively removing all those microscopic food bits and sediment that cause oil to break down, smoke up your kitchen, and give your next batch of food a funky, off-flavor.
Taking a few minutes to filter your oil can honestly turn a murky, used liquid back into something that looks like liquid gold.
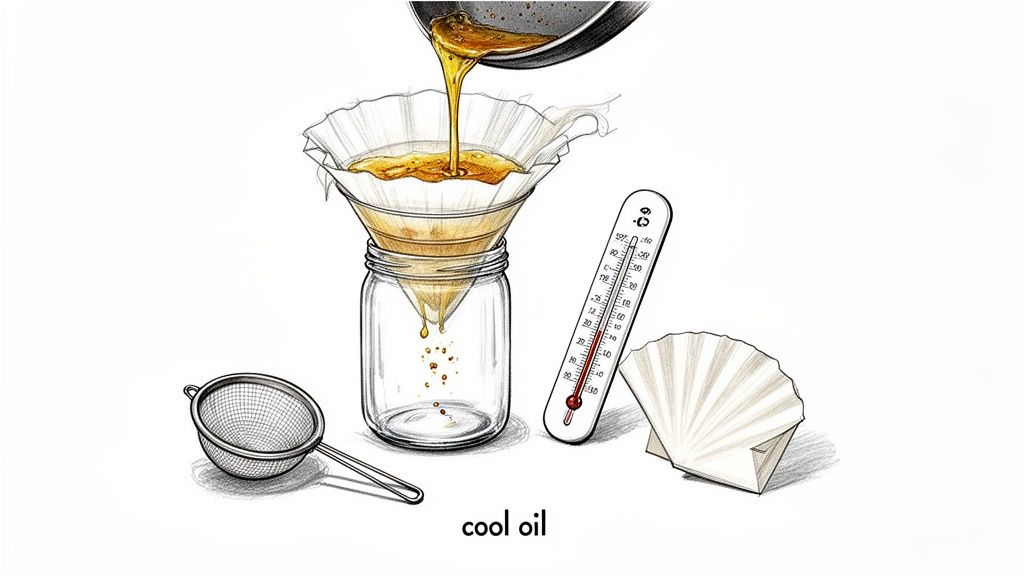
First things first, let's talk safety. Never, ever try to handle a fryer full of piping-hot oil. It's best to let it cool down to a much safer temperature, somewhere around 150-175°F (65-80°C). At this point, it's still warm enough to flow smoothly but not so hot that it’ll give you a nasty burn on contact.
Simple and Effective Filtering Methods
You don’t need any fancy, expensive gear to get this done right. Chances are, you already have a few effective filtering tools sitting in your kitchen cabinets. The goal is always the same: strain out every last speck of leftover gunk.
Here are a few of my go-to methods:
- Coffee Filters: Believe it or not, a standard paper coffee filter is amazing for catching even the tiniest particles. Just pop it inside a fine-mesh sieve for support, then slowly pour the warm oil through it into a clean container.
- Cheesecloth: Layering a couple of pieces of cheesecloth inside a strainer also works like a charm. It’s a little quicker than using a coffee filter but still does a fantastic job of trapping leftover batter and food debris.
- Specialized Tools: If you find yourself frying pretty often, it might be worth investing in oil filtering cones or a dedicated oil filtering pot. These can make the whole process even smoother.
For a deeper dive, check out our complete guide on how to filter frying oil. This little bit of effort pays off big time. Regular filtering can literally make your oil last twice as long—that's a 100% longer lifespan compared to leaving it unfiltered.
Storing Your Liquid Gold for Later
Once your oil is filtered and sparkling clean, storing it properly is what keeps it fresh for your next frying adventure. The biggest enemies of cooking oil are oxygen, light, and heat. Your storage solution needs to protect it from all three.
The best spot for your filtered oil is in an airtight container, tucked away in a cool, dark place like a pantry or cupboard. A simple glass jar with a tight-fitting lid is perfect. Whatever you do, don't store it on the counter next to the stove—the constant heat exposure will degrade it in no time.
Now, when you’ve finally squeezed every last use out of your oil and it's time for it to go, the cleanup should be just as clean and simple. This is where FryAway is a game-changer, giving you a completely mess-free way to get rid of it.
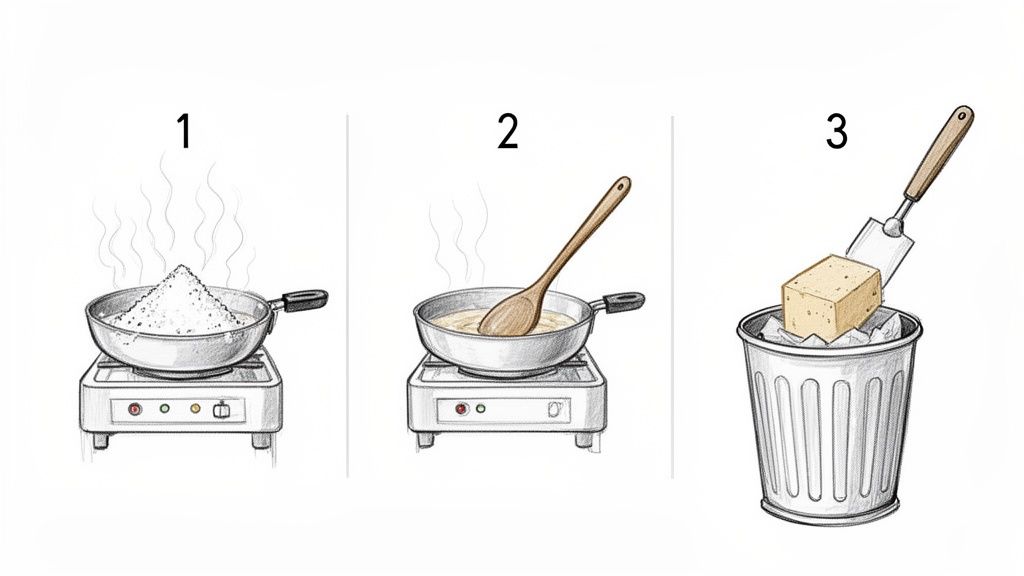
Just follow these three easy steps for best results:
- Sprinkle and Stir: While the oil is still hot, sprinkle in the FryAway powder and give it a gentle stir until it dissolves completely.
- Cool Down: Now just let the fryer and oil cool down. This is where the magic happens—the oil will transform into a solid, waxy block.
- Toss into household trash: Once it's solid, you can simply scoop it out and toss it right into your regular trash bin. No spills, no clogged pipes, and no mess. Problem solved.
The Easiest and Safest Way to Dispose of Used Oil
Once you've filtered your oil and decided it’s reached the end of its life, you’re faced with the most dreaded part of the process: disposal. Pouring spent oil down the kitchen sink isn't just a bad idea; it's a guaranteed recipe for plumbing disasters. Over time, that liquid grease cools and solidifies inside your pipes, creating stubborn clogs that can be a nightmare to fix.
Storing it in old milk cartons or leaky jars is another common tactic, but that just creates a greasy mess waiting to happen in your trash can. This is where the cleanup often becomes the biggest headache of frying at home.
A Modern Solution for Mess-Free Disposal
Thankfully, there’s a much simpler way to handle oil disposal that eliminates the mess, the stress, and the environmental guilt. We always recommend FryAway, a 100% plant-based powder that magically transforms liquid cooking oil into a solid, organic block.
This isn't just about convenience; it's about changing how you approach the entire cleanup. Instead of wrestling with slimy containers, you get a clean, simple, and planet-friendly solution. It completely removes the final obstacle that makes people hesitate to fry delicious foods like crispy Southern Fried Chicken at home.
The scale of oil disposal is massive. Consider that McDonald's restaurants in London alone dispose of a staggering 618,000 liters of used cooking oil annually. For home cooks, improper disposal contributes to a huge problem in urban sewers known as 'fatbergs'—giant masses of congealed grease and waste. Find out more about how fast-food chains manage their frying oil in this fascinating deep dive from Tasting Table.
How to Use FryAway in Three Simple Steps
Using FryAway couldn't be easier. For best results, follow this quick, three-step process right after you finish cooking.
-
Sprinkle and Stir
While your cooking oil is still hot, simply sprinkle the FryAway powder evenly across the surface. Use a spatula or spoon to gently stir until the powder has completely dissolved into the oil. -
Cool Down
This step requires zero effort. Just turn off the heat and walk away. As the deep fryer and oil cool down naturally, the FryAway works its magic, slowly transforming the liquid into a solid, waxy puck. -
Toss into household trash
Once the oil has fully solidified, you can easily scoop the entire block out of your fryer or pan with a spoon or spatula. From there, you just toss it directly into your regular household trash bin.
That’s it. No spills, no mess, no greasy containers, and absolutely no risk of clogging your pipes. Because FryAway is non-toxic and plant-based, it’s a responsible choice you can feel good about.
This simple method completely changes the game for home cooks. Imagine making a batch of perfect, golden-brown Restaurant-Style French Fries and having the cleanup be the easiest part of the meal. For more guidance, you can also explore our detailed article on how to dispose of deep fryer oil for additional tips and best practices.
Deep Cleaning Your Fryer After the Oil Is Gone
Once you've handled the used oil, it's time for the final act: giving your deep fryer a thorough cleaning. This isn't just about making it look good. A clean fryer gets rid of that sticky, greasy buildup, banishes lingering odors, and makes sure your next batch of food tastes fresh, not like yesterday's fish fry.
Whether you have a dedicated countertop machine or just a trusty pot on the stove, the process is pretty much the same.
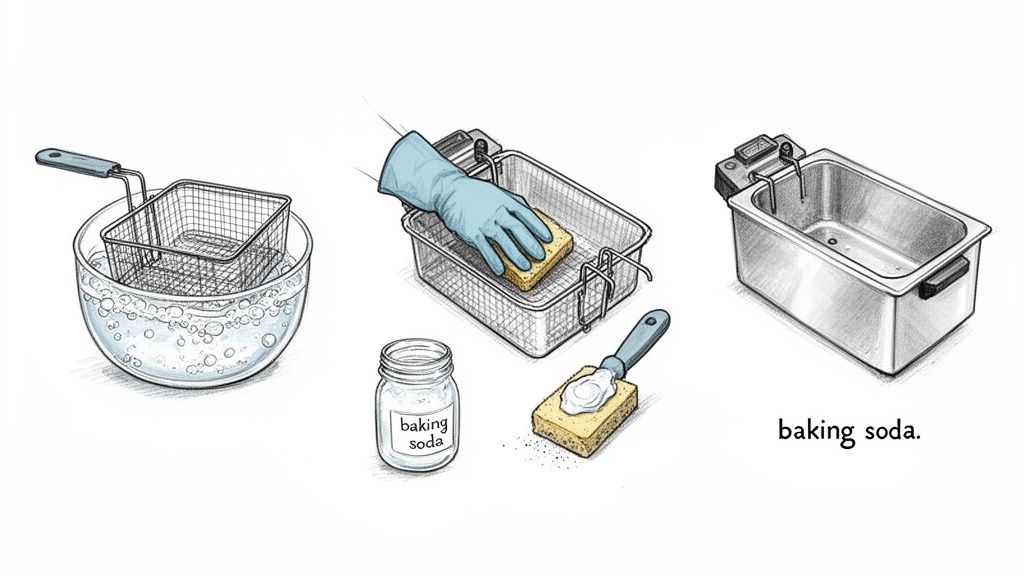
First things first, take the fryer apart. Pull out the basket, heating element, and any other bits that come off. Most of these can be washed in hot, soapy water, just like your regular dishes. If they're caked with gunk, let them soak for a while.
For the main fryer pot, grab a paper towel and wipe out any leftover oil and food crumbs. This quick wipe-down makes the real scrubbing so much easier.
Tackling Stubborn Grease and Gunk
Over time, cooking oil can polymerize, creating a tough, sticky varnish on the fryer's surfaces that regular dish soap just can't handle.
A surprisingly effective trick is to make a simple paste with baking soda and a little water. Slather this paste on the inside of the fryer and gently scrub with a non-abrasive sponge. The baking soda is just gritty enough to lift that polymerized mess without scratching the finish. For more pro techniques, check out our guide on the best way to clean a deep fryer.
If you’re dealing with a truly baked-on disaster, a commercial degreaser designed for kitchen equipment can be a lifesaver. Just be sure to follow the product's directions and rinse the fryer thoroughly with clean water to get rid of any chemical residue.
A clean fryer is the secret to better-tasting food and longer-lasting oil. This final step is what gets your equipment spotless, odor-free, and ready for your next crispy creation.
This whole process is borrowed straight from the pros. In busy restaurant kitchens, they filter their oil at least twice a day. This diligence can easily double the life of their cooking oil, turning what would have lasted for three uses into six—slashing their costs in half.
For more insights into keeping your whole cooking space pristine, take a look at these expert tips for commercial kitchen cleaning.
After a final rinse and a good dry, your deep fryer will be back in prime condition, ready for the next round of golden-brown goodness.
Recipes to Try With Your Spotless Deep Fryer
Alright, you've officially mastered the art of cleaning your deep fryer oil. From filtering and storing to safe disposal, you're practically a pro. Now comes the best part—actually cooking with it!
Using properly maintained, clean oil isn't just a minor detail; it's the secret ingredient that chefs swear by. It genuinely makes a world of difference in the final flavor, color, and texture of your food.
Here are a couple of classic fried recipes to put your spotless fryer and pristine cooking oil to the test. These are the kinds of dishes where clean oil is non-negotiable for achieving that signature crispy perfection.
Ultimate Crispy Southern Fried Chicken
There is absolutely nothing like the satisfying crunch of truly great homemade Southern fried chicken. The key to that perfectly golden-brown, shatteringly crisp crust? Frying in oil that is impeccably clean and heated to the perfect temperature. If you use old, degraded oil, you'll end up with a coating that turns dark and greasy long before the chicken inside is even cooked through.
Ingredients:
- One whole chicken, cut into 8 pieces
- 2 cups all-purpose flour
- 2 tablespoons salt
- 1 tablespoon black pepper
- 1 tablespoon paprika
- 1 teaspoon garlic powder
- 2 large eggs
- 1/2 cup milk
- 48 oz. peanut or vegetable oil for frying
Instructions:
First, mix your dry ingredients—flour, salt, pepper, paprika, and garlic powder—in a shallow dish. In a separate bowl, whisk the eggs and milk together to create an egg wash. Dip each piece of chicken into the egg wash, letting any excess drip off, then dredge it thoroughly in the flour mixture. Make sure it's completely coated.
Heat your oil to a steady 350°F (175°C). Carefully place the chicken pieces into the hot oil, making sure you don't overcrowd the fryer. Fry for about 6-8 minutes on each side, until the chicken is beautifully golden brown and cooked all the way through.
Pro Tip: Clean oil is everything here. Peanut and vegetable oils have high smoke points, which means they can maintain a steady temperature to cook the chicken perfectly without burning the outside. If the oil were old, it would start smoking at a lower temperature and impart a nasty, rancid taste that would ruin the entire dish.
Restaurant-Style French Fries
Ever wonder why the fries you get at a restaurant are so much better than the ones you make at home? The secret is usually a two-step frying process and, just as importantly, exceptionally clean oil. Using fresh canola oil is what gets you that fluffy-on-the-inside, crispy-on-the-outside perfection without any hint of greasiness.
Ingredients:
- 4 large Russet potatoes, washed and scrubbed
- 48 oz. canola oil for frying
- Salt, to taste
Instructions:
Start by cutting the potatoes into uniform ¼-inch sticks. Rinse them in cold water and then—this is critical for crispiness—pat them completely dry with a paper towel.
Heat your canola oil to 300°F (150°C) for the first fry. Cook the potatoes in small batches for about 5 minutes until they're soft but not browned. This step is called blanching. Remove them from the oil and let them cool down for a bit.
Now, crank up the heat. Increase the oil temperature to 375°F (190°C). Fry the blanched potatoes again, this time for just 2-3 minutes, until they are golden brown and wonderfully crisp. Pull them out and immediately season with salt.
After you've enjoyed your amazing fried creations, the cleanup doesn't have to be a chore. Instead of worrying about what to do with all that leftover oil, just turn to FryAway.
Follow these three simple steps to solidify the oil for the easiest disposal ever:
- Sprinkle and Stir: Add FryAway powder to the still-hot cooking oil and give it a good stir until it’s all dissolved.
- Cool Down: Let the fryer cool down completely. You'll see the oil magically transform into a solid block.
- Toss into household trash: Just scoop the solid oil puck out and throw it away in your regular garbage. Done.
Got Questions About Cleaning Up Fryer Oil? We've Got Answers
Stepping into the world of deep frying can bring up a few questions, especially when you're trying to get the most out of your cooking oil and keep things clean. Here are some of the most common questions we hear from home cooks just like you.
How Many Times Can I Actually Reuse My Oil?
This is the big one, and the honest answer is: it depends. The lifespan of your oil comes down to two main things—the type of oil you're using and what you’re cooking in it.
A high-smoke-point oil like peanut oil can often be reused 4-6 times. This is especially true if you're frying something "clean" like potatoes for those perfect, Restaurant-Style French Fries that don't leave a lot of debris behind.
On the other hand, if you're frying battered items like Southern Fried Chicken, that oil will break down much faster because of all the little food particles left floating around. In that case, you might only get 2-3 uses before it's time to call it quits. Always trust your senses—if it looks dark, smells funky, or starts smoking too soon, it’s done.
Is It Okay to Mix New Oil With Old Oil?
It might seem like a smart way to top off your fryer and stretch your budget, but mixing fresh oil with old, filtered oil is a bad idea. Think of it like this: the old oil has already started to break down, and it will drag the new oil down with it, causing the entire batch to degrade much more quickly.
For the best-tasting food and the longest-lasting oil, you're always better off starting with a completely fresh batch once your current one is spent.
Keeping your new and old oils separate is the secret to ensuring every meal starts with the highest quality foundation for crisp, clean-tasting results.
Is FryAway Safe for My Deep Fryer?
Absolutely. FryAway is completely safe to use in all types of deep fryers, not to mention regular pots and pans on the stovetop.
Because it's a 100% plant-based and non-toxic product, it works its magic on every kind of cooking oil you can think of, from vegetable and canola to fancy peanut and corn oil.
For best results, just follow this simple three-step process:
- Sprinkle and Stir the powder into your hot oil until it’s fully dissolved.
- Let it Cool Down completely, which allows it to solidify.
- Toss the solid puck of oil directly into your household trash. No mess, no spills.
Ready to make your frying cleanup completely mess-free? FryAway transforms used cooking oil into solid waste you can easily toss in the trash. Try FryAway today and experience the easiest oil disposal ever.