


· By FryAway
How to Make Fried Chicken Crispy Every Time
Ever wonder what separates good fried chicken from the truly legendary kind? It's that audible, shatter-on-impact crunch. This isn't just kitchen luck—it's a deliberate process won by mastering moisture.
The main enemy of a crispy crust is water. The battle against sogginess is won in three key stages, each building on the last to systematically remove moisture. It all starts with the brine, moves to the dredge, and finishes in the hot oil of the fryer.
The Science Behind a Shatterproof Crust
The journey to an unbelievably crisp crust begins long before the chicken hits the oil.
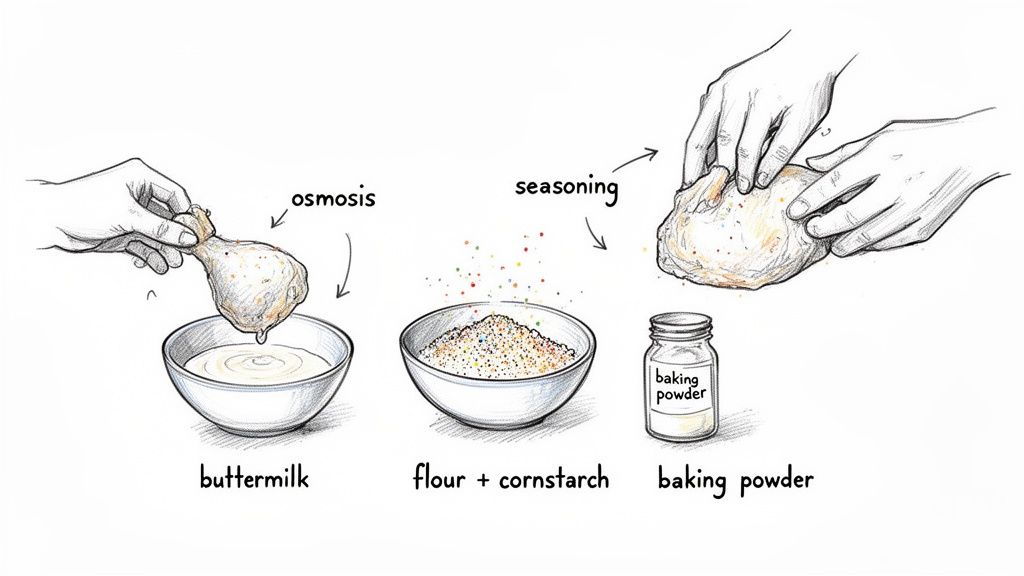
It kicks off with a buttermilk or saltwater brine, a critical first step that does way more than just tenderize the meat. Through osmosis, the brine actually starts drawing moisture away from the skin. That's your first victory in the quest for crispiness.
Next comes the dredge. This isn't just a simple flour coating; it's a textured shell designed to create a dry barrier. A great dredge repels oil while building the foundation for a crunchy exterior.
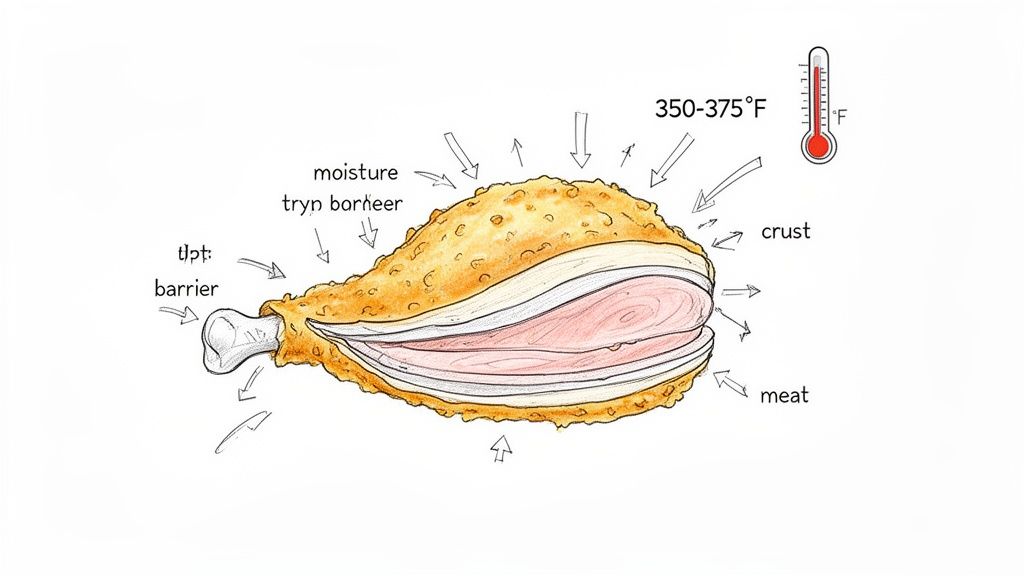
Finally, it all comes together in the hot oil. This is where precise temperature control is non-negotiable. The intense heat instantly turns any lingering moisture in the coating into steam, forcing it to escape and leaving behind that dry, incredibly crisp crust we're all after.
Getting this right is what transforms your chicken from simply cooked to perfectly crispy.
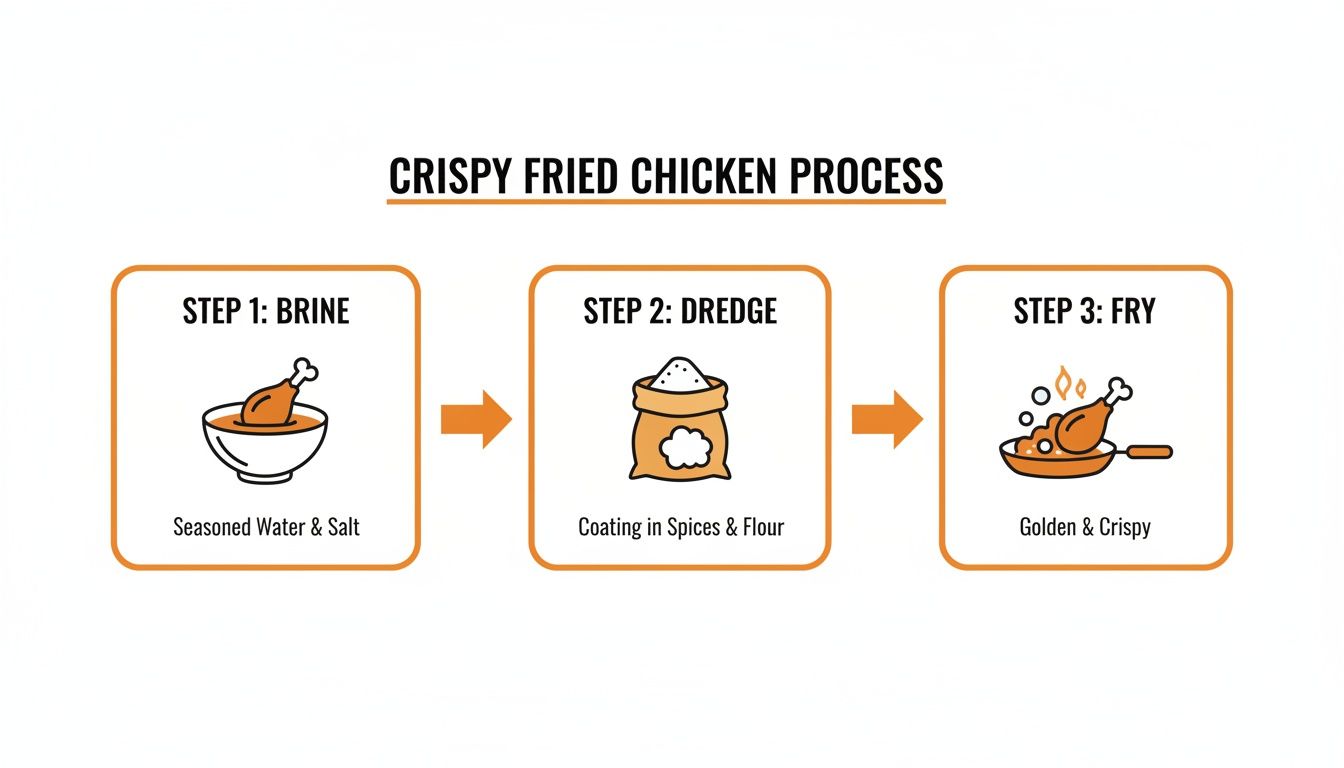
To make it even clearer, here's a quick roadmap summarizing how each stage contributes to that final, glorious crunch.
Your Roadmap to Crispy Fried Chicken
This table breaks down the entire process, showing you what to do at each stage and why it's so important for getting that shatterproof crust.
| Stage | Key Action | Why It's Critical for Crispiness |
|---|---|---|
| Brining | Soak chicken in a buttermilk or saltwater solution. | Draws initial moisture from the skin, seasons the meat, and tenderizes it for a juicy interior. |
| Dredging | Coat the brined chicken in a seasoned flour mixture. | Creates a dry, protective barrier that will become the crispy crust once it hits the hot oil. |
| Frying | Cook the chicken in cooking oil at a precise, high temperature. | Rapidly evaporates remaining moisture from the coating, leaving behind a golden, crunchy crust. |
Think of these stages as building blocks. Skipping one or rushing through it will compromise the final result. Master all three, and you'll have perfect fried chicken every time.
The Cleanup Simplified
Let's be honest: one of the biggest reasons people avoid frying at home is the dreaded cleanup. What are you supposed to do with all that used cooking oil? Pouring it down the drain is a guaranteed recipe for a plumbing disaster.
A simple, eco-friendly solution can make the entire process feel less like a chore. We always recommend FryAway, a plant-based powder that turns messy liquid cooking oil into a solid, easily disposable puck.
Using it is incredibly straightforward. Just follow these 3 steps:
- Sprinkle and Stir: Right after you finish frying, while the oil is still hot, sprinkle the FryAway powder into the pan. Stir until it completely dissolves.
- Cool Down: Now, just let it be. As the oil cools down, the powder works its magic, transforming the liquid into a solid, waxy substance.
- Toss into household trash: Once it's completely solid, you can easily scoop the entire puck of hardened oil out of your pan and toss it straight into your household trash.
This method completely eliminates messy spills and the risk of clogged pipes, letting you focus on the joy of incredible homemade fried chicken.
Building Your Foundation for Flavor and Crunch
The secret to truly incredible fried chicken starts hours before it even thinks about hitting the oil. This is where you lay the groundwork for deep, savory flavor and set the stage for that flawless, crunchy crust everyone craves. Skipping these early steps is like building a house on sand—it just won’t hold up.
It all kicks off with a proper soak. This isn't just about adding flavor; it's a science-backed method for dehydrating the skin, which is the absolute most important step toward getting that ultimate crispiness.
The Transformative Power of Brining
A good brine is your first line of defense against bland, soggy chicken. Your two best bets are a traditional saltwater brine or a classic buttermilk soak. Both do a fantastic job of tenderizing the meat and seasoning it from the inside out.
More importantly, a brine kickstarts the drying process through osmosis. Soaking chicken in a saltwater solution with 5-10% salinity actually pulls 15-20% of the water from inside the chicken to the surface. This moisture then evaporates like crazy in the hot oil, leaving you with significantly drier, crispier skin. This technique has been a cornerstone of Southern cooking since the 1800s for one simple reason—it works.
The global fried chicken market, valued at a whopping USD 34.6 billion in 2024, is built on this universal love for texture. It's projected to hit USD 54.8 billion by 2034, with classic bone-in chicken holding a massive 44.2% market share. This just proves that a perfect crunch never goes out of style.
Whether you go for a saltwater brine for pure crispiness or buttermilk for its tangy flavor and tenderizing magic, let your chicken soak for at least four hours. Honestly, though, overnight is even better. This gives the brine plenty of time to work its way deep into the meat, guaranteeing a juicy interior and setting you up for a perfectly crisp finish.
Crafting the Perfect Dredge for Maximum Crunch
Once the brining is done, the next mission-critical component is the dredge. This isn't just a simple toss in flour; it's a carefully engineered mix designed to create a light, airy, and ridiculously crispy crust that sticks to the chicken like glue.
A basic all-purpose flour dredge gets the job done, but if you want to elevate your fried chicken to legendary status, you need a strategic blend. The goal is to build a coating that’s sturdy enough to form a shell but light enough to shatter when you bite into it.
Here’s the breakdown of what you need for a superior dredge:
- All-Purpose Flour: This is the backbone of your coating, giving it structure and that classic golden-brown color.
- Cornstarch: This is the secret weapon for next-level crispiness. Cornstarch soaks up moisture and stops gluten from developing, which means a lighter, crispier, and less greasy crust. A ratio of 3 parts flour to 1 part cornstarch is a great place to start.
- Baking Powder: A tiny amount—about one teaspoon per cup of flour—makes a world of difference. The baking powder reacts with the hot oil, creating tiny air bubbles in the coating. This expands the surface area, leading to an exceptionally light and crunchy texture.
Once you have your base, it's time to season it. Don't be shy here; the dredge is your best chance to pack the crust with flavor. A generous hand with salt, black pepper, paprika, garlic powder, and onion powder is a classic combination that never disappoints.
The Dredging Technique for a Flawless Coating
How you apply the dredge is just as important as what’s in it. A common mistake is going straight from the wet brine to the dry flour, which creates a gummy paste instead of a distinct, crispy coating.
First, pull the chicken out of the brine and let any extra liquid drip off. Pat it mostly dry with paper towels, but leave it just a little tacky. That slight bit of moisture is what helps the flour stick.
Working one piece at a time, press the chicken firmly into your dredge mixture. Make sure every single nook and cranny is completely covered. Shake off any excess, then set the coated chicken on a wire rack.
Pro Tip: Let the coated chicken rest on that wire rack for at least 15-20 minutes before it goes into the fryer. This gives the flour time to hydrate and form a "skin," creating a durable coating that won't fall off in the hot oil.
This patient approach is fundamental to learning how to make fried chicken crispy. It guarantees your breading stays put, creating that thick, crunchy crust that makes every bite so satisfying. Choosing the right cooking oil is the next big step, and you can learn more about how different oils affect your final result by checking out this guide on the best oil for frying.
Mastering Your Frying Technique and Temperature
Alright, this is the moment of truth. You’ve done the prep work with the brine and the dredging, but the fry itself is where the magic really happens. Getting this part right is what separates truly shatteringly crispy chicken from a greasy, disappointing mess. Think of it less as art and more as a science.
First things first: your cooking oil. For deep frying, you absolutely need an oil with a high smoke point—that’s the temperature where it starts to break down and smoke. Oils like peanut, canola, or vegetable oil are my go-tos because they can handle the intense heat without burning and ruining your chicken.
The Critical Role of Oil Temperature
While the right oil is important, the real game-changer is temperature control. This is the single most important factor in achieving that crunchy crust you're dreaming of. The sweet spot for frying chicken is a very specific 350°F to 375°F.
If your oil is too cool (say, below 325°F), the chicken will just sit there and soak up grease, leaving you with a soggy crust and oily meat. No thanks. But if the oil is scorching hot, the crust will burn long before the inside is safely cooked through. Your mission is to stay in that perfect temperature window.
I can't stress this enough: temperature control is the secret sauce. When the oil dips below 325°F, chicken can absorb up to 50% more oil, which is a one-way ticket to a greasy finish. This isn't just kitchen folklore; Colonel Sanders famously insisted on pressure fryers that held a precise 325°F to create KFC's iconic crust.
Modern food science backs this up, showing that the optimal temperature results in a breading with 15-20% less moisture retention. This boosts its crispiness by 35% over the course of an hour. The global fried chicken industry, valued at an astonishing $93.33 billion in 2024, is built on this science, with a projected growth rate of 6.96% fueled by more people frying at home.
Pro-Level Secret: The Double-Fry Method
Want to guarantee a next-level, stay-crispy-for-hours crunch? It's time to adopt a professional technique: the double-fry. It might sound like a hassle, but it's remarkably simple and delivers an unbelievably crispy crust that holds its own.
Here's the logic: the first fry cooks the chicken through at a lower temperature, while the second, hotter fry is all about crisping that exterior to perfection. The initial fry gently renders fat and pushes moisture out of the coating. After a short rest, the second, high-heat fry flash-cooks the now-drier crust, creating that legendary shatter-crisp skin.
Here’s how you pull it off:
- First Fry: Get your cooking oil to a lower temp, around 300-325°F. Carefully add your chicken and fry until it's cooked through and just a light golden color. This usually takes about 6-8 minutes per side, depending on the size of the pieces.
- Rest: Pull the chicken from the oil and let it rest on a wire rack for at least 15-30 minutes. This cool-down period is crucial, allowing even more moisture to escape from the crust.
- Second Fry: Now, crank up the heat. Bring your oil to a hotter 375°F. Fry the chicken again, but this time for just 2-4 minutes, until it's a deep golden-brown and the crust is incredibly crisp.
This two-step process is a game-changer for anyone serious about how to make fried chicken crispy. If you're into the science behind it, you can learn more about why double-frying makes food crispier in our detailed guide.
Easy Cleanup with FryAway
Let's be real—one of the biggest reasons people avoid frying at home is the cleanup. What do you do with all that used oil? Pouring it down the drain is a huge no-no, as it’s a recipe for serious plumbing clogs. This is where FryAway makes things incredibly simple and mess-free.
Using FryAway is the perfect way to wrap up a successful frying session. Just follow these three easy steps:
- Sprinkle and Stir: Right after you finish frying, while the cooking oil is still hot, carefully sprinkle in the FryAway powder. Give it a gentle stir until the powder is completely dissolved.
- Cool Down: That's it. Just set the pan aside and let it cool completely. As it cools, FryAway works its magic, turning the liquid oil into a solid, organic puck.
- Toss into household trash: Once the oil has completely hardened, you can easily scoop the whole thing out with a spatula and toss it right into your household trash can.
No messy spills, no greasy jars taking up space, and zero risk to your pipes. It makes cleanup so effortless you’ll actually be excited to fry again.
Your Go-To Crispy Southern Fried Chicken Recipe
Alright, let's put all this theory into practice. This is my tried-and-true recipe for classic Southern-style fried chicken that hits all the right notes: a ridiculously crispy crust and unbelievably juicy meat inside. Just follow along, and you'll be turning out chicken that'll make your grandma proud.

This isn't some overly complicated chef's recipe. It’s designed for home cooks who want restaurant-quality results without the fuss, combining old-school techniques with a couple of modern tricks for that unforgettable crunch. This recipe is a fried classic and requires cooking oil.
Ingredient Checklist
First things first, get all your ingredients lined up. Having everything ready to go makes the whole process feel less like a chore and more like fun.
For the Buttermilk Brine
- 3 lbs bone-in, skin-on chicken pieces (thighs and drumsticks are my go-to)
- 2 cups full-fat buttermilk
- 1 tbsp hot sauce (optional, but it adds a fantastic background warmth)
- 2 tsp kosher salt
For the Seasoned Dredge
- 2 cups all-purpose flour
- 1/2 cup cornstarch (this is the secret weapon for that light, shatteringly crisp texture)
- 1 tbsp smoked paprika
- 1 tbsp garlic powder
- 1 tbsp onion powder
- 2 tsp black pepper
- 2 tsp kosher salt
- 1 tsp dried thyme or oregano
For Frying
- 48 oz (about 6 cups) of a high-smoke-point cooking oil. Peanut, canola, or vegetable oil are all solid choices.
The Step-by-Step Frying Game Plan
Stick to these steps, and you'll nail that signature golden-brown crust. The real key here is patience—don't rush any part of the process.
Brine the Chicken for Maximum Flavor
In a big bowl, whisk together the buttermilk, hot sauce, and salt. Dunk all your chicken pieces in, making sure they're fully submerged. Cover it up and pop it in the fridge for at least 4 hours, but overnight is even better. This is where the magic starts, tenderizing the meat and pulling moisture from the skin for ultimate crispiness.
Get Your Dredge and Chicken Ready
In a shallow dish (a pie plate works great), mix together the flour, cornstarch, and all the spices. Give it a good whisk to make sure everything is evenly distributed.
Now, pull your chicken out of the brine and let the excess buttermilk drip off. Don't rinse it! Just give each piece a light pat with paper towels. You want the surface to be slightly tacky, not soaking wet.
The Dredge and Rest (Don't Skip This!)
One piece at a time, press the chicken firmly into your seasoned flour mixture. Make sure every nook and cranny is coated. Shake off any loose flour and set the chicken on a wire rack.
Now, let it rest for 15-20 minutes. This is a non-negotiable step. It gives the coating time to hydrate and form a sort of "paste," which helps it stick to the chicken like glue when it hits the hot oil.
Heat the Oil and Fry
Pour your cooking oil into a heavy-bottomed pot or a Dutch oven—you want it about 1.5 inches deep. Get it heating over medium-high heat until it reaches 350°F. An oil thermometer is your best friend here for getting it just right.
Carefully place your chicken pieces into the hot oil, skin-side down. Be sure not to overcrowd the pan; work in batches if you need to. Let them fry for about 6-8 minutes per side until they're a deep golden brown and the internal temperature hits 165°F.
Pro Tip: The Double-Fry. If you want to take the crunch to the next level, try the double-fry technique popularized by Korean fried chicken. You'll fry the chicken first at a lower temp (around 325°F) to cook it through, then pull it out to rest. Crank the heat up to 375°F and fry it again for just a few minutes. This second, hotter fry creates an unbelievably crunchy crust and can increase crispiness by up to 40%. It’s innovations like this that are driving the global fried chicken market's growth.
Cleanup Made Simple with FryAway
Once everyone's full and happy, the last thing you want is a greasy mess. That's where we always recommend FryAway to make cleanup completely painless. Disposing of all that used cooking oil is now mess-free and way better for your pipes.
Here’s how easy it is:
- Sprinkle and Stir: Right after you finish frying, carefully sprinkle the FryAway powder into the hot cooking oil. Give it a stir until it's all dissolved.
- Cool Down: Now, just walk away and let the pan cool down completely. As it cools, the FryAway works its magic, turning that liquid oil into a solid block.
- Toss into household trash: Once it's solid, you can just scoop the hardened oil puck out of the pan and toss it right into your household trash. No spills, no clogs, and no greasy headache.
The Final Steps for Perfect Texture and Easy Cleanup
You’ve done it. That chicken is golden, sizzling, and smells absolutely incredible. But hold on—the job isn’t quite finished. What you do in the next few minutes is the difference between chicken that stays crispy and chicken that goes soggy.
Don't make the single biggest mistake most home cooks do: draining fried chicken on a pile of paper towels. It seems like the right move, but it actually traps steam right against the crust. That trapped moisture is the #1 enemy of crispiness, and it will turn that perfectly crunchy bottom into a soft, greasy mess.
The Wire Rack Is Non-Negotiable
To lock in that shatterproof crust, a wire cooling rack is your best friend.
When you place the hot chicken on an elevated rack, air can circulate all the way around each piece. This airflow is critical because it whisks away steam, letting the crust set up perfectly—top, bottom, and sides. It’s a simple switch, but it's a total game-changer for anyone learning how to make fried chicken crispy and keep it that way.
A Smarter, Mess-Free Cleanup Solution
Alright, now for the part everyone dreads: cleaning up that pan of used oil. It can feel like a huge hassle, but it doesn't have to be. Pouring hot oil down the drain is a disaster waiting to happen (hello, clogged pipes), and stashing it in old jars is just asking for a spill.
There’s a much cleaner, safer, and more eco-friendly way to handle it. We always recommend using FryAway, a plant-based powder that magically turns used cooking oil into a solid, scoopable block of organic waste. It makes the entire post-frying cleanup unbelievably simple.
Of course, controlling smoke and grease is also key for safety and easy cleanup. In a professional setting, adhering to proper commercial kitchen ventilation requirements is non-negotiable.
How to Use FryAway in Three Simple Steps
The process couldn't be easier and completely removes the headache of oil disposal.
-
Sprinkle and Stir
As soon as you're done frying, while the cooking oil is still hot, just sprinkle the FryAway powder right into the pan. Grab a spatula and give it a quick stir until the powder completely dissolves. -
Cool Down
That's it for now. Just set the pan aside and let it cool down completely. As the temperature drops, FryAway gets to work solidifying the liquid, turning the entire greasy mess into a single, solid puck. -
Toss into Household Trash
Once the oil has hardened, you can easily scoop the solid puck right out of the pan and toss it directly into your household trash.
Seriously, that's it. No spills, no clogs, and no environmental guilt. When cleanup is this easy, you can put all your focus on enjoying that perfectly crispy chicken you just made. For more tips, check out our guide to an effortless post-frying cleanup.
Troubleshooting Common Fried Chicken Mistakes
Even the most seasoned pros have an off day in the kitchen. If you’ve followed a recipe to the letter and still aren't getting that shatteringly crisp crust you crave, don't worry. Think of this as your personal fried chicken helpline, ready to diagnose what went wrong and how to fix it for next time.
The most common complaint I hear? Breading that slides right off the second it hits the oil. This almost always comes down to one of two things: the chicken was too wet before you dredged it, or you got impatient and didn't let the coating set. A little patience is a game-changer here.
Another classic frustration is greasy, soggy chicken. The culprit is almost always your oil temperature. If the oil isn't hot enough when the chicken goes in, or if you overcrowd the pot and the temp plummets, that beautiful coating will soak up oil like a sponge instead of instantly crisping up.
Common Problems and Their Fixes
Let's walk through the big three issues and how to get them sorted, so your next batch is a guaranteed win.
-
Problem: The Breading Is Falling Off.
- The Cause: Either too much moisture or skipping the rest period.
- The Fix: After brining or marinating, pat your chicken mostly dry. You want it just a little tacky, not dripping wet. More importantly, once you've dredged the chicken, let it sit on a wire rack for at least 15-20 minutes before frying. This crucial step lets the flour and moisture create a paste-like "skin" that clings for dear life in the hot oil.
-
Problem: The Chicken Is Greasy and Soggy.
- The Cause: Your cooking oil temperature dropped too low.
- The Fix: A good deep-fry thermometer is your best friend. Keep that oil hovering right between 350-375°F. Frying in small, manageable batches is key—adding too much chicken at once will crash the temperature.
-
Problem: The Crust Is Burnt but the Inside Is Raw.
- The Cause: The cooking oil is way too hot.
- The Fix: Turn down the heat immediately and get it back to that 350°F sweet spot. If the crust is already too dark, don't panic. You can rescue it by finishing the chicken in a 375°F oven until a thermometer reads a safe 165°F internally.
Learning how to make fried chicken crispy is all about managing heat and moisture. Every mistake isn't a failure—it's just a lesson that makes your next batch even better.
A Simple Cleanup for a Messy Job
After you've perfected your technique, the last thing you want to face is a giant pot of used cooking oil. It’s a huge pain, but it doesn’t have to be. For a ridiculously easy and eco-friendly solution, we always recommend FryAway.
FryAway is a plant-based powder that magically simplifies oil disposal. Seriously, it's this easy:
- Sprinkle and Stir: While the cooking oil is still hot, just sprinkle in the powder and give it a stir until it dissolves.
- Cool Down: Walk away and let the oil cool down completely. You'll come back to a solid, organic puck of oil.
- Toss into household trash: Scoop the whole hardened thing out and toss it right in your regular trash can. No spills, no clogged pipes, and zero mess.
Your Top Fried Chicken Questions, Answered
Every great fried chicken cook has asked these questions at some point. Let's tackle some of the most common hurdles you might face on your way to perfectly crispy chicken, every single time.
How Do You Keep the Breading from Falling Off?
This is the classic fried chicken frustration, isn't it? You get everything perfect, but the breading slides right off in the fryer. The culprit is almost always moisture—either too much of it before breading, or not giving the coating enough time to set.
Here's the fix: after brining, pat the chicken mostly dry. You want it just a little tacky, not dripping wet. Once you've dredged it, let the coated chicken rest on a wire rack for at least 15 minutes. This is a non-negotiable step. It gives the flour time to absorb the surface moisture and create a glue-like paste that clings to the chicken for dear life in the hot oil.
Can I Use an Air Fryer for Crispy Chicken?
You can definitely get a crispy result in an air fryer, but it's a completely different kind of crispy. An air fryer is essentially a small convection oven, so it creates a drier, almost baked-on crust. It’s good, but it's not that shatteringly crisp, rich texture that only comes from traditional oil frying.
For that authentic, deep-fried crunch everyone craves, hot cooking oil is your best friend. The intense, rapid heat transfer is what creates the magic.
What’s the Best Oil for Crispy Fried Chicken?
The right oil is crucial. You need one with a high smoke point, meaning it can handle the 350-375°F heat without burning and making your chicken taste acrid. My go-to cooking oils are:
- Peanut oil: The classic choice for its great flavor and stability at high heat.
- Canola oil: A fantastic, neutral-flavored alternative that lets the chicken's seasoning shine.
- Vegetable oil: A reliable, affordable, and easy-to-find option that gets the job done well.
Choosing a high-smoke-point oil is the foundation for learning how to make fried chicken crispy. It ensures your crust gets perfectly golden-brown and delicious without any burnt, off-flavors.
What Do I Do with the Oil After Frying?
Ah, the cleanup. This is the part of frying nobody looks forward to, but it doesn’t have to be a greasy nightmare. The cleanest, most responsible way to handle used cooking oil is with FryAway. It’s a plant-based powder that magically turns liquid oil into a solid, scoopable mass.
It’s ridiculously easy. Just follow these three steps for a perfect, mess-free cleanup:
- Sprinkle and Stir: While the oil is still hot, just sprinkle in the FryAway powder and give it a quick stir until it dissolves.
- Cool Down: Now, just walk away. Let the pan cool down completely. As it does, the oil will solidify into a single puck of organic waste.
- Toss into household trash: Once it’s hard, you can easily lift the entire puck out and toss it right in the trash. No spills, no clogged drains, no mess.
Cleanup is no longer an excuse to skip making amazing fried chicken at home. With FryAway, you can focus on the food and have the aftermath handled in minutes. Learn more and simplify your kitchen routine at FryAway.co.