


· By FryAway
How to Keep Drain Pipes Clean and Prevent Costly Clogs
Keeping your drain pipes clean is all about building good habits, not just reacting when a clog finally strikes. The real secret is controlling what goes down your sink in the first place—especially fats, oils, and food scraps, which are the usual suspects behind slow drains and frustrating blockages.
Stop Clogs Before They Start
Let's be honest, nobody thinks about their drain pipes until there's a problem. It’s usually a slow-draining sink, a weird gurgling sound, or—the worst-case scenario—a full-on backup. By then, you're already in the middle of a plumbing headache. The trick to keeping drain pipes clean isn’t some magical chemical you pour down the sink; it’s understanding what causes the blockage and stopping it at the source.
Most plumbing nightmares don't just happen. They’re the result of weeks, months, or even years of seemingly harmless habits. Rinsing a greasy pan, letting coffee grounds slip past the drain stopper, or washing tiny food scraps down the sink all contribute to a slow-building disaster hidden inside your pipes.
The Anatomy of a Clog
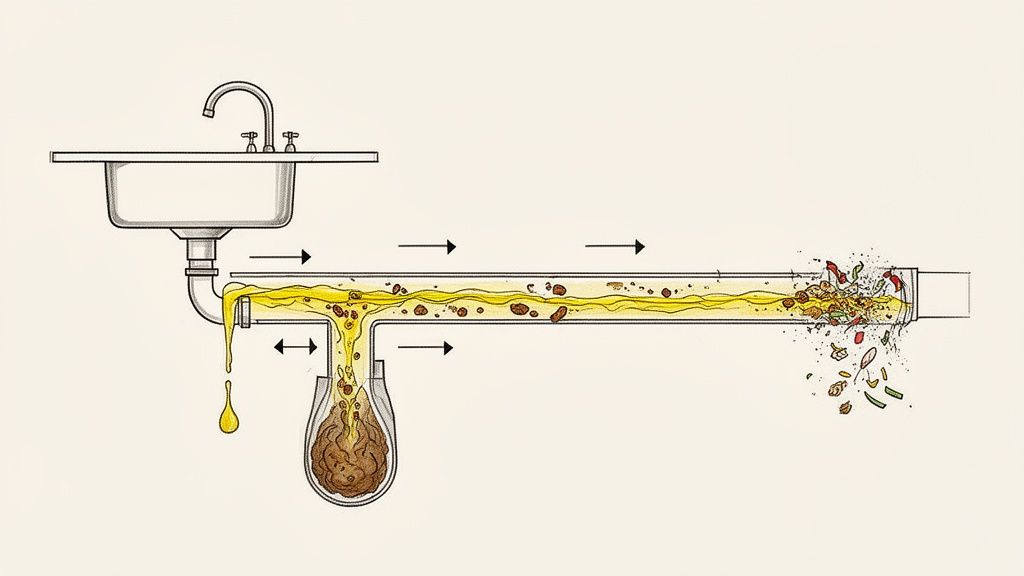
Think of your drain pipes like arteries. When you pour fats, oils, and grease (we call this FOG) down the sink, they might be liquid at the time, but they cool down and solidify fast. This greasy gunk clings to the inside of the pipes, creating a sticky trap for everything else.
Over time, that sticky layer catches all the other debris that follows it down:
- Tiny food particles from dinner plates
- Soap scum from dish soap
- Coffee grounds and other fine sediments
This combination acts like slow-motion glue, building layer by layer until the water has barely any room to get through. Eventually, it forms a dense, stubborn blockage that brings your whole kitchen to a standstill. The only way to win this fight is to be proactive.
Top 5 Culprits of Clogged Drains in Your Home
To really get ahead of clogs, it helps to know exactly what not to put down your drain. We've all been guilty of letting a few of these slip by, but making a conscious effort to stop can save you a lot of trouble.
| Culprit | Why It Clogs Drains | Proper Disposal Method |
|---|---|---|
| Fats, Oils, & Grease | Cools and solidifies inside pipes, creating a sticky residue that traps other debris. | Use a product like FryAway to solidify the oil. Simply 1) Sprinkle and Stir into hot oil, 2) Cool Down, and 3) Toss the solid block into the household trash. |
| Coffee Grounds | They don't dissolve. Instead, they clump together and mix with grease to form a thick, sludge-like paste. | Toss them in the trash, compost them, or use them in your garden. |
| "Flushable" Wipes | Despite the name, they don't break down like toilet paper and are a primary cause of major sewer blockages. | Always throw them in the trash can. Never flush them. |
| Starchy/Fibrous Foods | Pasta, rice, potato peels, and celery expand with water and turn into a pasty, glue-like substance. | Scrape all food scraps into the garbage or compost bin before rinsing plates. |
| Eggshells | The sharp, hard pieces get caught on existing grease, and the membrane can wrap around garbage disposal blades. | Crush them and add them to your compost or simply throw them away. |
By keeping these five troublemakers out of your plumbing, you’re already well on your way to a clog-free kitchen.
The Real Cost of Improper Disposal
The problem of clogged drains goes way beyond just your house. When FOG enters the municipal sewer system, it contributes to enormous blockages known as 'fatbergs'—and they can cost cities millions of dollars to clear.
Statistics show that fats, oils, and grease account for up to 47% of sewer blockages in major markets like California, where local agencies spend over $47 million annually just to fix the damage from improper disposal.
The infographic below really puts the staggering impact of grease on our plumbing infrastructure into perspective.
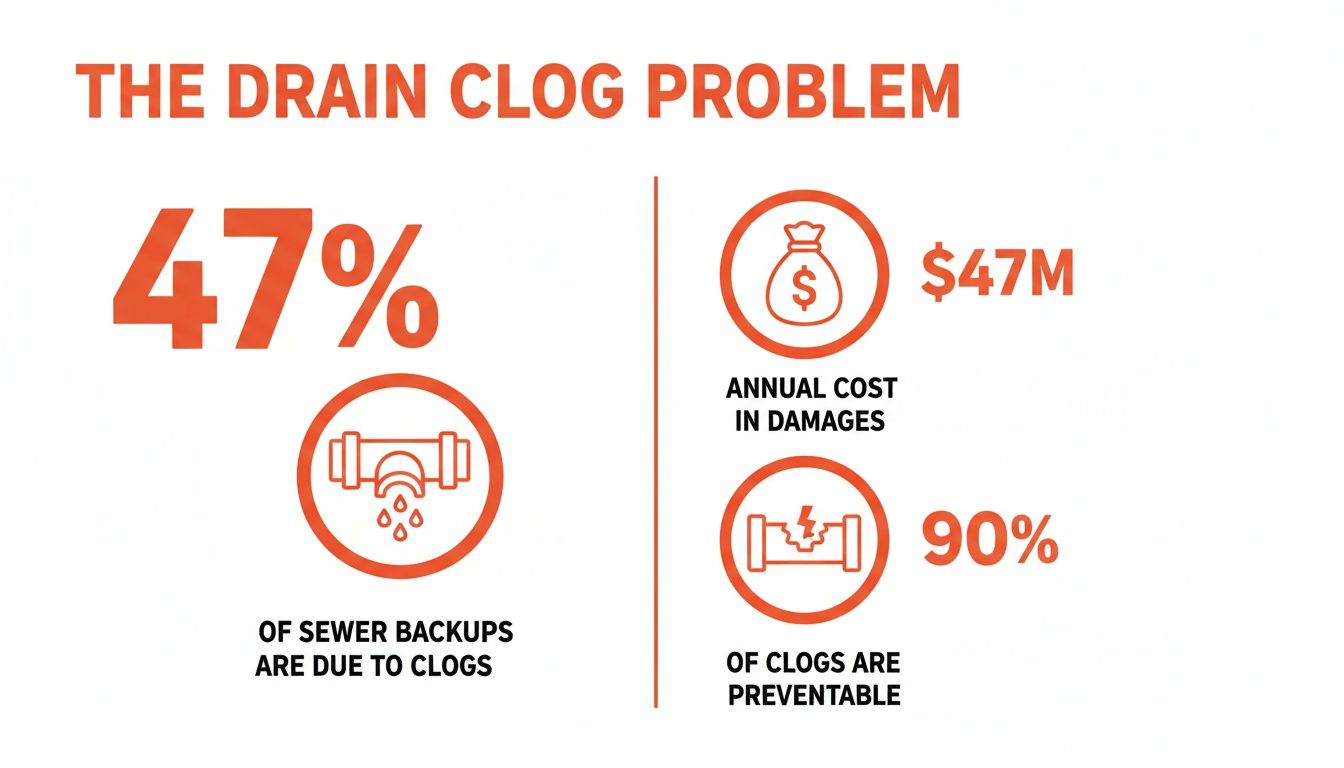
This data shows how a simple kitchen habit scales up to become a massive public works crisis. For home cooks, pouring hot oil down the drain is a recipe for disaster because it solidifies and builds up, restricting flow by up to 90% in severe cases.
Understanding this connection is the first step. When you change how you get rid of kitchen waste, you’re not just protecting your own home’s plumbing—you’re also helping create a healthier, more efficient public sewer system for everyone. This preventative mindset is the foundation for all the practical solutions we'll cover next.
The Smart Way to Handle Cooking Grease
If there's one public enemy number one for household drains, it's cooking oil. Whether you're dealing with a pan full of grease after frying chicken or just the remnants from a few strips of bacon, that liquid fat is the source of some of the most stubborn plumbing headaches imaginable.
Pouring hot oil down the sink seems harmless enough—it's liquid, after all. But once it travels down into the cooler pipes, it starts to solidify into a thick, waxy sludge. This gunk clings to the inside of your pipes, creating a sticky trap for every little bit of food, soap scum, and coffee ground that follows. Before you know it, you've got slow drains, foul smells, and eventually, a complete blockage that’s a nightmare to clear.
This is the exact same process that creates those infamous "fatbergs" in city sewer systems, which are massive, concrete-like clumps of congealed fat and debris. Your kitchen sink is just a miniature version of that much larger problem.
A Modern Solution for an Old Problem
For decades, the go-to advice was to pour used cooking oil into an old coffee can or a jar and just toss it in the trash. While that's certainly better than sending it down the drain, it’s still messy, prone to leaks, and just adds another greasy container to your garbage can.
Thankfully, there's a much cleaner and more elegant way to handle used cooking oil.
FryAway is a plant-based powder that works like magic, turning liquid cooking oil into a solid, organic block. This completely eliminates the mess and takes the risk of grease clogs off the table. It's really the definitive answer for anyone wondering how to keep drain pipes clean in a modern kitchen.
The real beauty of this method is its simplicity. You're not just preventing a clog; you're tackling the problem at its source before it ever gets near your plumbing. It's a proactive step that makes fried food cleanup completely stress-free.
To really get a handle on clogs, especially if you do a lot of frying, it’s worth understanding the best practices for grease disposal. These principles are even more critical in restaurants, as you can see in guides on commercial deep fryer cleaning for effective grease management. The core concept is always the same: keep that grease far, far away from your drain.
How to Use FryAway for Perfect Grease Disposal
Using FryAway couldn't be easier—it's literally just three quick steps. Let’s say you’ve just finished making a batch of perfectly crispy fried chicken and now you're left with a pan of hot oil. Here's what you do.
-
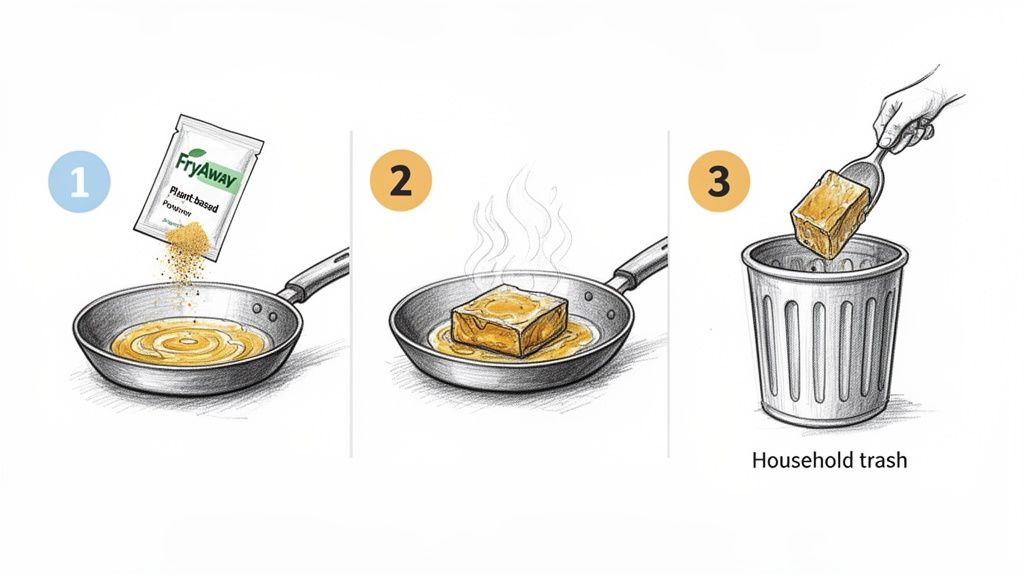
Sprinkle and Stir
Turn off the heat, and while the oil is still hot, sprinkle in the FryAway powder. The packaging makes it clear how much to use based on the amount of oil. Just give it a quick stir to make sure it's all mixed in. -
Cool Down
That's it for the hard part. Now, just let the pan sit and cool down completely. As the temperature drops, the FryAway gets to work, transforming that liquid oil into a solid, gel-like substance. No need to rush it; just leave the pan on a cool burner or a heat-safe counter until it’s no longer warm. -
Toss into Household Trash
Once the oil has fully solidified, you can easily scoop the hardened puck right out of the pan with a spatula. It usually comes out in one clean piece, leaving a surprisingly non-greasy surface behind. From there, you just toss the solid block right into your regular trash bin.
And you're done. No messy jars, no oily plastic bags, and absolutely zero chance of that oil ever causing a problem for your pipes. For anyone who loves fried foods but dreads the cleanup, this is a total game-changer. Making this simple routine a habit is one of the most powerful things you can do to keep your drains clean for good.
Your Weekly Drain Maintenance Routine
Preventing clogs is about more than just dodging bad habits; it’s about proactive care. Setting up a simple maintenance routine can keep your pipes flowing freely without ever needing to reach for harsh chemicals. This isn't another huge chore to add to your list—it's just a few minutes each week to prevent a costly plumbing emergency.
Consistency is everything. A weekly flush or a monthly deep-clean helps break down the gunk that builds up from daily use, like soap scum and tiny food particles, before it solidifies into a stubborn blockage. Think of it as essential upkeep for one of your home’s hardest-working systems.
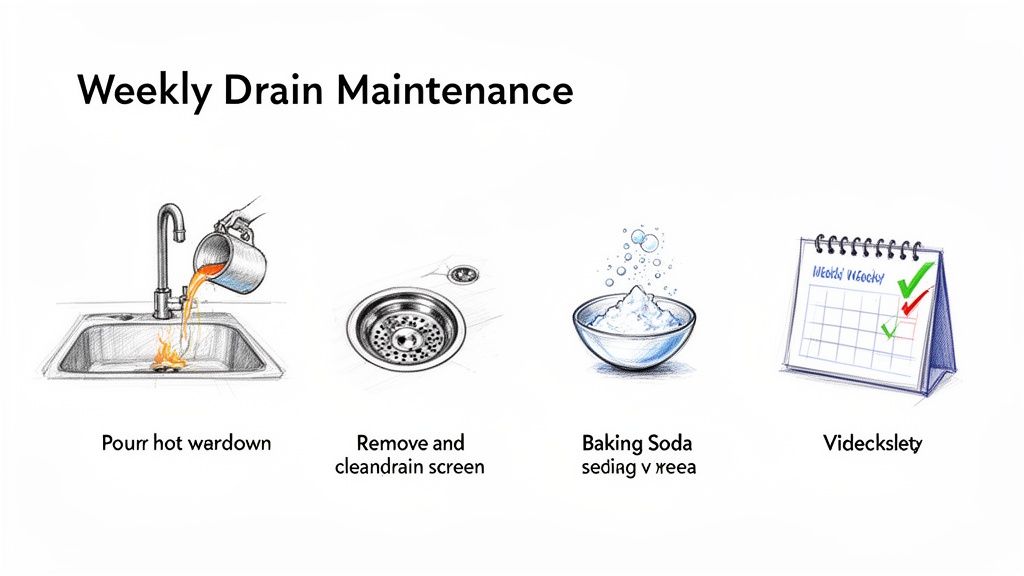
Simple Weekly Drain Flush
One of the easiest things you can do is a weekly hot water flush. It’s surprisingly effective at melting and washing away the initial buildup of grease and soap before it has a chance to harden and grab onto other debris.
Here's a quick checklist to run through once a week:
- Boiling Water Flush: After doing the dishes, boil a full kettle or pot of water. Carefully pour it straight down the kitchen sink to help dissolve any light grease from recent meals.
- Clear the Drain Catcher: Pull out your drain screen and get rid of any collected food scraps, hair, or other gunk. A clean screen is your first line of defense.
- Run Cold Water in the Disposal: If you have a garbage disposal, always use a strong stream of cold water while it's running. Cold water keeps any grease solid so the blades can chop it up, while hot water would just melt it, letting it coat your pipes further down the line.
A Deeper Monthly Clean with Natural Ingredients
For a more powerful (but still safe) cleaning session, a monthly treatment can work wonders. This DIY solution uses common household items to create a fizzing reaction that scrubs away grime and kills odors.
This popular method uses the classic combo of baking soda and vinegar for a gentle but effective scrubbing action inside your pipes.
- First, pour about a cup of baking soda directly into the drain.
- Follow it up with one cup of plain white vinegar. You'll see it start to foam and fizz immediately.
- Pop a drain stopper over the opening to keep the reaction working inside the pipes.
- Let it sit for at least an hour. This gives the bubbling action time to break down all that buildup.
- Finally, flush everything out with a pot of boiling water.
This simple process is an excellent way how to keep drain pipes clean without the pipe-damaging effects of caustic commercial cleaners.
The science here is pretty straightforward: baking soda is a base and vinegar is an acid. When they mix, they create carbon dioxide gas, which is what causes all that bubbling. The reaction physically dislodges and scrubs away the grime clinging to your pipe walls.
The Value of Prevention in the Bigger Picture
Keeping your drains clear isn't just about avoiding a personal headache; it has a real impact on the larger municipal system. For families and foodies who fry regularly, the numbers are eye-opening: residential grease is behind 40% of plumber calls, which cost an average of $250-$500 a pop.
Studies show that responsible disposal, like using a product like FryAway, can slash these clogs by 65%. It keeps pipes clean without any high-tech heroics. Proactive maintenance at home is a game-changer for your wallet and your city's infrastructure. You can discover more insights about these findings on the National Science Foundation's website.
Enjoy Fried Foods Without the Guilt
Let's be honest, keeping your drains clean shouldn't mean giving up the food you love. When you have a smart cleanup plan, you can whip up crispy, delicious fried meals without ever worrying about what to do with the leftover cooking oil. It’s really all about connecting good habits with good food.
To show you just how simple it can be, we're sharing two classic fried food recipes that are guaranteed crowd-pleasers. Most importantly, we'll walk you through the cleanup for each, so you can see exactly how easy it is to handle used cooking oil the right way.
Recipe One: Classic Southern Fried Chicken
There's just nothing like the crunch of perfectly seasoned fried chicken. This recipe uses a buttermilk brine to make sure the meat is tender and juicy, with a crust that’s almost impossibly crispy. It calls for a good amount of oil for shallow frying, making it the perfect chance to practice a smart cleanup.
What You'll Need:
-
For the Chicken:
- 1 whole chicken (about 3-4 lbs), cut into 8 pieces
- 2 cups buttermilk
- 1 tablespoon salt
- 1 teaspoon black pepper
- 1 teaspoon paprika
-
For the Dredge:
- 2 cups all-purpose flour
- 2 teaspoons salt
- 2 teaspoons black pepper
- 1 teaspoon garlic powder
- 1 teaspoon onion powder
-
For Frying:
- Approximately 3-4 cups of canola or peanut oil
Cooking Instructions:
First, combine the chicken, buttermilk, salt, pepper, and paprika in a large bowl. Cover it up and let it chill in the fridge for at least 4 hours, but overnight is even better.
In a separate shallow dish, whisk together all the dredge ingredients: flour, salt, pepper, garlic powder, and onion powder.
Take the chicken out of the buttermilk, letting any excess drip off. Coat each piece thoroughly in the flour mixture. For an extra-crispy crust, you can dip it back into the buttermilk and then into the flour a second time.
Pour about 1.5 inches of oil into a large, heavy-bottomed skillet (cast-iron is king here). Heat the oil over medium-high heat until it hits 325°F.
Carefully place the chicken pieces in the hot oil, skin-side down. Be sure not to overcrowd the pan; work in batches if you need to.
Fry for about 6-8 minutes per side, until the chicken is a deep golden brown and the internal temperature reaches 165°F. Transfer the cooked chicken to a wire rack to let it drain.
Cleanup Pro-Tip: After you've finished frying your incredible chicken, turn off the heat. While the oil is still hot, simply 1) Sprinkle and Stir the FryAway powder right into the skillet until it dissolves. Let it 2) Cool Down completely. Once it’s a solid block, you can easily 3) Toss it into your household trash. No mess, no stress, and definitely no clogged pipes.
Recipe Two: Perfect Golden Onion Rings
Crispy, light, and perfectly golden, these homemade onion rings are in a different league from the frozen kind. The secret is the beer batter, which creates a puffy, airy crust that stays crisp long after frying. This recipe involves deep-frying, leaving you with a good bit of oil to manage.
What You'll Need:
- 2 large sweet onions, sliced into ½-inch thick rings
- 1 ½ cups all-purpose flour, divided
- 1 cup beer (a light lager is perfect)
- 1 large egg
- 1 teaspoon salt
- ½ teaspoon black pepper
- Approximately 6-8 cups of vegetable or canola oil for deep-frying
Cooking Instructions:
Start by carefully separating the onion slices into individual rings. In a shallow dish, toss the rings in ½ cup of flour for a light coating, then set them aside. This little step helps the batter stick better.
In a medium bowl, whisk together the remaining 1 cup of flour, salt, and pepper. Add the egg and the beer, then whisk until the batter is mostly smooth (a few small lumps are fine).
Pour your oil into a large, deep pot or a deep fryer and heat it to 375°F.
Dip each floured onion ring into the batter, making sure it’s completely coated, and let any excess drip off for a second.
Working in small batches, carefully add the battered rings to the hot oil. Fry for about 2-3 minutes, flipping once, until they are beautifully golden brown and crispy.
Use a slotted spoon or spider strainer to pull the onion rings out and place them on a wire rack to drain. A little sprinkle of extra salt while they're still hot is a pro move.
Cleanup Pro-Tip: Even with a lot more oil, the cleanup is just as simple. Once you're done, turn off the heat. Carefully 1) Sprinkle and Stir FryAway into the hot oil, following the package directions for the amount of oil you used. Then let the pot 2) Cool Down completely. Once it solidifies, you can scoop the entire puck of hardened oil out and 3) Toss it straight into the trash. Your pipes (and your plumber) will thank you.
FryAway Product Guide for Your Recipes
Not sure which FryAway is right for your kitchen adventures? This handy guide matches our products to common cooking scenarios so you can always grab the perfect one.
| Recipe Type | Typical Oil Amount | Recommended FryAway Product |
|---|---|---|
| Crispy Pan-Fried Fish | Less than 1 cup | FryAway Pan Fry |
| Southern Fried Chicken | 3-4 cups | FryAway Deep Fry |
| Homemade French Fries | 6-8 cups | FryAway Deep Fry |
| Crispy Onion Rings | 6-8 cups | FryAway Deep Fry |
| Turkey Frying (Seasonal) | 3-5 gallons | FryAway Super Fry |
Whether you're doing a quick pan-fry or a full-on deep-fry feast, there’s a FryAway product designed to make your cleanup effortless. Choose the one that fits your recipe and say goodbye to messy oil disposal for good.
Even with the best habits, a drain problem can still sneak up on you. You might notice the water in your kitchen sink taking its sweet time to drain, hear a weird gurgling sound from the pipes, or catch a funky odor. These are all little SOS signals from your plumbing. Catching them early is the key to a simple fix.
Before you reach for your phone to call a plumber, do a little detective work. Is it just one sink that’s slow, or are all the drains in your house on a go-slow? A single slow drain usually points to a clog right under that specific sink, which is often a manageable DIY job. But if multiple drains are backing up at once, that’s a red flag for a bigger headache in your main sewer line.
Your First Line of Defense: Simple Tools
For those minor, localized clogs, a couple of basic tools can often get things flowing again without much fuss. You don’t need to be a pro to use them, but knowing the right technique makes all the difference.
- The Plunger: This is your go-to tool. Make sure you have a good seal around the drain opening and a few inches of water in the sink to create suction. Then, give it several firm, steady pumps to dislodge whatever is stuck in there.
- A Simple Drain Snake: Sometimes called a zip-it tool, this is a long, flexible piece of plastic with little barbs on it. Just feed it down the drain, wiggle it around to snag hair and gunk, and pull the clog right out. It's surprisingly effective, especially for bathroom sinks.
Most of the time, these simple methods are all you need to clear the minor blockages that cause everyday drain issues.
When to Put Down the Tools and Call a Pro
Knowing how to fix small problems yourself is empowering, but true wisdom is knowing when to call for backup. While DIY fixes are great for small clogs, some issues are clear signs you’re dealing with something beyond the scope of a plunger. Pushing a DIY solution too far can sometimes turn a small problem into a big, expensive one.
You should call a licensed plumber immediately if you run into any of these situations:
- Water Backing Up in Multiple Drains: If flushing a toilet causes water to bubble up in your shower drain, that’s a classic sign of a main sewer line clog.
- Persistent Clogs: You clear a blockage, but it comes right back a few days later. This usually means there's a deeper issue that a simple drain snake just can't reach.
- Foul Odors That Won't Go Away: A constant sewer gas smell could point to a problem with your drain's P-trap or a venting issue.
- No Success with a Plunger or Snake: If you’ve given it your best shot and the drain is still completely blocked, it's time for professional equipment.
Understanding the Health Risks of Clogged Pipes
A blocked drain is more than just an annoying inconvenience; it can pose a real health risk. Clogged pipes are the perfect breeding ground for harmful bacteria and are linked to millions of illnesses globally each year.
For example, in the UK between 2005 and 2011, 85 hospital patients contracted a multidrug-resistant bacteria from sewer backflows caused by blocked drains.
The parallel for home cooks is clear: kitchen grease from frying foods can mix with food scraps to create similar blockages that back up right into your sink.
If your preventative measures don’t quite cut it and you’re faced with a stubborn blockage in your garbage disposal, don’t panic. It's a common issue that’s often fixable. Before calling for help, you can learn how to clear a clogged garbage disposal with a few simple, safe steps. Mastering this can save you time and the cost of a service call.
Got Questions About Drain Care? We've Got Answers
Even with the best habits, specific questions always pop up when it comes to keeping your pipes clear. Let's tackle some of the most common ones so you can handle any kitchen cleanup scenario like a pro.
How Often Should I Actually Clean My Drains?
For routine upkeep, a quick hot water flush at least once a week works wonders. It helps melt away any fresh, minor gunk from daily cooking before it gets a chance to set up shop and harden in your pipes.
Once a month, give your drains a deeper clean using the baking soda and vinegar method. Consistency is everything here. This simple habit breaks down the slow, sneaky buildup of soap scum and grease, stopping a major clog before it ever starts. And of course, your first line of defense is always a drain catcher—use it every single day.
Is FryAway Really Safe for My Septic System?
Yes, it's completely safe for septic systems, but only when used as intended. FryAway is designed to solve the grease problem before it gets to your plumbing.
It’s a 100% plant-based and non-toxic powder that solidifies used cooking oil so you can throw it straight into your household trash. The whole point is to keep oil out of your pipes entirely. So, never put the solidified oil block down your sink, toilet, or garbage disposal. By tossing it in the trash, you're protecting both your septic tank and the city's sewer lines from greasy clogs.
Can't I Just Use a Chemical Drain Cleaner for Tough Clogs?
We get why it's tempting, but we strongly advise against it. Those harsh chemical drain cleaners often contain caustic ingredients that can eat away at your pipes over time, whether they're modern PVC or older metal ones. That corrosion can lead to leaks and repairs that are way more expensive than a plumber's visit.
On top of that, those chemicals are bad news for the environment once they make their way into the water system. If a plunger or a simple drain snake won't fix a stubborn clog, your safest and most effective bet is to call in a professional plumber.
What's the Best Way to Get Rid of Bacon Grease?
Bacon grease is public enemy number one for plumbing. As it cools, it quickly turns into a thick, waxy mess that’s notorious for causing clogs. Pouring it down the drain is probably the worst thing you can do for your pipes.
The best way to handle it is with FryAway. After you've finished cooking your bacon and the grease is still hot in the pan, simply follow the three-step process for perfect cleanup.
Here’s the foolproof method:
- Sprinkle and Stir: Just sprinkle the FryAway powder into the hot bacon grease right in the pan and give it a quick stir to mix it in.
- Cool Down: Let the pan cool completely on a heat-safe surface. You'll see the grease transform into a solid, easy-to-handle puck.
- Toss into household trash: Once it's solid, you can easily scoop the hardened grease out and toss it right into the garbage. No mess, no stress, and no risk to your pipes.
Ready to make messy oil disposal a thing of the past? Join the thousands of home cooks who trust FryAway to keep their kitchens clean and their pipes clear. Visit FryAway.co to find the perfect product for your cooking style and enjoy fried foods without the cleanup guilt!